How to Email Authors When Articles Are Published in WordPress

Featured Imgs 23

Do you want to email authors when their articles are published in WordPress?

If you run a multi-author blog, then notifying authors when their blog posts are published keeps them informed. Plus, it can also help increase engagement on your website since authors can quickly share their content and participate in discussions.

In this article, we will show you how to email authors when their articles are published in WordPress.

Email authors when their articles are published in WordPress

Why Email Authors When Their Articles Are Published in WordPress?

By notifying authors when their posts are published on your WordPress blog, you allow them to immediately promote their work on social media platforms and communicate with readers in the comments section.

Additionally, notifications keep authors updated about the publication statuses for different posts. This helps build trust among your team by showing that you value the writer’s contributions to your multi-author blog.

By alerting authors immediately upon post publication, you also give them the opportunity to view their content and correct any typos or errors before visitors have a chance to read it.

Having said that, let’s see how to easily email authors when their articles are published in WordPress. You can use the links below to jump to the method of your choice:

Method 1: Email Author When Their Article Is Published in WordPress Using a Plugin

If you prefer to use a plugin to notify your authors, then this method is for you.

First, you need to install and activate the PublishPress Planner plugin. For detailed instructions, you may want to see our beginner’s guide on how to install a WordPress plugin.

Note: You can also use the PublishPress Pro plan to unlock more features like Slack integration, send reminder notifications, and meta posts. This will help you improve the overall editorial workflow of your multi-author blog.

Upon activation, you need to visit the Planner » Settings page from the WordPress admin sidebar and switch to the ‘Notifications’ tab.

Once you are there, type in the admin email address that will be used to send emails to your authors next to the ‘Email from’ option.

After that, check the ‘Always notify the author of the content’ option to send emails to authors every time their posts are published on your website.

Check the always notify author option

If you also want to notify the users who edited the post, then you can check the ‘Always notify users who have edited the content’ option.

Once you are done, click the ‘Save Changes’ button to store your changes.

Now, when you publish an author’s post, they will receive an email notification that looks like this:

Preview of author email notification upon post publication

Method 2: Email Author When Their Article Is Published in WordPress Using Code

If you don’t want to use a plugin, then you can also automatically send emails to authors by adding code to your theme’s functions.php file.

However, the smallest error when adding code can break your website and make it inaccessible.

That is why we recommend always using WPCode. It is the best WordPress code snippets plugin on the market that makes it super safe and easy to add custom code to your website.

First, you need to install and activate the WPCode plugin. For details, you can see our step-by-step guide on how to install a WordPress plugin.

Note: You can also use WPCode’s free plan for this tutorial. However, upgrading to the pro version will give you access to more features like a code snippets library, conditional logic, CSS snippets, and more.

Upon activation, simply visit the Code Snippets » + Add Snippet page from the WordPress dashboard. Then, click the ‘Use Snippet’ button under the ‘Add Your Custom Code (New Snippet)’ option.

Add new snippet

This will take you to the ‘Create Custom Snippet’ page, where you can start by adding a title for the code snippet.

After that, select the ‘PHP Snippet’ option from the Code Type dropdown menu on the right.

Choose the PHP Snippet option for emailing authors upon post publication

Now copy and paste the following custom code into the ‘Code Preview’ box:

function notifyauthor($post_id) {
 
$post = get_post($post_id);
$author = get_userdata($post->post_author);
$subject = "Post Published: ".$post->post_title."";
 
$message = "
      Hi ".$author->display_name.",
       
      Your post, \"".$post->post_title."\" has just been published.
       
      View post: ".get_permalink( $post_id )."
       
      Thanks"
      ;
       
   wp_mail($author->user_email, $subject, $message);
}
add_action('publish_post', 'notifyauthor');

This code runs when a new post is published in WordPress. It sends an email notification to the author using the subject and message defined in the code. Feel free to change the subject and message fields to meet your needs.

Once you have done that, scroll down to the ‘Insertion’ section and choose the ‘Auto Insert’ mode. The code will be automatically executed on your website upon activation.

Choose an insertion method

Finally, scroll back to the top and toggle the ‘Inactive’ switch to ‘Active’.

After that, click the ‘Save Snippet’ button to store your settings.

Save the snippet for emailing authors upon post publication

Now, when you publish a post, the author will automatically receive an email notification.

It will look like this:

Preview for sending email notification to authors upon post publication

Bonus: Use WP Mail SMTP to Send Your Emails

When you send emails to your authors about their published posts, you are using the default WordPress email settings, which are not always reliable.

This means that your email may not reach the author or might even end up in their spam folder.

To fix this issue, you can use WP Mail SMTP, which is the best WordPress SMTP plugin on the market. It uses the SMTP (Simple Mail Transfer Protocol) method for mail transmission and eliminates your email delivery problems.

WP Mail SMTP website

You can easily connect WP Mail SMTP with popular email marketing services and make sure that your emails reach the user’s inbox immediately.

With WP Mail SMTP, you can easily avoid the spam folder, track your email logs, use backup connections and failure alerts, and use premade templates to send emails to your users.

For detailed instructions, you can see our beginner’s guide on how to properly configure your WordPress email settings.

We hope this article helped you learn how to email authors when their articles are published in WordPress. You may also want to see our tutorial on how to highlight author comments in WordPress and our expert picks for the best free author bio box plugins in WordPress.

If you liked this article, then please subscribe to our YouTube Channel for WordPress video tutorials. You can also find us on Twitter and Facebook.

The post How to Email Authors When Articles Are Published in WordPress first appeared on WPBeginner.

How to Display Author’s Twitter and Facebook on the Profile Page

Featured Imgs 23

Want to display your author’s Twitter and Facebook links on their WordPress profile page?

By default, WordPress user profile pages don’t include fields for adding social media profiles such as Facebook or Twitter.

In this article, we will show you how to easily display your author’s Twitter and Facebook profile links in WordPress.

How to Display Author's Twitter and Facebook on the Profile Page

Why Display Author’s Twitter and Facebook Profiles on Your Site?

Social media platforms are an important source of traffic for your WordPress website. That’s why we put together a social media cheat sheet that will help you set up your social media profiles the right way.

Your authors will also have their own social profiles, and you can display them on your site to build credibility with your readers and strengthen your site’s authority.

Your visitors will be able to follow their favorite authors on social media and discover new articles on your site sooner. You can also add their social media profiles to your site’s schema, boosting your site’s trust score on Google and other search engines.

With that being said, let’s take a look at how to display an author’s Twitter and Facebook links on their user profile page.

Some of the best WordPress themes will display an author info box below each article. You can use this feature to display simple links to your author’s social profiles.

Simply go to Users » All Users in your WordPress admin panel and click the name of the author, or the ‘Edit’ link underneath to open the Edit User page.

Click on a User in the All Users List

Next, you should scroll down to the ‘About the user’ section and look for the ‘Biographical Info’ box.

If it is there, then your theme has built-in support for an author box.

Adding HTML Social Links to the User Bio

Here you can type a description of the author using text or HTML. You can manually add HTML links for the author’s Twitter and Facebook profile URLs, like this:

ADD BIO HERE. Follow them on <a href="https:/twitter.com/USERNAME">Twitter</a> and <a href="https://facebook.com/USERNAME">Facebook</a>.

Make sure you add a short biography about the author and change ‘USERNAME’ to their actual Twitter and Facebook usernames.

Once you’re finished, don’t forget to scroll to the bottom of the page and click the ‘Update User’ button to store your settings.

You will now see Twitter and Facebook links with the user’s bio on the posts that they write. Here’s how it looks on our demo website:

Preview of Author Bio with Twitter and Facebook Links

Method 2: Displaying Social Icons With an Author Bio Box Plugin

If your theme doesn’t display an author bio box, or if you want one that is more customizable and displays social icons instead of links, then you can use a plugin.

Simple Author Box is the best free author bio box plugin. It lets you customize nearly every Aspect of your author bio box, including adding social media links for your authors.

First, you need to install and activate the Simple Author Box plugin. For more details, see our step-by-step guide on how to install a WordPress plugin.

If you want even more features, then there’s a pro version that lets you display an author box before or after content, add website links, get more social icon styles, include guest authors and co-authors, and more.

Upon activation, the plugin adds social media fields to each user profile. Simply navigate to the Users » All Users page in your WordPress admin area and click on the author’s name or the ‘Edit’ link below.

Click on a User in the All Users List

Tip: To quickly edit your own user profile, you can go to the Users » Profile page.

When you scroll to the bottom of the author profile, you will notice some new fields that have been added by the Author Bio Box plugin.

Scroll until you see the section labeled ‘Social Media Links (Simple Author Box).’ Now you need to select ‘Facebook’ from the drop-down menu, and then paste the URL to their Facebook profile into the next field.

Adding a Facebook Profile Using Author Bio Box

Now you can click the button labeled ‘+ Add new social platform.’

A new drop-down and field will be added where you can add their Twitter URL.

Adding Facebook and Twitter Links Using Simple Author Box

Once you’ve done that, make sure you click the ‘Update User’ button to store your settings.

Note: Don’t worry if the Facebook and Twitter URLs vanish after clicking the button. At the time of writing, there is a minor bug that hides the URLs, but the settings have been saved.

Now Facebook and Twitter icons will be displayed with the author’s profile at the bottom of their posts. Clicking these icons will take your visitors to their social profiles, but these links will open in the same window as your blog.

Preview of Simple Author Box with Social Icons

If you would prefer that the links open in a new tab, then you can navigate to the Appearance » Simple Author Box page and then click on the Elements tab. Once there, you need to find the option to ‘Open social icon links in a new tab’ and toggle it to the on position.

Open Simple Author Box Icons in a New Tab

Now the author’s social profiles will open in a new tab.

Method 3: Adding Social Profiles to Your Site’s Schema for SEO

All in One SEO (AIOSEO) is the original WordPress SEO plugin that’s used on over 3 million websites. It can also be used to add social profile fields on the author’s profile page.

Unlike the other methods, this method will improve your website’s SEO since AIOSEO adds these social profiles to your site’s schema markup.

The problem is that AIOSEO does not automatically display them in the author bio. But don’t worry, we will show you how to do that.

For this tutorial, we’ll use the free version of All in One SEO since it allows you to add social profiles for your website and each user. However, AIOSEO Pro offers even more features to help you rank better in search engine results pages.

The first thing you need to do is install the free All in One SEO Lite plugin. For more details, see our step-by-step guide on how to install a WordPress plugin.

Once you have the AIOSEO plugin set up, you need to head over to the Users » All Users page, and then click on the author’s name or the ‘Edit’ link just below.

Click on a User in the All Users List

This will open the Edit User page for that author.

Notice that AIOSEO has added a Social Profiles tab at the top of the page. You need to click on that tab now.

All in One SEO Social Profiles Tab

You can now enter the URL to the user’s social profiles in the boxes provided, such as:

https://facebook.com/johnsmith345
https://twitter.com/johnsmith345

Note that simply adding the username is not enough.

Alternatively, if the author uses the same username on multiple social networks, then you can click the box labeled ‘Use the same username for multiple social networks.’

Quickly Adding Multiple Social Networks With Same Username

You can then type in that username and check the social networks it is used on. For other social networks, you can simply type the full URL as before.

Once you are done, click on the ‘Update User’ button at the bottom of the page to store your changes.

Pro Tip: If you have Twitter and Facebook profiles for your business or website, then you can add these to your site’s schema in a similar way by visiting All in One SEO » Social Networks and adding the links on the Social Profiles tab.

The author’s social media profiles have now been added to your site’s schema, helping search engines understand your site better. But they are not yet being displayed on your website.

Displaying AIOSEO Author Twitter and Facebook Links in Your Theme

Now you need to display these fields as links in your theme.

If you are an advanced user, then you can display links from All in One SEO’s social profiles by editing your WordPress theme files. If you haven’t done this before, then check out our guide on how to copy and paste code in WordPress.

Note: If you’re not familiar with editing your theme’s core files and adding custom code, then we recommend you use AIOSEO to add the social profiles to your site’s schema, and then display them on your website using method 1 or method 2 above.

Advanced users can add the following code to your theme files where you want to display the author profile links.

<?php
$twitter = get_the_author_meta( 'aioseo_twitter', $post->post_author );
$facebook = get_the_author_meta( 'aioseo_facebook', $post->post_author );
echo '<a href="' . $twitter .'" rel="nofollow" target="_blank">Twitter</a> | <a href="'. $facebook .'" rel="nofollow" target="_blank">Facebook</a>';
?>

Save your changes and view a post on your website.

Here’s how it looks on our demo website. We added the code snippet to the biography.php file in the template-parts folder of the Twenty Sixteen theme.

Displaying AIOSEO Social Profiles in Your Theme Using Code

We hope this article helped you learn how to display the author’s Twitter and Facebook profile links in WordPress. You may also want to see our guide on how to display recent tweets or how to display your Facebook timeline in WordPress.

If you liked this article, then please subscribe to our YouTube Channel for WordPress video tutorials. You can also find us on Twitter and Facebook.

The post How to Display Author’s Twitter and Facebook on the Profile Page first appeared on WPBeginner.

How To Efficiently Manage Post Series in WordPress

Featured Imgs 23

Are you looking for a better way to manage post series in WordPress?

If you’re working on an online novel or simply want to cover a broad industry topic, then creating a long post may not work for you. A post series allows you to dig deep into a particular topic and encourage readers to keep coming back for more.

In this article, we’ll show you how to efficiently manage post series in WordPress.

How To Efficiently Manage Post Series in WordPress

Why Publish Post Series in WordPress?

If you are writing about a complex topic on your WordPress website, then it is often better to write a series of posts that break the topic up into smaller chunks than to write one long post.

For example, our ultimate guide to speed up WordPress is a roundup of a series of posts we published on different ways to improve your site’s performance.

When you write a big series of posts like that, it can be tough to help your readers navigate the series and find all the information in the right order.

You could simply add a paragraph before each post telling your users that the post is part of a series and then list the rest of the posts at the bottom. But then you would have to manually update every post each time you publish a new article in the series.

Another solution would be to create a custom taxonomy called ‘Series’, but this also creates more work, such as creating or customizing template files.

Luckily, there is a WordPress plugin that will help you manage a series of articles. Let’s take a look at how to efficiently manage post series in WordPress.

How to Efficiently Manage Post Series in WordPress

The first thing you need to do is install and activate the Issues and Series plugin. For more details, see our step by step guide on how to install a WordPress plugin.

There is a premium version with more features, but for this tutorial, we’ll use the free plugin.

As soon as the plugin is activated, you will be able to create new series and add posts to it.

Creating a New Series

To create your first series, you’ll need to head over to the Posts » Manage Series page. This looks similar to the page you see when adding new categories.

Once there, you will need to type a name, slug, and description for the series. When you’re finished, you’ll need to click the ‘Add New Series’ button at the bottom of the page.

Add a New Series in WordPress

You’ll notice that the new series is added to the list on the left.

Adding Posts to the Series

Now you can add some blog posts to the series. To start, simply create a new post or edit an old one.

In the settings panel on the right of the screen, you’ll notice a new section called ‘Series’. Simply click the button next to the series you created to add this post.

Add a New Post to Your Series

Make sure you click the ‘Publish’ or ‘Update’ button at the top of the page to push the post live as part of the series.

Next, you should add any other existing posts to the series. As you continue to write new articles, simply repeat this step to add them to the series.

Customizing the Order of Posts in the Series

By default, your articles will be displayed in the order you add them to the series. However, you can customize the post order by visiting the Posts » Publish Series page in your WordPress admin area.

Here you will see all the series you have created, with columns to show how many articles are published, unpublished, and scheduled in each. You will also see links to update the post order, publish or unpublish all, and view the series.

Click the 'Update Order' Link to Reorder Your Posts

To change the order of the posts, you will need to click the ‘Update order’ link. You will now see a list of all the posts in that series.

You can reorder the articles by dragging the post names up or down the list. When you move a post, the ‘Current Part’ number will be updated automatically to reflect the new order.

Drag and Drop Your Posts to Place Them in the Right Order

When you’re happy with the order of the posts, make sure you click the ‘Update Order’ button to store your settings.

Previewing Your Post Series

Now you can visit your WordPress blog to see how your new post series looks. Simply view a post that is part of the series.

At the top of the article, there will be a message that the post is part of a series. You will also see a list of all posts in the series and can easily navigate between them by clicking a link.

Post Order Preview

You will also find links at the bottom of the article to navigate to the next and previous article in the series.

We hope this tutorial helped you learn how to efficiently manage post series in WordPress. You may also want to learn how to track visitors to your WordPress site, or check out our list of must have plugins to grow your site.

If you liked this article, then please subscribe to our YouTube Channel for WordPress video tutorials. You can also find us on Twitter and Facebook.

The post How To Efficiently Manage Post Series in WordPress first appeared on WPBeginner.

How to Change the Author of a Post in WordPress

Featured Imgs 23

Do you want to change the author of a post in WordPress?

Sometimes you may need to change a post to a different author than the user who first uploaded the post. You can do this without having to copy and paste the post with a different account.

In this article, we’ll show you how to simply change the author of a post in WordPress with just a few clicks.

How to change the author of a post in WordPress

Before You Change the Author of a WordPress Post

If you just want to show your own name on a post written by another user on your WordPress site, then you’re ready to follow the instructions in this article.

But, if you want to show a different user as the author, then you need to make sure this user exists on your WordPress site first. See our guide on how to add new users and authors in WordPress for detailed instructions.

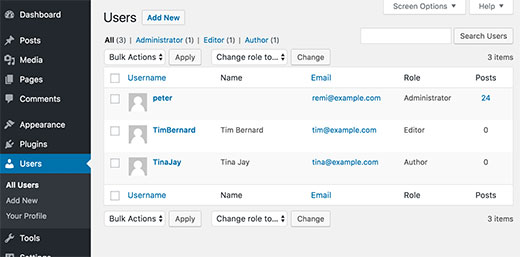
You can view and manage all the users on your WordPress site by visiting the ‘Users’ menu item when logged in with your WordPress administrator account.

Managing users in WordPress

If you only want to change the way your name is displayed, then check out our guide on how to add or change your full name in WordPress.

Having said that, let’s look at how to quickly and easily change the author of a post in WordPress.

Video Tutorial

If you don’t like the video or need more instructions, then continue reading.

How to Change the Author of a Single WordPress Post

First you need to open the post or page where you want to change the author name.

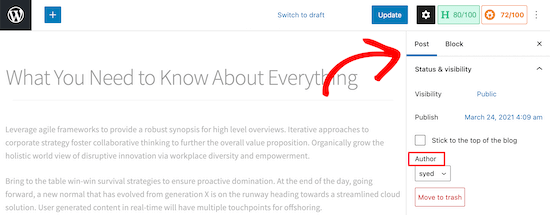
On the post edit screen, you need to make sure ‘Post’ is selected in the right-hand sidebar.

Then, locate ‘Author’ under the ‘Status & Visibility’ section.

Locate post then author section

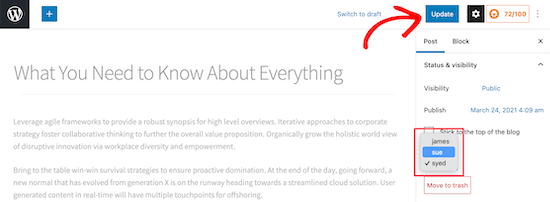
Next, select the new author name from the drop down menu.

You’ll see a list of available authors to choose from.

Select new author drop down

Once you’ve done that, make sure you click ‘Update’ or ‘Save Draft’ to save your changes.

That’s it, you have successfully changed the author of a post in WordPress.

How to Change the Author of Multiple WordPress Posts

Changing the author by editing a single post is easy.

However, if you want to change the author for multiple posts, then this would take a lot of time.

Luckily, there’s an easier way to quickly change the author for multiple WordPress posts at once.

To bulk update authors, click on the ‘Posts’ menu item from your WordPress admin menu. This will list all the posts on your WordPress site.

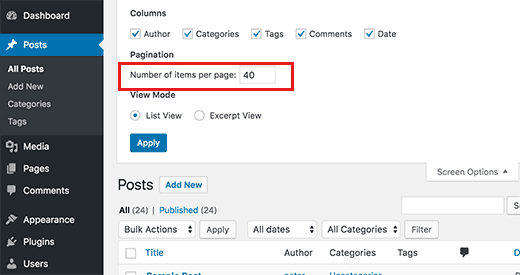
By default, WordPress shows 20 posts per page. If you want to display more posts, then you need to click on ‘Screen Options‘ and change the number of posts you want to display.

Show more posts in admin area

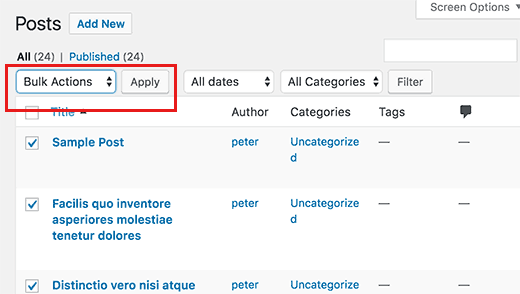
Now you need to select the posts where you want to change the author.

After selecting posts, select ‘Edit’ from ‘Bulk Actions’ dropdown menu and then click the ‘Apply’ button.

Bulk edit posts in WordPress

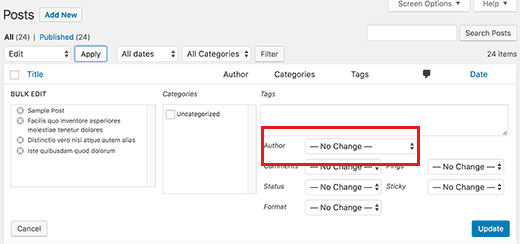
WordPress will now show you ‘Bulk Edit’ metabox.

You need to select the new author by clicking on the dropdown menu next to Author option.

Bulk edit author for multiple posts in WordPress

Don’t forget to click on the ‘Update’ button to save your changes.

That’s it, you have successfully changed the author for multiple WordPress posts without editing them individually.

How to Optimize Your Author Profiles for SEO

Finally, you may want to optimize your author profile pages to improve your SEO rankings.

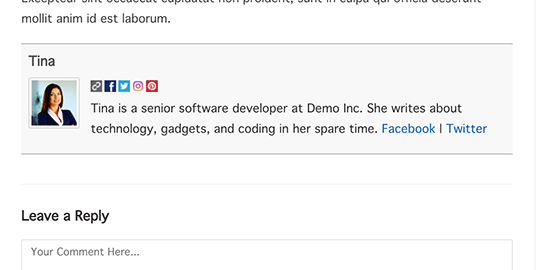
The author profile is what appears at the bottom of blog posts published under your name.

Author info box plugin preview

Here you can add a brief bio, links, and even your social media profiles.

By showcasing your author bio, you can build more credibility and give your readers a chance to learn more about you and the authors on your site.

WordPress allows you to add a brief author bio, but to add social media links you’ll need to use a WordPress author bio plugin.

Aside from that, you’ll also want to improve your Author archive pages where WordPress displays a list of posts written by that author.

To optimize author pages for SEO, we recommend using All in One SEO. It’s the best SEO plugin for WordPress used by over 2 million websites.

For more details, see our guide on how to install a WordPress plugin.

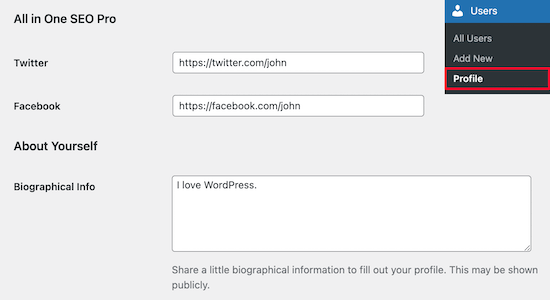
Upon activation, simply navigate to Users » Profile to edit your author profile.

Next, scroll down to the ‘All in One SEO Pro’ section where you can add links to your Facebook and Twitter profiles and create an author bio.

Author profile SEO

Once you’ve made the necessary changes, make sure you click ‘Update Profile’ at the bottom of the page.

Users will now see your new author bio at the bottom of any post you publish or change to your name.

We hope this article helped you learn how to change the author of a post in WordPress. You may also want to see our expert list of the best WordPress plugins for websites, and our comparison of the best online course platforms.

If you liked this article, then please subscribe to our YouTube Channel for WordPress video tutorials. You can also find us on Twitter and Facebook.

The post How to Change the Author of a Post in WordPress appeared first on WPBeginner.