Privacy-Conscious WordPress Plugin Caches and Serves Gravatar Images Locally

Featured Imgs 29

Ari Stathopoulos released his new Local Gravatars plugin last week. The goal of the plugin is to allow site owners to take advantage of the benefits of a global avatar system while mitigating privacy concerns by hosting the images locally.

In essence, it is a caching system that stores the images on the site owner’s server. It is an idea that Peter Shaw proposed in the comments on an earlier Tavern article covering local avatar upload. It is a middle ground that may satisfy some users’ issues with how avatars currently work in WordPress.

“I am one of the people that blocks analytics, uses private sessions when visiting social sites, I use DuckDuckGo instead of Google, and I don’t like the ‘implied’ consents,” said Stathopoulos. “I built the plugin for my own use because I don’t know what Gravatar does, I don’t understand the privacy policies, and I am too lazy to spend two hours analyzing them. It’s faster for me to build something that is safe and doesn’t leave any room for misunderstandings.”

He is referring to Automattic’s extensive Privacy Policy. He said it looks benign. However, he does not like the idea of any company being able to track what sites he visits without explicit consent.

“And when I visit a site that uses Gravatar, some information is exposed to the site that serves them — including my IP,” said Stathopoulos. “Even if it’s just for analytics purposes, I don’t think the company should know that page A on site B got 1,000 visitors today with these IPs from these countries. There is absolutely no reason why any company not related to the page I’m actually visiting should have any kind of information about my visit.”

The Local Gravatars plugin must still connect to the Gravatar service. However, the connection is made on the server rather than the client. Stathopoulos explained that the only information exposed in this case is the server’s IP and nothing from the client, which eliminates any potential privacy concerns.

The Latest Plugin Update

Stathopoulos updated the plugin earlier today to address some performance concerns for pages that have hundreds or more Gravatar images. In the version 1.0.1 update, he added a maximum processing time of five seconds and changed the cache cleanup process from daily to weekly. Both of these are filterable via code.

“Now, if there are Gravatars missing in a page request, it will get as many as it can, and, after five seconds, it will stop,” said Stathopoulos. “So if there are 100 Gravatars missing and it gets the first 20, the rest will be blank (can be filtered to use a fallback URL, or even fall back to the remote URL, though that would defeat the privacy improvement). The next page request will get the next 20, and so on. At some point, all will be there, and there will be no more delays.”

He did point out that performance could temporarily suffer when installing it on a site that has individual posts with 1,000s of comments and a lot of traffic. However, nothing would crash on the site, and the plugin should eventually lead to a performance boost in this scenario. For such large sites, owners could use the existing filter hooks to tweak the settings.

Right now, the plugin is primarily an itch he wanted to scratch for his own purposes. However, if given enough usage and feedback, he may include a settings screen to allow users to control some of the currently-filterable defaults, such as the cleanup timeframe and the maximum process time allowed.

The Growing List of Alternatives

With growing concerns around privacy in the modern world, Local Gravatars is another tool that end-users can employ if they have any concerns around the Gravatar service. For those who are OK with an auto-generated avatar, Pixel Avatars may be a solution.

“I’ve seen some of them, and they are wonderful!” Stathopoulos said of alternatives for serving avatars. “However, this plugin is slightly different in that the avatars the user already has on Gravatar.com are actually used. They can see the image they have uploaded. The user doesn’t need to upload a separate avatar, and an automatic one is not used by default.”

He would not mind using an auto-generated avatar when commenting on blogs or news sites at times. However, Stathopoulos prefers Gravatar for community-oriented sites.

“My Gravatar is part of my online identity, and when I see, for example, a comment from someone on WordPress.org, I know who they are by their Gravatar,” he said.

How to Edit the Footer in WordPress (Step by Step)

Featured Imgs 29

Do you need to edit the footer area of your WordPress website? The footer area appears at the bottom of each page on your WordPress site.,

There are several different ways website owners can utilize this area and make it more useful for their website visitors.

In this article, we will show you how to edit the footer in WordPress.

Editing your footer in WordPress

What is the Footer in WordPress?

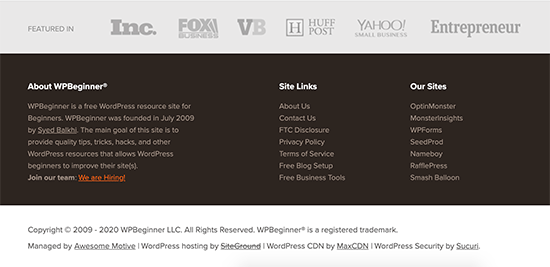
The ‘footer’ in WordPress is the bottom part of your website that appears after the content area. It normally appears on all pages on your website.

Example of the footer area on a WordPress powered website

This part of the website is located far down below and is often ignored by most beginners for a long time. However, there are several ways you can utilize this area by making it more helpful for your users, WordPress SEO, and your business.

All top WordPress themes come with footer widget area that’s easy to edit. You can also carefully edit the footer.php template file in your theme to remove unwanted links from this area.

That being said, let’s take a look at how to easily edit the footer in WordPress. You can use the following links to jump to the section you want to read.

Editing Widgets in Your Footer in WordPress

Many popular WordPress themes have widget areas in the footer.

You can use these widget areas to add text, images, or links to your privacy policy and legal disclaimers in the footer area.

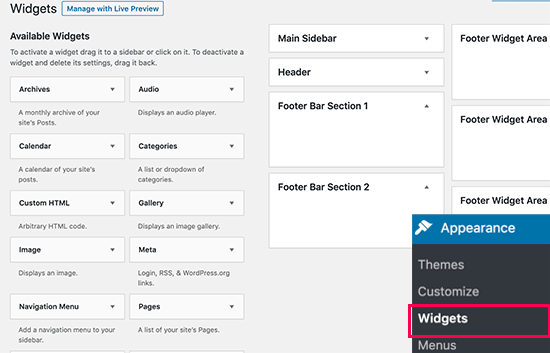
Adding text and images is quite straight forward. You can simply go to the Appearance » Widgets page and add a Text, Image, or Gallery widget to your footer widget area.

Add widgets to footer in WordPress

To add a widget, simply drag and drop it into a footer area. If you need more help, then see our article on how to add and use widgets in WordPress.

Note that many themes will have multiple footer areas, and they may use them differently. You can preview your website after adding widgets to make sure that they appear where you want them to be.

Adding Links in Footer Widget Area

You may also want to add links to different pages, categories, or to the legal pages of your website in the footer area.

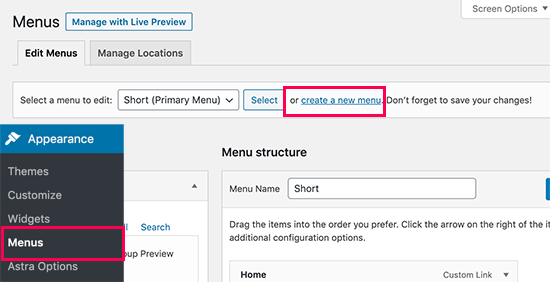
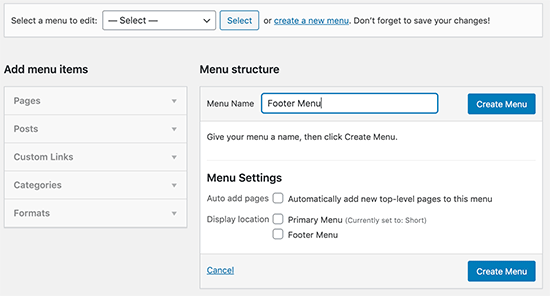
WordPress comes with an easy to to manage those links using the navigation menus. Simply head over to the Appearance » Menus page and click on the ‘create new menu’ link.

Create new menu in WordPress

WordPress will ask you to provide a name for your new menu. Enter a name that helps you easily identify this menu and then click on the ‘Create Menu’ button.

Enter your navigation menu name

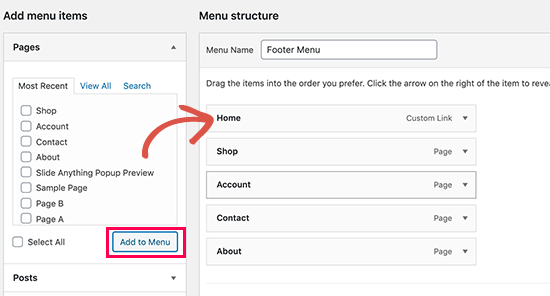
Your menu is now ready and you can start adding links to it. Simply select the pages, posts, categories from the left column to add them to your menu.

Add pages to your menu

Once you are finished, click on the Save Menu button to store your changes. For more help, see our article on how to create navigation menus in WordPress.

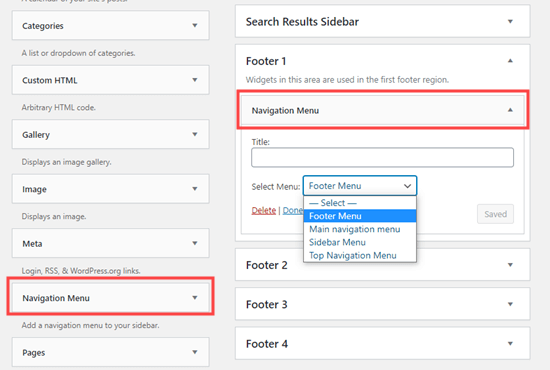
Your menu is now ready to be added to the WordPress footer widget area. Simply visit the Appearance » Widgets page in your WordPress admin and then add the Navigation Menu widget to your footer area.

Adding a navigation menu widget to your website's footer

In the widget settings, select the footer navigation menu you created earlier from the dropdown menu and click on the Save button.

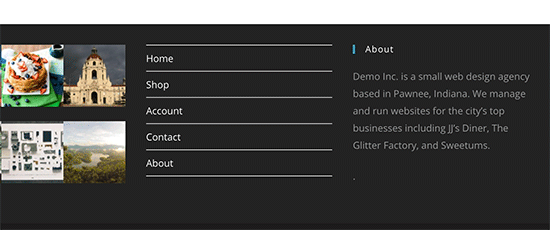
You can now visit your website to see your footer links in action.

A footer section with navigation menu links

You can create multiple navigation menus in WordPress and add as many navigation menu widgets to your sidebar as you need. If you need another set of links simply repeat the same steps again.

Removing the ‘Powered by WordPress’ Text from Your Footer

When you first install WordPress, your site may have a ‘Powered by WordPress’ link in a footer bar at the bottom. This isn’t a widget, so it’s often not clear how to change it.

The 'Powered by WordPress' text and link in the Twenty Twenty theme

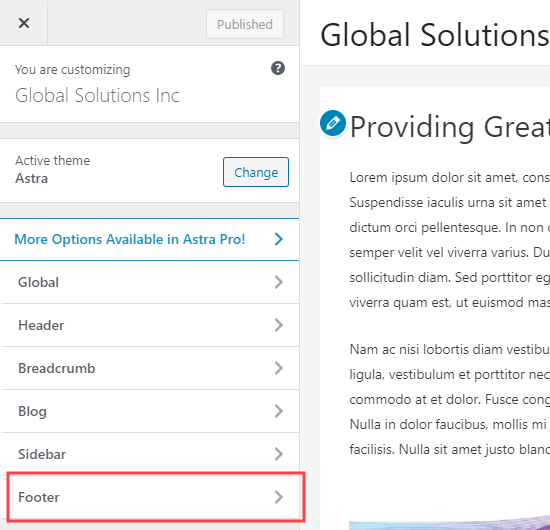
Some themes will alter this to their own text and link. If so, you can normally change this text using the live theme customizer. Simply go to Themes » Customizer in your WordPress admin. Look for an option to edit your site footer:

The Footer tab in the WordPress theme customizer

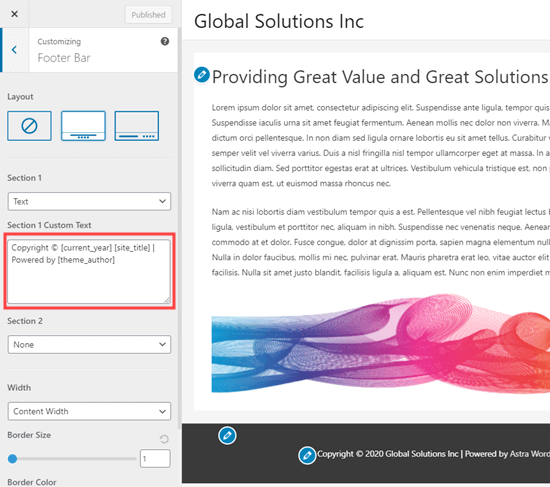
We’re using the Astra theme for this example. With Astra, you need to go to Footer » Footer Bar in the customizer. You will then have the option to change the text of your footer bar:

Editing the footer text in the theme customizer for the Astra theme

Once you’ve finished editing the text, don’t forget to click the Publish button at the top of the screen to put your changes live.

Go ahead and view your site to see your new footer:

Viewing the new footer text live on your website

For more help, take a look at our in-depth guide to the WordPress theme customizer.

Editing the Footer Text Manually

What if your theme doesn’t have the option to edit the footer text using the customizer?

In this case, you need to edit the footer.php file. It is a template file stored in your WordPress theme folder and is responsible for displaying the footer area for that particular theme.

The easiest way to edit this is by using an FTP client to connect with your WordPress hosting.

First, download the /wp-content/themes/yourtheme/footer.php file and then edit it in a text editor.

You will need to find the line in the file with the ‘Powered by WordPress’ text. This is how it looks in the Twenty Twenty theme:

<div class="footer-credits">

	<p class="footer-copyright">&copy;
		<?php
		echo date_i18n(
			/* translators: Copyright date format, see https://www.php.net/date */
			_x( 'Y', 'copyright date format', 'twentytwenty' )
		);
		?>
		<a href="<?php echo esc_url( home_url( '/' ) ); ?>"><?php bloginfo( 'name' ); ?></a>
	</p><!-- .footer-copyright -->

	<p class="powered-by-wordpress">
		<a href="<?php echo esc_url( __( 'https://wordpress.org/', 'twentytwenty' ) ); ?>">
			<?php _e( 'Powered by WordPress', 'twentytwenty' ); ?>
		</a>
	</p><!-- .powered-by-wordpress -->

</div><!-- .footer-credits -->

Then, simply delete or change that text, and reupload your footer.php file.

Tip: Make a copy of your footer.php file before making changes. That way, if you accidentally break anything, you can easily upload the original file again.

For more help, check out our guide on removing the ‘Powered by WordPress’ footer link.

Adding Code to Your WordPress Footer

Sometimes, you may need to add code snippets to your WordPress footer. This is often done in order to connect your site with an external app.

For instance, to add a Pinterest button to your site, you need to add Pinterest’s script to your footer. You may also see a tutorial that asks you to insert your Google Analytics code there.

The easiest way to do this is to install and activate the Insert Headers and Footers plugin. For more details, see our step by step guide on how to install a WordPress plugin.

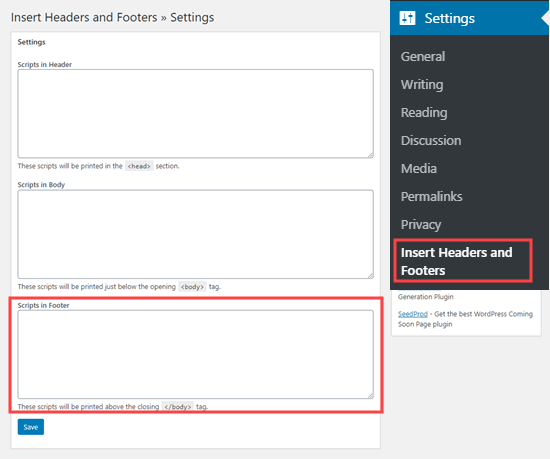
Upon activation, simply go to Settings » Insert Headers and Footers in your WordPress admin. Go ahead and copy and paste your footer code into the ‘Scripts in Footer’ box:

Using the Insert Headers and Footers plugin to add code to your website's footer

Don’t forget to click the Save button before moving on.

For more help, take a look at our guide to adding header and footer code in WordPress.

If you’re looking to add Google Analytics, then we recommend you use another method instead which helps with better tracking.

We hope this article helped you learn how to edit the footer in WordPress. You may also want to see our comparison of the best drag & drop WordPress page builder plugins, and our guide on how to create a custom WordPress theme without writing any code.

If you liked this article, then please subscribe to our YouTube Channel for WordPress video tutorials. You can also find us on Twitter and Facebook.

The post How to Edit the Footer in WordPress (Step by Step) appeared first on WPBeginner.

Matomo Analytics: Free Self-Hosted WordPress Analytics

Featured Imgs 29

Matomo Analytics: Free Self-Hosted WordPress AnalyticsTraffic is the lifeblood of a successful website. Without traffic, you have a good-for-nothing website, no matter how good your offer or product is. And it’s not just any traffic, but the right kind of traffic. In other words, you need targeted traffic to grow your website hence business. But to drive targeted traffic, you need […]

The post Matomo Analytics: Free Self-Hosted WordPress Analytics appeared first on WPExplorer.

Important tips for calculating the conversion rate of the website

Featured Imgs 29

One of the most effective and simple ways to measure the performance of the website or manage the ROI is by setting up the conversion goals. To set your conversion goals, you can use a tool like Google Analytics. So, every time a visitor engages with a website, a conversion can be measured.     Why […]

The post Important tips for calculating the conversion rate of the website appeared first on designrfix.com.

Catch Fire Before Launch Day With These Free WordPress Coming Soon Page And Under Construction Plugins

Featured Imgs 29

Your site’s Coming Soon page is the perfect canvas to give visitors a sneak peek of what’s to come. The pre-launch or construction stage of a website is also great opportunity to drum up excitement and interest in advance. In this article we’re reviewing some of the best WordPress plugins that can help you do this.

Three, two, one… and we’re “go” for launch…

Soon!

As touched on above, today we’re introducing you to several free WordPress Coming Soon and Under Construction plugins.

All of these plugins can help you with a new pre-launch, or if you need to perform maintenance on your site. If used correctly, best believe they can help your site take off like a rocket (before it’s even live!).

We’ll also demonstrate how to set each plugin up, and introduce you to all of the main features.

The goal being to see what sets each one apart, and helping you decide which plugin will work best for you.

By the time we’re done, you’ll hopefully feel better about launching your site before it’s open, or after construction.

Doing it the right way is important, unlike, well…

Dev Man launching a WordPress website.
Dev Man about to launch a new website — into the air. It’s not recommended to do it this way (especially with a computer).

First, Make Sure Your Coming Soon Page Can Be ‘Counted On’…

As several of these plugins countdown for you, you need to count on them. There are some essential things your coming soon page needs to do.

For example, the page should:

  • Match your branding – Your coming soon content should be along the same lines of your overall offerings in terms of design. Also, it should highlight specific features you want to showcase.
  • Help capture leads – You’ll want to have prominent form displayed on your page to encourage visitors to sign up for launch notifications. A free plugin like Forminator is great for this.
  • Encourage social sharing – To help generate buzz about your launch, you’ll want easy to integrate options for people to share news of your site socially.

Grab a Hard Hat, Here’s What Else Your Under Construction Page Needs:

If your site is under construction, there are additional features that should be included:

  • Stay analytically friendly – If you need to do work on your site, ensure that you don’t get penalized by Google for being down. Keep your SEO in check.
  • Mention you’re under construction and will open soon – Nothing can upset a potential customer or visitor than a site that doesn’t function and doesn’t mention why.

It’s a fairly simple set of requirements, and the tools we’ll be discussing will help you execute all of them in style.

Let The [Plugin] Countdown Begin!

WAIT! Before we accelerate into examples of plugins, you may be interested in some background resources:

So now you have a good marketing plan, you have a URL, and your website’s being worked on. It’s time to get on the clock. Punch in and we’ll set up the ultimate coming soon page.

Down below you’ll find five free coming soon plugins for WordPress, as well as one of our own premium plugins (which we’d be silly not to mention).

Some function specifically for counting down, others are best for when you’re under construction.

Let’s get to work.

  • Colorlib Coming Soon & Maintenance Mode

    Coming Soon & Maintenance Mode by ColorLib allows you to create coming soon and maintenance pages that are one of a kind.

    While it’s operating, you can easily work on your website while the plugin collects your visitors’ emails.

    Let’s go ahead and activate this plugin.

    By the way… if you’d like to follow along with all of the demonstrations in this post, be sure to visit the plugin’s page and download it. (I know, it goes without saying. But still…)

    Once you have it installed, go to Settings and you’ll be taken to the block editor.

    ColorLib customization area.
    The settings area.

    All the settings are accessible by clicking the blue pencils, or you can edit them on the left-hand side of the screen.

    The General area is where it supports its main function — which is a countdown clock.

    You can quickly activate it so it’s displayed on your website by clicking the switch next to Activate Colorlib Coming Soon Page.

    Below that is an option for the timer. Simply flip the switch to activate it.

    All the features of this plugin are accessible without any advanced CSS needed. It’s easy to adjust the date and time, timezone, and you can even upload a new image in this area.

    ColorLib General tab.
    A look at the General tab.

    As we mentioned at the beginning of this article, social sharing is important.

    Folks need to share and get the word out about your launch. With that said, there is a tab you can utilize to help get visitors get in tune with your social accounts. You can also keep them posted on your progress.

    The ColorLib social media area.
    The social tabs.

    Also, for more advanced customizations, you can add custom CSS.

    ColorLib custom CSS.
    ColorLib custom CSS.

    As for getting visitors to sign up for updates and to get on your email list, there’s a form already available when this plugin is activated.

    ColorLib sign-up form.
    The customizable signup form.

    You can easily disable or activate it, like anything else on this plugin. If activated, you can integrate it with an email service (e.g. MailChimp).

    I like how the form remains hidden while editing the site. It’s only accessible once you’re logged out and you preview your site, or if you use a different browser.

    ColorLib live website.
    A live look at what the coming soon timer and opt-in form look like.

    It’s nice how there is currently no upgrade option, so all of the features are instantly available and free.

    Overall, what I enjoyed most was the beautiful and responsive designs, the ability to work with all WordPress themes, and the easy setup.

    You don’t need much more than what is offered. With plenty of 5-star reviews, we’re down (countdown, that is) with this plugin.

    Interested in Colorlib Coming Soon & Maintenance Mode?

  • Countdown, Coming Soon -- Countdown & Clock

    The Countdown, Coming Soon — Countdown & Clock is another simple, easy to use timer and coming soon plugin. It comes with numerous countdown display options (e.g. digital, circle, etc.) and customizable coming soon settings.

    On that note, let’s check it out in WP.

    When you have the plugin installed, it’s nice that the two main features of it are prominent on your dashboard. You can easily pick between creating a Countdown & Clock or a Coming Soon display.

    Countdown and Coming Soon in dashboard.
    The dashboard.

    If you’d like to feature a countdown timer it’s quick and easy to do. There are several varieties to choose from when it comes to look and style.

    The Add New Countdown screen.
    The Add New Countdown screen.

    As you can see, immediately you have some options not available unless you upgrade, such as hiding on mobile devices, scheduling, and more.

    But that’s okay. For basic use of creating a timer, you don’t need the upgrade unless there are specific features you wish to include.

    You can add a title, date, timezone, and set your clock’s countdown time.

    With Countdown Types, you can specify what style of countdown clock you would like.

    Countdown and coming soon timers.
    Selection of timers.

    There are other options to add advanced CSS to the timers and more. However, if you want to keep it simple, none of that is necessary.

    Once you have it named and designed how you would like it – simply save the timer. It will then give you a shortcode.

    Countdown and coming soon enable clock.
    Where the shortcode is located.

    Paste the shortcode on a blog or webpage — and you’re all set.

    Countdown and coming soon pasted code.
    Where we’ll paste the code for this example.
    Countdown and coming soon published clock.
    The live timer.

    If you’d like to set the coming soon display up, it’s also very easy to do.

    Go to the dashboard and select Coming Soon.

    You’ll then want to make sure Enable is turned on. Here you can craft your Headline and Message that you would like displayed on your website.

    Countdown and coming soon message.
    Where you type your message.

    If all looks well, hit Save Changes and it will display on your website.

    Coming soon example.
    Example of what the coming soon message can look like.

    Again, this is a very simple plugin. It has the essential features needed for creating a countdown timer and coming soon message.

    It’s a bit limited on some of the other features (e.g. an opt-in form), but it’s functional, easy to set up, and works well.

    Interested in Countdown, Coming Soon -- Countdown & Clock?

  • JQuery T (-) Countdown

    The JQuery T (-) is a basic countdown sidebar widget that requires shortcodes for it to function. You’ll notice the theme of this plugin is all Star Wars based (for example, one of the Force Load CSS options is ‘Jedi’), which we find quite interesting (and out of this world).

    It’s not exactly user friendly for anyone looking to quickly set up a countdown timer. However, with a little CSS knowledge, it is easy to use. It’s also highly customizable and the result can look impressive.

    This doesn’t come with all of the bells and whistles as some of the other plugins. There’s no opt-in forms, upgrades, or social buttons.

    With all that being said, grab a lightsaber, and let’s check it out.

    There’s only one page of customization widget options once installed, which makes it nice to have everything in the same spot.

    JQuery T Widget options.
    The jQuery T (-) Countdown Widget options.

    Once here, this is where all of the coding and building of the countdown timer takes place.

    What if I don’t have any CSS knowledge? No problem. They’ve made it a breeze to find the shortcode that is needed for your purposes with a link to one of their CSS pages.

    jQuery custom CSS.
    You simply paste it into the Custom CSS area and build it up like the Death Star.

    Once you have the shortcode that you need, jQuery works as a widget. So, you can move it into the desired area in WordPress.

    jQuery widget.
    Where the widget is located when activated.

    When it’s added to your site, you can customize the widget even more, if you’d like.

    jQuery widget customization.
    You can see numerous options that require CSS coding.

    Here is our very basic widget that we just set up.

    jQuery live example.
    An example of the countdown timer live.

    You can get more advanced with this and have some fun customizing the CSS.

    jQuery advanced styling.
    Some advanced timers.

    They do have options to upgrade, like an advanced countdown control. All additional features require being purchased.

    Overall, it’s a nice free plugin/widget that’s fairly easy to set up and use.

    You might find it difficult using some of the CSS without much knowledge of it, however, we also see this as a good opportunity to learn about basic CSS and — like a good Jedi mind trick — you might be surprised with what you can do.

    Interested in JQuery T (-) Countdown?

  • Minimal Coming Soon & Maintenance Mode -- Coming Soon Page

    For a free plugin, the Minimal Coming Soon & Maintenance Mode — Coming Soon Page offers a ton of options to ensure your visitors will be excited to visit your website when it’s ready for launch. And you can get it up and running in a matter of minutes.

    It doesn’t include a countdown timer, but it’s one of the most customizable options for everything else.

    This plugin even has its own themes that can work well with the maintenance mode. However, you don’t necessarily need to use theirs, because it’s also compatible with any other theme in WordPress.

    It’s a great choice for simplicity, ease of use (no CSS or coding required), and functionality.

    After downloading the plugin, it’s effortless to get moving. Everything is on the page and organized by the following menu tabs:

    • Basic
    • SEO
    • Themes
    • Design
    • Email
    • Advanced
    • Support

    There is also a tab to upgrade to the PRO version, which offers a lot more options for themes, SEO, design, email, and more.

    Starting with the Basic tab.

    Minimal coming soon setup.
    The Basic menu.

    Here you can enable Maintenance Mode, add Header Text, and Content.

    You can set everything up accordingly and include whatever message is best for your viewers. It does come with default text as well, if you’re not sure what to include.

    Minimal Coming Soon SEO options.
    The SEO section.

    This is an area where you can add keywords, a meta description, enable search engines, and more. It’s nice that they’ve also included an area to enable Google Analytics Tracking ID.

    Minimal Coming Soon themes.
    The themes area.

    It’s impressive how this plugin has its own themes available.

    There are free and PRO themes to choose from. As mentioned, you don’t need to include one of their themes to get this plugin to function, however, these themes were designed to function with the plugin so it’s aesthetically pleasing.

    Minimal Coming Soon images.
    Design options.

    When designing your page, they make it easy to upload a background and foreground image. You can upload your design or use theirs.

    Minimal Coming Soon email settings.
    Email settings.

    The email settings are available with everything else. It’s also extremely simple to incorporate MailChimp or another email service.

    Once added, you can include an opt-in form so that your visitors can be contacted with updates.

    Minimal Coming Soon opt in.
    The form area.

    Your opt-in form can be edited specifically to your liking. And as you can see, you’re given plenty of options to choose from.

    You can also get into more advanced settings, which include adding custom CSS and more.

    However, we chose to keep it simple.

    As you can see below, we added our very own Dev Man and used their default background. This is just a simple example of what you can do with this plugin.

    Minimal Coming Soon live preview.
    Dev Man, mountains, a nice looking coming soon site…What more do you need?

    This plugin has a 5-star rating from well over a hundred users, so don’t just take our word for it that this is a nice and easy coming soon option.

    Despite missing a timer option, this plugin has everything else you’d want to support your website before you’re up and running.

    Interested in Minimal Coming Soon & Maintenance Mode -- Coming Soon Page?

  • Under Construction

    The Under Construction plugin by WebFactory LTD is another free amazing and simple to use under construction plugin that takes just minutes to install.

    We love the fun designs and illustrations they include that can be used for your website while it’s getting ready for take off.

    All of the features are bundled in one area, and can all be simply accessed. It has most of the essentials you need for your page, as you’ll soon see.

    First, start under Settings to access the main panel.

    Since we’re going to be going under construction, the first step is to flip the Under Construction Mode switch to On.

    This will ensure visitors will see that it’s being worked on.

    In this tab, you can also prevent search engines from indexing the temporary site, automatically set up an end date and time, enable Google Analytics tracking, and reset settings.

    Under Construction main tab.
    The main panel where you have plenty of options.

    To design your under construction page, click over to the Design tab.

    Under Construction design page.
    The Design area.

    This is where you’ll discover a lot of fun, unique, and effective page designs.

    Some of them are premium features, which you can get if you upgrade. However, even without upgrading, they have a lot of great options to choose from.

    Once you find a design you like, click Activate and you’re in business.

    Of course, you’ll want to edit your message. You can do all of that in the Content area.

    Under Construction content area.
    The content area.

    Here you can edit more than just text. There are shortcode options, multilingual support, and also an area to include your social links and email.

    Under Construction social links.

    In the Access area, you can include things like whitelisted IP addresses and other URL based options.

    Under Construction access area.
    The Access area.

    And just like that, you can have a custom under construction page up for your visitors.

    Under Construction live example.
    A preview of our just created under construction page. Purr-fect.

    Though it’s functional, one thing it lacks is opt-in options for your visitors.

    You can include your social links and email — which is good. However, it’s always recommended to include an area for visitors to sign up, too. This can be created with some custom CSS.

    Here’s a bit more about using Under Construction in the video below.

    Interested in Under Construction?

  • Branda Pro

    Now we couldn’t let this post come to an end without giving our very own Branda Pro a cheeky mention…

    Branda image.
    “Hey there.”

    She’s a plugin that boasts WordPress white label branding, maintenance mode and coming soon landing pages, custom admin bars, and much more.

    Branda Pro features.
    More Branda Pro features.

    There’s a TON you can do with customization. And what’s especially great about Branda is that it makes it easy to match your website’s theme or topic.

    For this example, we’ll just be looking at the coming soon and under construction features she has on offer.

    Once installed, you can quickly access Branda on your dashboard. To start maintenance or coming soon mode, navigate to the Utilities area under Website Mode.

    Utilities in Branda for WordPress.
    The Utilities area in the WordPress dashboard for Branda.
    Branda coming soon area.

    Once here, you can pick Coming Soon, Maintenance, or Off.

    The content can all be edited directly below. Even the option for adding all of your social accounts.

    Branda social features.
    The social linking area in Branda.

    Adjusting colors and adding your own custom CSS is also a breeze.

    Branda color and CSS section.
    Branda color and CSS section.

    And here’s a look at a finished countdown timer.

    Branda timer example.
    And the Branda Pro countdown begins!

    Branda Pro is a simple, easy to use plugin that can definitely get the job done when coming soon and maintenance mode is needed for your website.

    For WPMU DEV members, she is available now to create maintenance pages, countdowns, and much more. If you are not a member, sign up for a free 30-day trial.

    Soon though, there will also be a free option available.

    You can check here to keep tabs on what she’s up to, and any updates on when it will be released.

Time is On Your [Web]Side.

Hopefully, you have some ideas on what works best for your website on your next pre-launch or maintenance.

You can have peace of mind knowing your visitors won’t be turned off by an ugly construction or a 404 error.

Fun Fact: Being Under Construction Can Be Beneficial

It shows your visitors that the website is evolving, up to date, and gives them a chance to connect with you on your social accounts or email.

And with that, when the maintenance is done and the website is open — job well done.

Feel free to punch the clock and take some time to yourself.

How to Enable Author Tracking in WordPress

Featured Imgs 29

Do you want to enable author tracking on your WordPress website?

If you run a multi-author WordPress site, then you’re probably wondering which of your authors write the most popular posts. This information can help you increase traffic and grow your website.

In this article, we’ll share how to enable author tracking in WordPress.

How to enable author tracking in WordPress

Why Enable Author Tracking in WordPress?

If you run a multi-author blog, then you need to enable author tracking in WordPress. It allows you to gather data about how each author’s posts perform on your WordPress website.

You can then promote high-performing authors and offer some extra help to those who are struggling.

It is also a great way to find out whose posts bring in the most traffic and which articles are engaging readers.

For instance, you might have an author who’s great at writing posts that get lots of visitors. However, those visitors may not stick around on your site. This may result in a high bounce rate, fewer page views, and less time spent on the website.

After gathering this data, you can make informed decisions by improving your editorial workflow and offering more tips and help to struggling writers. You might find a way to funnel users from the first author’s posts to the writers you want to get more attention.

That said, let’s see how you can enable author tracking on your website.

Setting up Author Tracking in WordPress

The easiest way to track the most popular authors in WordPress is using MonsterInsights. It is the best Analytics plugin for WordPress and helps you set up Google Analytics without editing code.

MonsterInsights

MonsterInsights offers a Dimensions addon that allows you to set up custom dimensions in Google Analytics.

It helps you track additional information in Google Analytics that’s not available by default. This includes author tracking, most popular post types, categories, tags, and more.

Do note that you’ll need at least the MonsterInsights Pro plan because it includes the custom dimensions feature. There is also a MonsterInsights Lite version you can use for free.

First, you need to install and activate the MonsterInsights plugin. For more details, see our step-by-step guide on how to install a WordPress plugin.

Upon activation, you will see the welcome screen. Go ahead and click the ‘Launch the Wizard’ button.

Launch setup wizard

Next, you can follow the instructions in the setup wizard to connect Google Analytics with your website. For more details, please see our guide on how to install Google Analytics in WordPress.

Once connected, Google Analytics will start tracking all your website traffic.

With MonsterInsights, you can easily set up dual tracking and start collecting data in a Google Analytics 4 (GA4) property. GA4 is the latest analytics version, and it will replace Universal Analytics on July 1, 2023.

After this date, you won’t be able to track website traffic in your Universal Analytics property. That’s why this is the best time to switch to Google Analytics 4.

Setting up Author Custom Dimensions for Accurate Tracking

Now that everything is up and running, let’s tell Google Analytics to start tracking authors by adding a custom dimension.

You need to start by visiting the Insights » Addons page. From here, you need to go to the ‘Dimensions’ addon and click on the ‘Install’ button.

Activate the dimensions addon

The addon will now automatically install and activate.

Next, you can go to the Insights » Settings page and switch to the ‘Conversions’ tab.

MonsterInsights settings - conversions tab

From here, simply scroll down a little, and you’ll see the ‘Custom Dimensions’ box.

This is where you can add a new custom dimension. Go ahead and click on the ‘Add New Custom Dimension’ button.

Add new custom dimension

Next, you’ll need to select the ‘Author’ dimension from the drop-down menu.

Besides that, you will also need to add the ID that will be filled in for you.

Select Author in the dropdown menu

Don’t forget to click the to store your settings.

Now that you have set up custom dimensions in MonsterInsights, the next step is to do the same in Google Analytics.

We’ll go through the steps for Universal Analytics and Google Analytics 4.

Add Custom Dimensions in Universal Analytics

First, you can visit the Google Analytics website and open your website property. Do be sure that the ID for this property begins with ‘UA.’

Choose a website property

From here, you need to click on the ‘Admin’ button at the bottom left corner of the screen.

Then you can select Custom Definitions » Custom Dimensions under the Property column.

Choose custom dimensions

Next, you’ll need to add a new dimension.

Simply click the ‘+ New Custom Dimension’ button.

Click new custom dimension

On the next screen, type in ‘Author’ for the name and leave the other details unchanged.

After that, click the ‘Create’ button, and Google Analytics will save it.

Add author to dimension name

Next, you’ll see some code on the next screen.

You don’t need to do anything, as MonsterInsights handles everything for you. Just click ‘Done’ to continue.

Click the done button

Next, you will see your ‘Author’ custom dimension listed in a table with an ‘Index’ column.

Make sure that the value in the ‘Index’ column is the same as the ID given to that author’s custom dimension in MonsterInsights.

View your author dimension

If not, then don’t worry because you can edit the custom dimension in MonsterInsights.

Now, let’s see how you can set up custom dimensions in GA4.

Add Custom Dimension in Google Analytics 4

First, you will need to go to your Google Analytics 4 property.

Once logged in, head to the ‘Configure’ tab on the left.

Go to configure

Next, you can click the ‘Custom definitions’ option from the menu that appears.

After that, go ahead and click the ‘Create custom dimensions’ button.

Create a new custom dimension

A window will slide in from the right, where you will need to enter the details of your custom dimensions.

To start, enter a name for your dimension. There is also an option to add a description.

From here, you can keep the Scope set to ‘Event’ and then enter an event parameter like ‘author_tracking.’ The Event parameter is what Google Analytics 4 will use to show your dimension in the reports.

Enter dimension details in ga4

After entering these details, don’t forget to click the ‘Save’ button.

You have successfully set up author tracking on your WordPress website. Now, let’s get to the fun part of viewing the reports and finding out how your authors are doing.

Viewing Your Author Tracking Reports

After your website has collected traffic data, you can view your top authors on the WordPress dashboard.

Simply go to the Insights » Reports page and switch to the Dimensions tab.

View most popular author report

From here, you can see the top authors that generate the most traffic on your website.

You can now use this data to improve your editorial workflow and promote content from high-performing authors. For instance, you can display their content as popular posts and get more pageviews.

Additionally, the information will help you see which writers are struggling, so you can work with them and increase traffic to their blog posts.

We hope this article helped you learn how to enable author tracking in WordPress. You may also want to see our guide on how to start an online store and the must-have WordPress plugins.

If you liked this article, then please subscribe to our YouTube Channel for WordPress video tutorials. You can also find us on Twitter and Facebook.

The post How to Enable Author Tracking in WordPress first appeared on WPBeginner.