35% of Websites in the World are on WordPress now. For WordPress users, the Elementor ... Read More
The post Master Addons Review appeared first on WPArena.

Tips, Expertise, Articles and Advice from the Pro's for Your Website or Blog to Succeed
35% of Websites in the World are on WordPress now. For WordPress users, the Elementor ... Read More
The post Master Addons Review appeared first on WPArena.
In today’s world, most ambitious entrepreneurs are looking to move their businesses online. It is ... Read More
The post These 5 Things Can Make or Break Your eCommerce Website appeared first on WPArena.
Do you want to create a questionnaire in WordPress to survey your visitors or collect data?
Getting feedback on your products or simply learning more about your users can help your business to succeed.
In this article, we will show you how to easily create a questionnaire in WordPress, step by step.

Creating a questionnaire is a great way to learn more about your audience. This lets you tailor your content to their needs. You can also use the results to create or modify the products / services that will be most helpful to your audience.
There are several survey tools that you can use outside your website, but having your questionnaire on your website itself means you have full control over how it’s displayed. Plus, it’s more familiar and reassuring for your audience.
That being said, let’s take a look at how to easily add a questionnaire to your WordPress site.
For this tutorial, we’ll be using WPForms to create a questionnaire.
WPForms is the best forms plugin for WordPress and allows you to easily create any kind of forms using a simple drag and drop form builder.
First, you need to install and activate the WPForms plugin on your WordPress site. For more details, see our step by step guide on how to install a WordPress plugin.
Note: You’ll need the Pro version of the plugin to get the features that we will use in this tutorial.
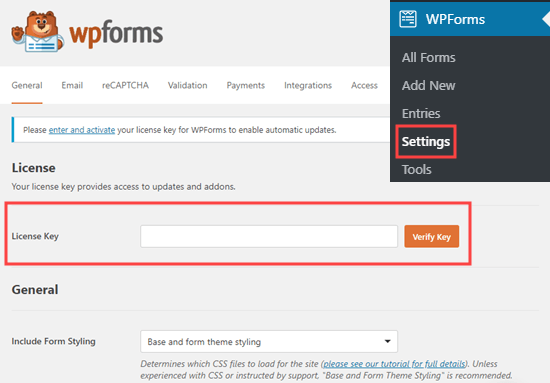
Upon activation, you need to visit the WPForms » Settings page in your WordPress admin area to enter your license key. You’ll find the license key under your account on the WPForms website.
Now, it’s time to move on and create your questionnaire.
WPForms’ powerful surveys and polls addon lets you create questionnaires easily. It also produces beautiful visual graphs of the results.
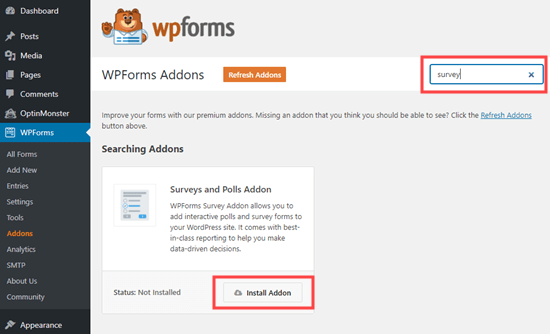
First, visit the WPForms » Addons page to install the Survey and Polls addon. Use the search bar to find it, then click the Install Addon button.
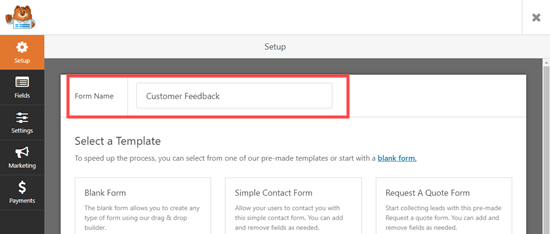
Next, go to WPForms » Add New to create a new form. First, type in a name for your form at the top of the screen:
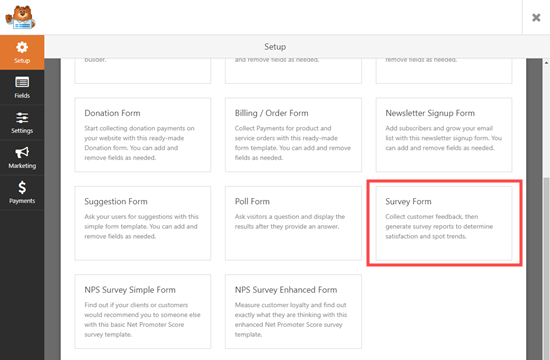
There are 4 different pre-built survey form templates to choose from. These are the Poll Form, the Survey Form, the NPS Survey Simple Form, and the NPS Survey Enhanced Form.
We are going to use the Survey Form for our questionnaire.
After you select the template, it will open up in the WPForms editor.
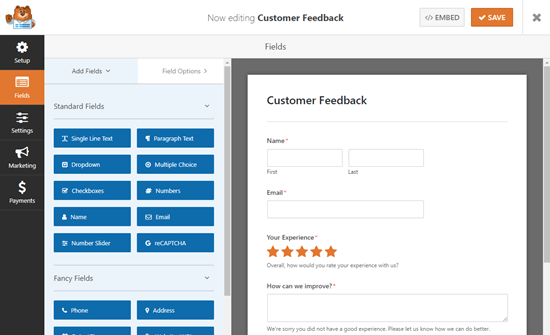
We recommend that you edit the questions to make them appropriate for your audience and needs. We are going to use the form to gather customer feedback on products and delivery.
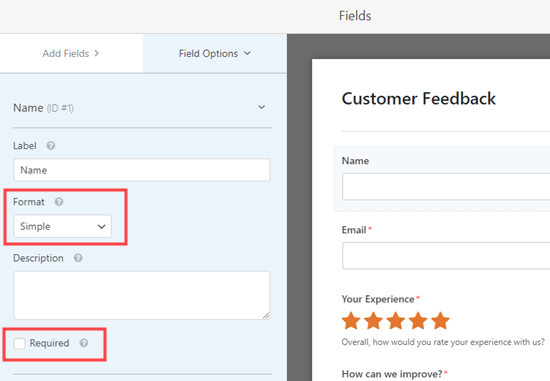
To edit any field, simply click on it. The editing view will then open up on the left-hand side of your screen. Here, we are editing the Name field at the top. We changed the format to ‘Simple’ using the dropdown.
We also made it optional by unchecking the ‘Required’ box.
The ‘How can we improve?’ box only appears if the user rates their experience as 1 star or 2 stars.
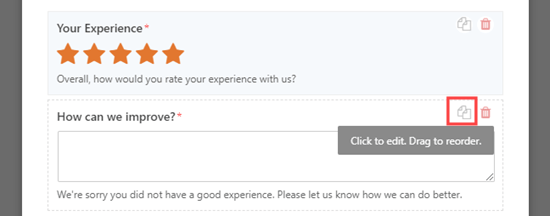
We’re going to add a new feedback box that will appear if the user rates their experience as 3 or 4 stars. To do this, simply bring your mouse cursor over the ‘How can we improve?’ box then click the Copy button:
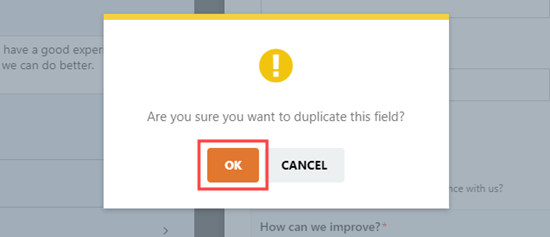
Next, WPForms will check that you want to duplicate the field. Go ahead and click the ‘OK’ button to continue:
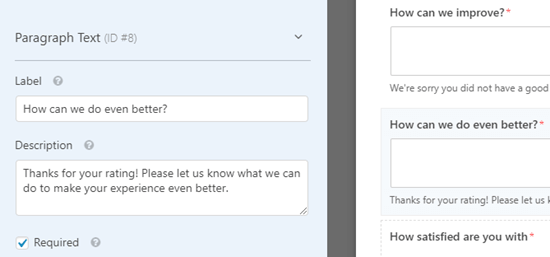
Now, you can edit your new field on the left-hand side of the screen. We have changed the label, which appears above the box. We also changed the description, which appears below the box:
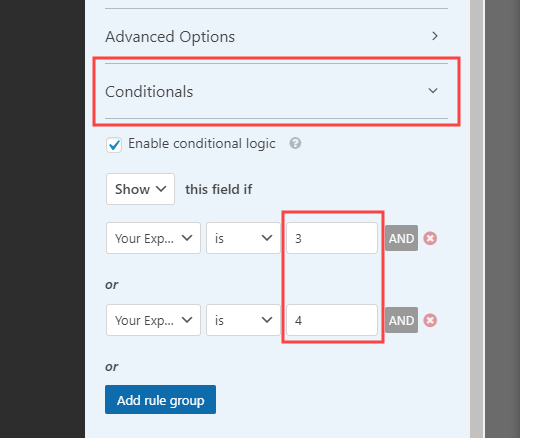
You also need to set the conditional logic for this field. To do that, click the Conditionals tab. Then, set the numbers to 3 and 4 instead of 1 and 2:
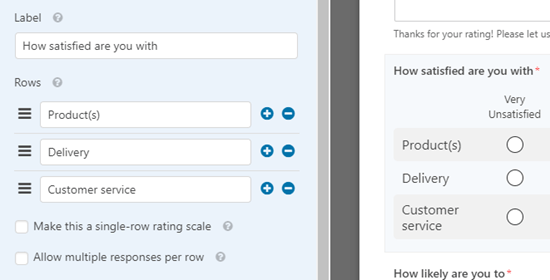
Finally, we are going to edit the ‘How satisfied are you with’ Likert scale. A Likert rating scale is a 5 or 7 point scale that is often used to measure satisfaction or attitudes.
Again, simply click on the field to edit it. Then, change the labels of the rows or columns to the text you want to use.
We are going to change the labels of the rows to make them more specific:
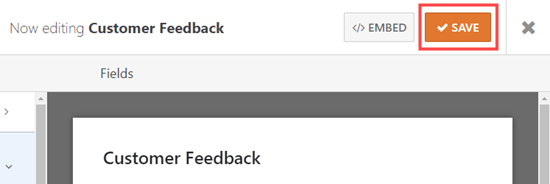
Go ahead and make as many changes to the form as you like. Don’t forget to click the ‘Save’ button at the top of the screen:
WPForms will send each completed questionnaire to the business email address that’s set in your website settings. It’s easy to change this by going to Settings » Notifications.
Simply delete the {admin_email} in the ‘Send To Email Address’ box and enter the email address you want to use instead:
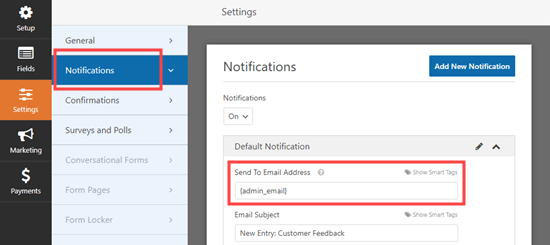
Tip: Not sure what your WordPress administration email is? Go to Settings » General and check what is listed in the ‘Administration Email Address’ box.
Don’t forget to save your questionnaire after making any changes.
You can add your questionnaire to any post or page on your website. You can even add it to your sidebar.
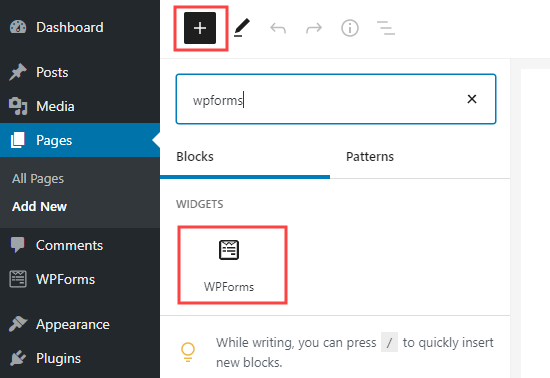
To add your form to a page, edit your page or go to Pages » Add New to create a new one. Then, click the + button to add a new block. Select the ‘WPForms’ block:
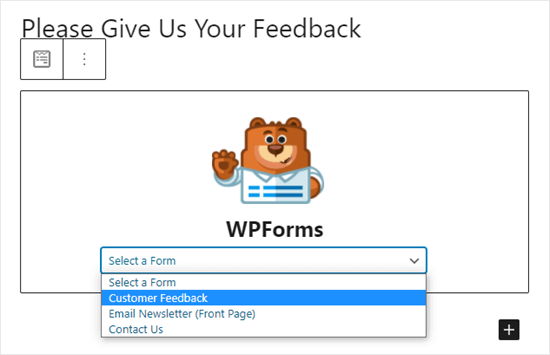
Next, simply click on the dropdown and select your questionnaire form.
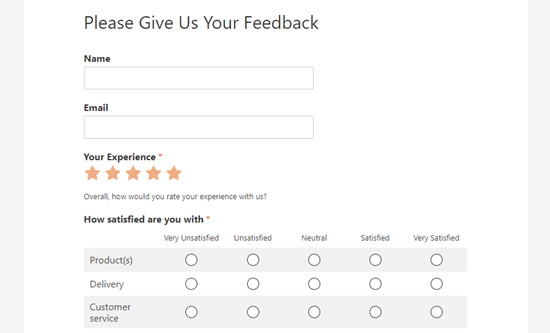
Now, simply preview or publish your post to see the form live on your WordPress website:
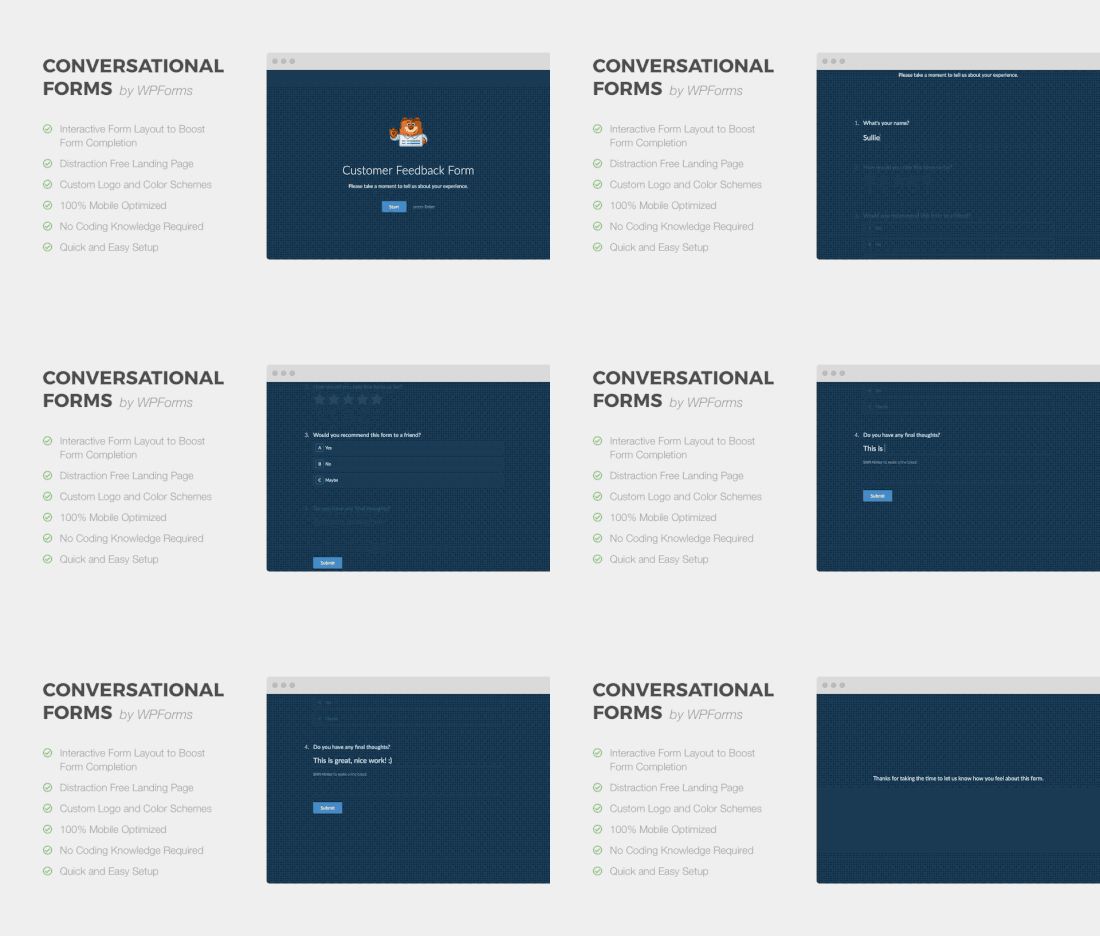
You can also use WPForms’ conversational forms feature.
A conversational form is an interactive form that flows like a conversation. Users answer a question and it automatically shows them the next one.
It makes longer forms like a questionnaire easier to fill out and reduces form abandonment.
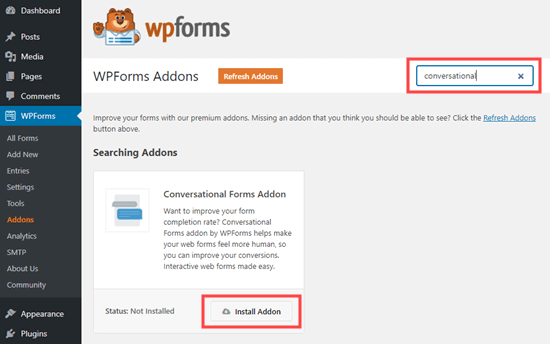
First, you need to go to WPForms » Addons in your WordPress admin. Then, search for and install the Conversational Forms addon:
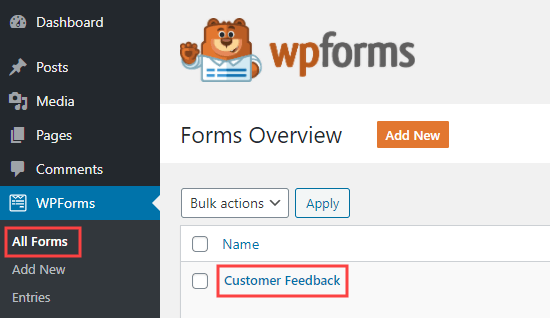
After that, go to WPForms » Add New and create a new form using the instructions in the previous method.
If you already created your form, then simply go to WPForms » All Forms page and click on it to edit it:
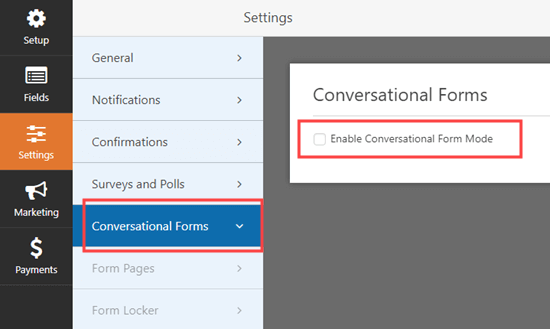
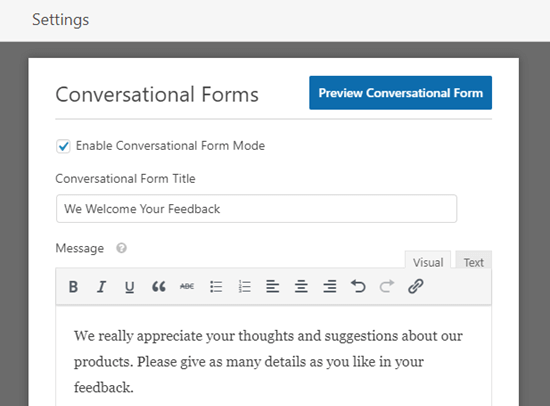
Now, we are going to convert your form into a conversational form. First, go to the Settings » Conversational Forms tab. Then, simply check the ‘Enable Conversational Form Mode’ box.
You will then see a number of extra options to fill in. Conversational forms can’t be embedded in a post or page, so you need to give your form a title here. You can also write any text that you want to display above the form:
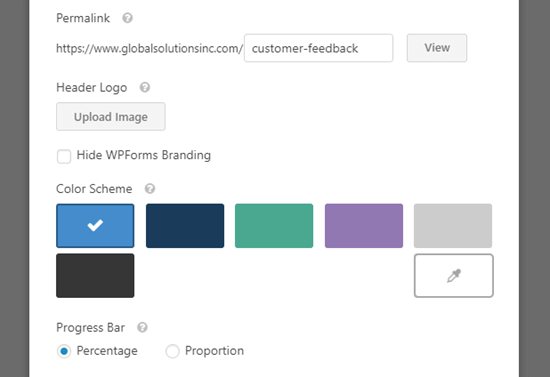
WPForms will automatically create a URL for your conversational form based on the form’s name. If you want to change this, simply type in a different URL here.
Optionally, you can also upload a header image, choose a color scheme, and change the Progress Bar style.
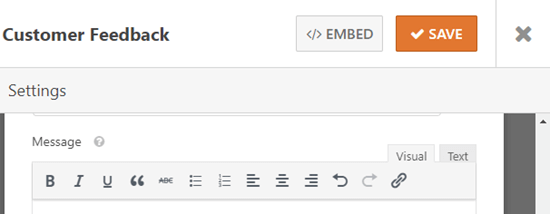
Once you are happy with your form’s settings, don’t forget to click the ‘Save’ button at the top of the screen:
Now, click the ‘View’ button next to the permalink for your form to see it live on your site:

The customer simply clicks the Start button to begin the form.

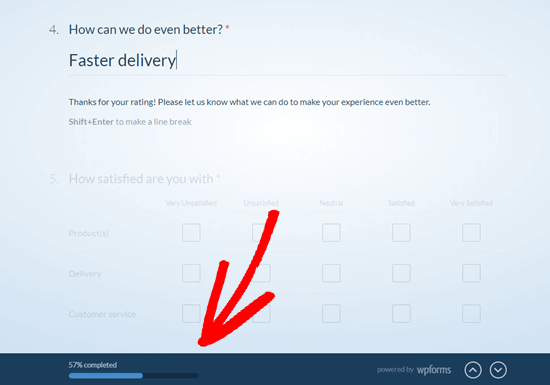
They can then enter their responses one question at a time. The questions that aren’t active will be faded out until the customer moves to them.

The sticky progress bar at the bottom of the screen will show how far through the form the customer is:
That’s it. You’ve successfully created your conversational questionnaire.
Whether you created a regular survey or a conversational form, the process for viewing the results is the same.
Each questionnaire response will be emailed to the email address you set up under Settings » Notifications.
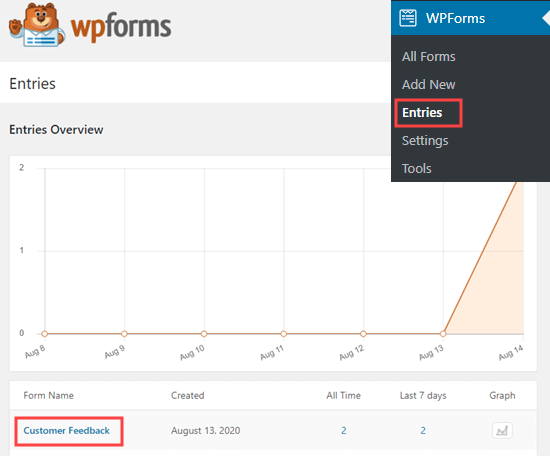
WPForms also stores all your survey results in your WordPress database. To view them, go to WPForms » Entries in your WordPress dashboard. Then, click on the name of your survey form:
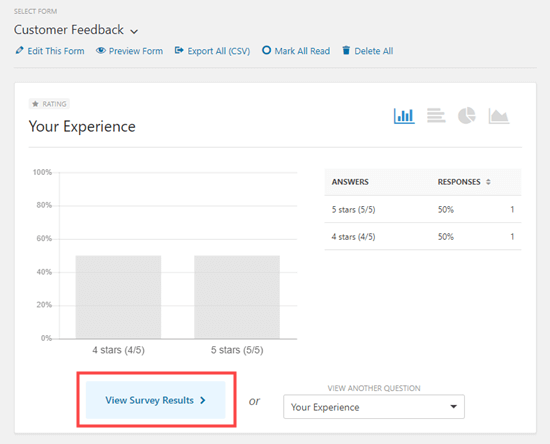
You will then see some of the answers from your questionnaire. Simply click the ‘View Survey Results’ button to view all the questionnaire results.
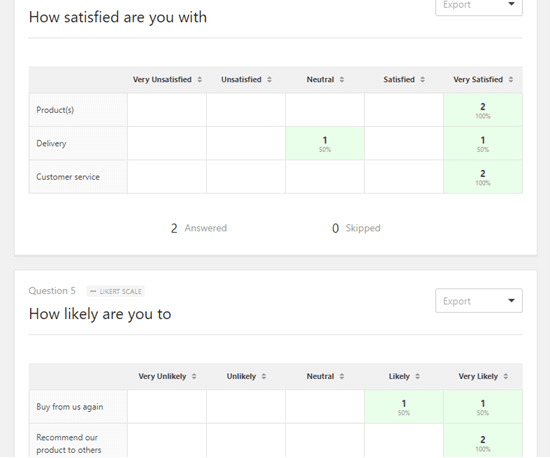
WPForms will automatically create graphs and charts to make it easy to interpret the results:
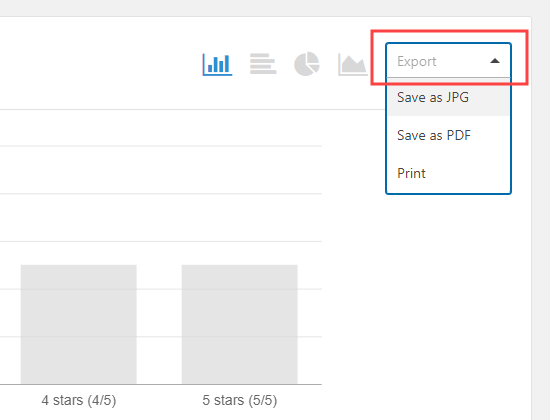
It’s easy to export any of the graphs as a PDF or JPG. You can even print them to share with others in your organization. Just click the ‘Export’ link next to any item and choose from the dropdown menu:
You can also download all your results as a CSV file. Just click the ‘Export All (CSV)’ button near the top of the page to download all the results:
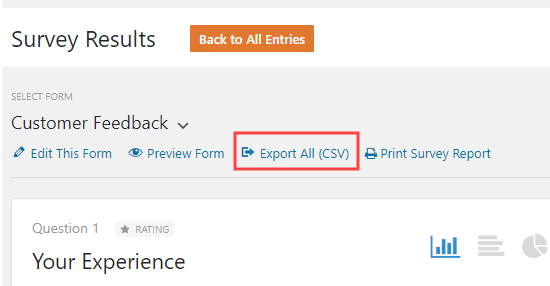
If you want to view the questionnaire answers from individual customers, then click the ‘Back to All Entries’ button at the top of the screen:

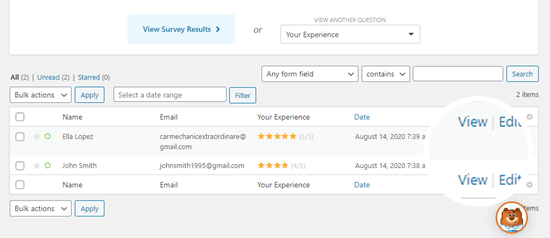
Next, scroll down to the table at the bottom of the screen. Click the ‘View’ button for the entry you want to see:
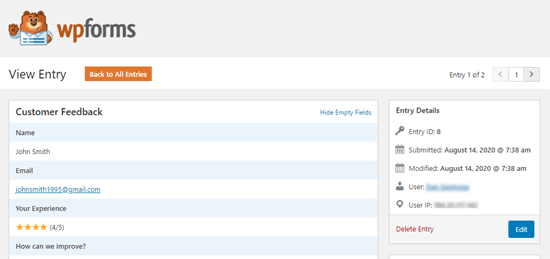
You will now see all the answers submitted by that person.
We hope this article helped you learn how to create a questionnaire in WordPress. You might also enjoy our articles on the best email marketing services and how to start an online store.
If you liked this article, then please subscribe to our YouTube Channel for WordPress video tutorials. You can also find us on Twitter and Facebook.
The post How to Create a Questionnaire in WordPress (Easy Way) appeared first on WPBeginner.
According to 99 Firms, there are somewhere between 12 and 24 million eCommerce sites, with ... Read More
The post Setting a Solid Marketing Foundation for Your eCommerce Store appeared first on WPArena.
In 2020, a whopping 35% of the Internet is powered by WordPress, which means over 455,000,000 websites are using WordPress as their platform. The reason why WordPress is so popular is because of its ease of installation, ability to customize everything, its safety features, and ease of use for beginners. One of the most distinctive features […]
The post 7 Tips on Choosing WordPress Themes for Your Website appeared first on WPArena.
According to BreexyHill Marketing, 81% of people conduct some sort of online search before they make a large purchase. This means brands must be visible if they are to attract such buyers. Businesses have, therefore, learned the importance of SEO to improve the search engine ranking of their websites. But is that enough in such […]
The post Proxies & SEO – Efficient Monitoring appeared first on WPArena.
If you are a blogger or an affiliate marketer or a site owner that is looking for a content planning system that can streamline their site content, then you are reading the right review. Source: PublishPress website Introducing PublishPress Plugins PublishPress is a great plugin for WordPress teams to easily manage the workflow and organize content […]
The post PublishPress Review – Content Planning System Every Blogger Needs appeared first on WPArena.
Do you want to organize WordPress files in the media library folders?
By default, WordPress automatically creates folders in the media library based on year and months. However, some users may want to create their own custom folders for different media files.
In this article, we’ll show you how to easily organize WordPress files in custom media library folders.

Normally, WordPress stores all your images and other media files in the /wp-content/uploads/ folder. To keep it structured, all files are stored in folders organized by year and month.
https://example.com/wp-content/uploads/2020/07/
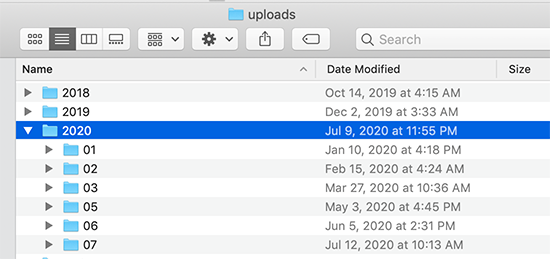
This works perfectly for most websites. However, some users may want to get better control on how WordPress stores media files.
For instance, a photography website may want to organize WordPress images by topic, location, or event folders. Similarly, a portfolio website may want to organize their media uploads by type, client, industry, and more.
This allows them to easily browse their media files. At the same time, it improves image SEO, as you can now add keywords in your image file URLs which makes URLs more meaningful.
Having said that, let’s take a look at how to easily create folders to organize your WordPress media files.
First, you need to install and activate the Media Library Folders plugin. For more details, see our step by step guide on how to install a WordPress plugin.
Note: The free version of the plugin only lets you create up to 10 folders. You will need to upgrade to the pro version if you want to make more.
Upon activation, the plugin will add a new menu item labeled ‘Media Library Folders’ in your WordPress admin sidebar. Clicking on it will open plugin’s folder view showing all the folders inside your WordPress upload directory.
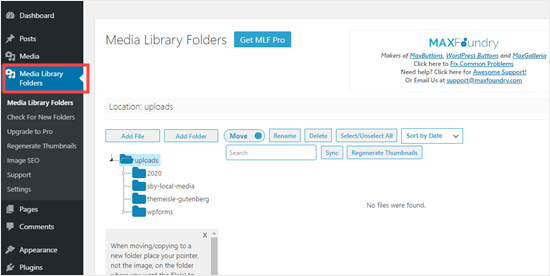
From here, you can create new folders and add files to them. You can also move, copy, rename, or delete your files.
We’re going to create some new folders and add images to them.
To create a new folder, simply click the ‘Add Folder’ button and then type in the name you want to use for that folder.
Tip: You cannot use spaces in folder names. Instead, use hyphen or underscore to separate words if needed.
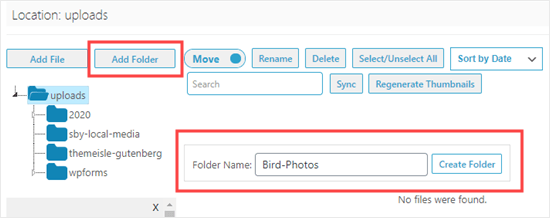
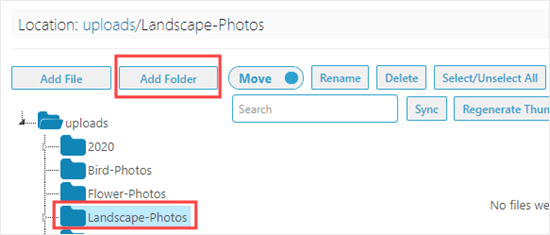
It’s also possible to make subfolders within folders, if needed. To create subfolders, simply click on the parent folder to select it, and then click on the ‘Add Folder’ button.
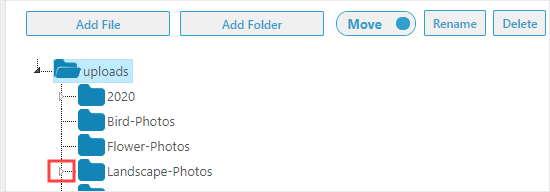
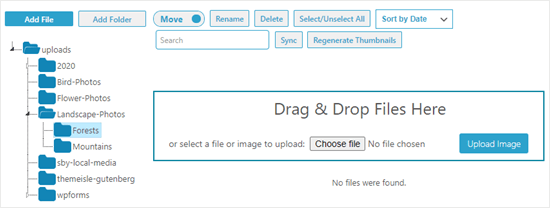
We created two subfolders for our ‘Landscape-Photos’ folder. They are ‘Forests’ and ‘Mountains’. To view a subfolder, you need to click on the small arrow to the left of the main folder:
To add files to your folders, simply click on the folder then click the ‘Add File’ button. After that, go ahead and upload as many files as you want.
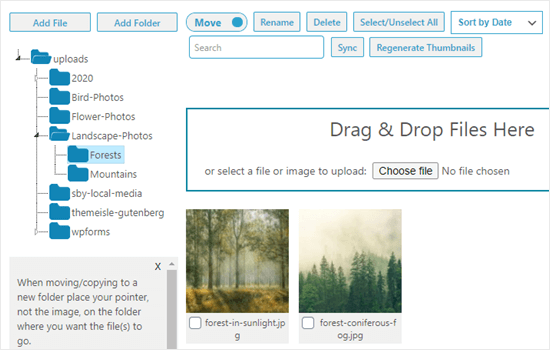
Once you’re done uploading files, you’ll see them on the screen as thumbnails with the filename below:
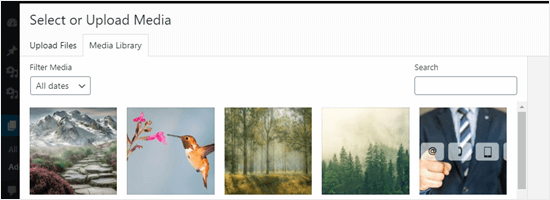
It’s easy to add your uploaded files to your posts or pages. You can add them just like any other files that you’ve uploaded to the media library:
What if you need to move a file to a different WordPress media library folder? It’s easy to move it or copy it using Media Library Folders.
Moving an Image to a New Folder in the Media Library
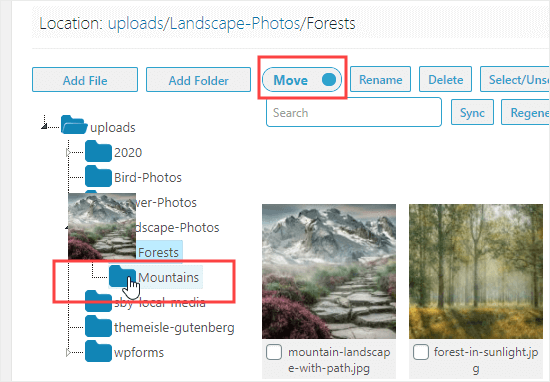
To move an image or any other file, simply check that the move/copy toggle is set to ‘Move’ and then drag the image to the correct folder.
Tip: Your mouse pointer should be on the new folder, as shown below. The small thumbnail of the image is just showing you what you’re moving, not where you’re moving it to.
In this example, a mountain image was incorrectly placed in the Forests folder. We are moving it to the Mountains folder.
Copying an Image to a Different Folder in the Media Library
To copy an image, set the move/copy toggle to ‘Copy’, then go ahead and drag the image as before. Here, we are copying an image of a bird and flower, so that it’s in both the ‘Bird-Photos’ and the ‘Flower-Photos’ folders.
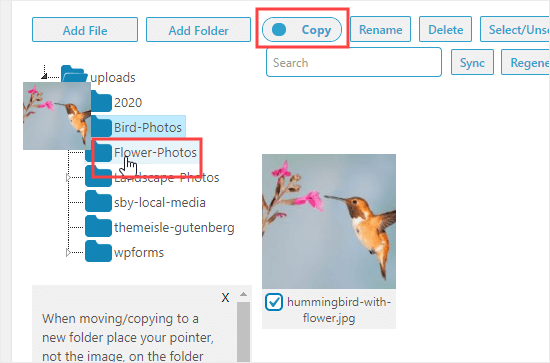
This time, your original image will stay in place. Your image will be duplicated so that it can be present in both folders.
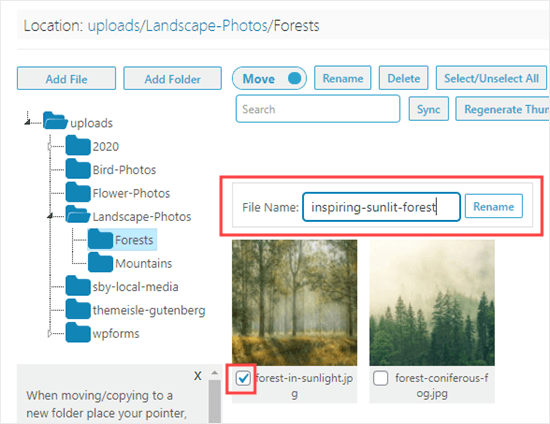
You can easily change the filename with the Media Library Folders plugin. First, find the file you want to change and click the checkbox below it. Next, click the ‘Rename’ button at the top of the screen.
After that, type in the filename you want to use. Image filenames can have a small impact on your WordPress SEO, so it’s recommended to use keywords within them. Here, we’ve changed the file name for a post on inspiring forest images:
You cannot rename or move a folder in Media Library Folders. However, it’s possible to create a new folder, move all the images into it, then delete the old folder.
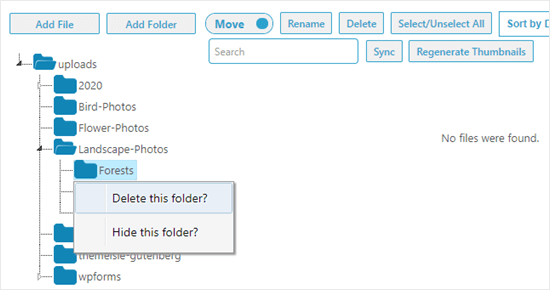
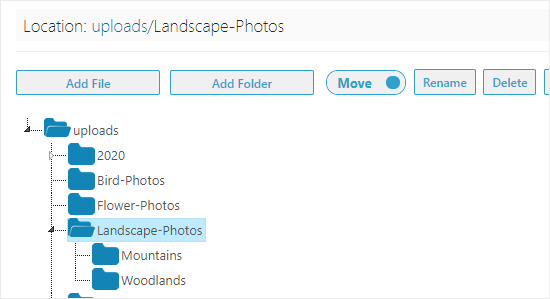
To delete a folder, right click on it, and then click ‘Delete this folder?’ button. Here, we’ve moved the forest images into a new folder called Woodlands, and we’re deleting the Forests folder:
You’ll then see a message prompting you to confirm. Click ‘OK’ to continue and the folder will be deleted. You’ll no longer see it in the list:
Tip: You may see the message ‘This folder is not empty and could not be deleted’ even though the folder looks empty. Simply click the ‘Sync’ button. WordPress may have created additional versions of your images that need deleting. After syncing, you’ll be able to review and delete those images.

We hope this article helped you learn how to organize WordPress files in media library folders. You might also want to check out our articles on fixing common image issues in WordPress and other must have WordPress plugins for business websites.
If you liked this article, then please subscribe to our YouTube Channel for WordPress video tutorials. You can also find us on Twitter and Facebook.
The post How to Organize WordPress Files in Media Library Folders appeared first on WPBeginner.
An intake form is a phenomenal form that permits you to get the hang of the customer’s needs. It causes you to decide if your business is equipped for going to the customer’s necessities or not. The intake form lets you assemble the information that you have to begin chipping away at a particular venture. […]
The post 5 Tips to Create a Client Intake Form appeared first on WPArena.
Communication is the glue that keeps teams and organizations together. When communication is done correctly, team members can work seamlessly with each other, and the organization as a whole can grow exponentially. More and more businesses are now setting up their own intranet website to allow team members to share information and documents, communicate with […]
The post 4 Tips on Building an Effective Intranet Website Using WordPress appeared first on WPArena.
Do you want to hide the title of a WordPress widget in your sidebar or footer?
WordPress widgets make it easy to drag and drop dynamic content into your theme to create unique layouts. However if you need to hide the widget title, then it typically requires coding knowledge of CSS and HTML.
In this article, we’ll show you how to easily hide the widget title in WordPress (without any code).
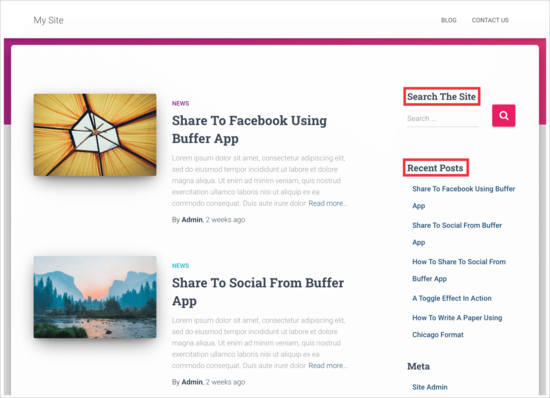
WordPress displays a default title for widgets, and it also allows you to rename them if you want. Most top WordPress themes will then display this title in the sidebar on your site.
However, sometimes you may not want to display the widget title in the WordPress blog sidebar. By default, there is no built-in option to simply switch off widget titles.
That being said, let’s take a look at how you can easily hide the widget title in the WordPress sidebar.
First, you want to install and activate the Widget Options plugin. For more details, please see our complete guide on how to install a WordPress plugin.
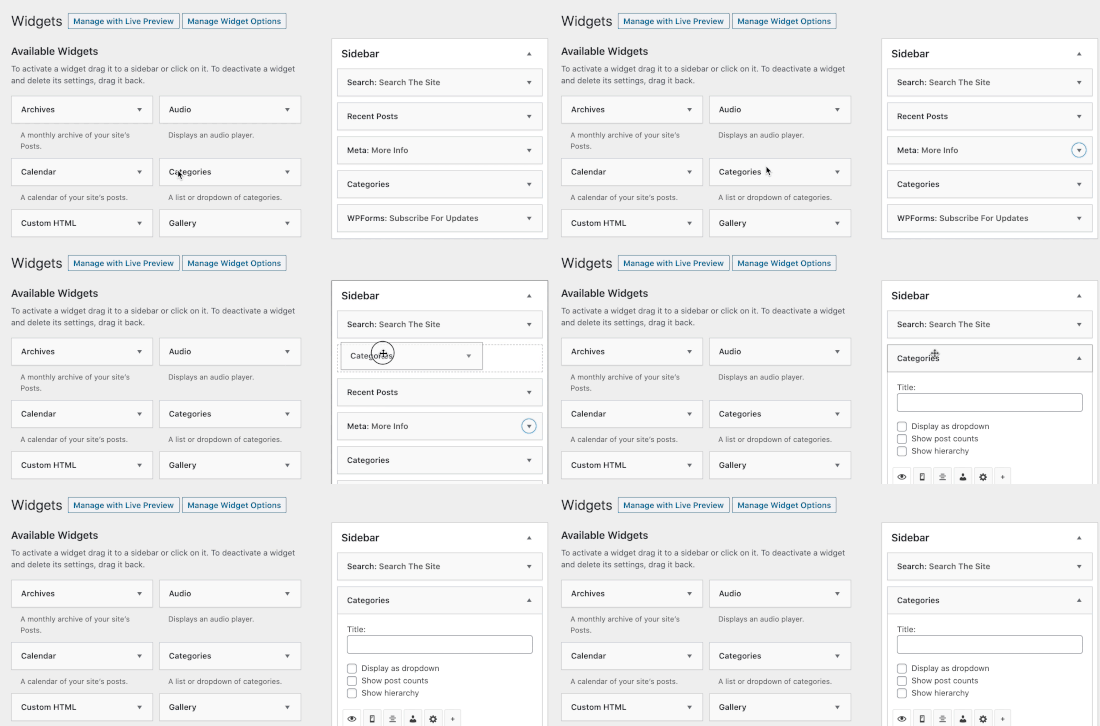
Once the plugin is activated, head over to Appearance » Widgets area in your WordPress admin area. Next, drag and drop a widget to your sidebar or any other widget-ready area on your site.
In this example, we’re going to remove the widget title ‘Search The Site’ from our search box in the sidebar.
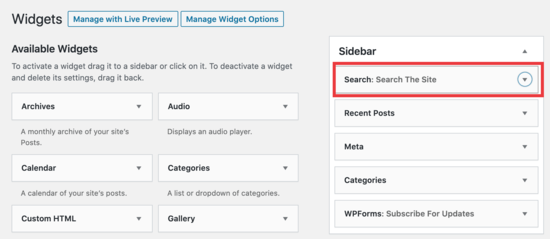
Simply click the arrow to open the widget and view the options to hide the title.
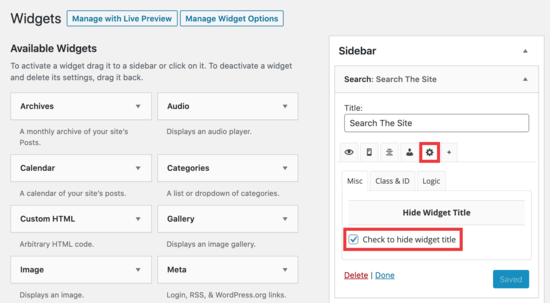
Make sure you click on the ‘gear’ icon, and then check the box next to ‘Check to hide widget title’ and click the ‘Save’ button.
Now, when you view your site, the WordPress search box will appear without the widget title.
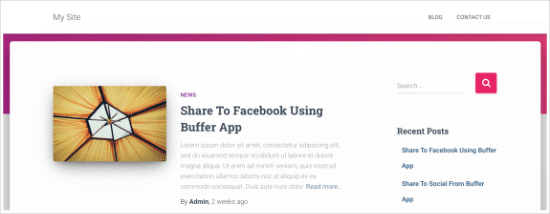
You can use this plugin to hide any widget title. The plugin also comes with multiple settings to hide or display titles based on page or post types and even screen sizes.
We hope this article helped you learn how to easily hide widget titles in WordPress. You may also want to check out our list of the most useful WordPress widgets for your site, and our comparison of the best drag and drop WordPress page builder plugins.
If you liked this article, then please subscribe to our YouTube Channel for WordPress video tutorials. You can also find us on Twitter and Facebook.
The post How to Easily Hide Widget Title in WordPress appeared first on WPBeginner.
Knowing that you can develop a certain product, an idea, or a service that no one else yet was able to come up, is reason enough to celebrate. But, having your own product or service...
The post How Important is a Domain Name for Your Online Business appeared first on 85ideas.com.
Most successful businesses create landing pages that are designed specifically for conversion and making a good first impression on customers. Landing pages are a significant Aspect of your website, and if you create your pages correctly, you can increase conversions by up to 300%. However, there are many different types of landing pages and all […]
The post 4 Different Types of Landing Pages and How to Use Them appeared first on WPArena.
Have you ever needed to set up delivery time slots for your online store?
Creating delivery time slots allows you to keep up with customer demand for more convenient delivery. At the same time, it also allows you to create a more manageable schedule to match your delivery capacity.
In this guide, we’ll share our step by step process on how to easily set up delivery time slots in WooCommerce.
Delivery slots allow customers on an online store to select a specific time and date ‘slots’ for delivery.
This convenient delivery model allows customers to know exactly when they’re going to receive their goods, which in turn increases customer satisfaction and confidence in your brand.
For store owners, offering specific delivery time slots for customers can drastically reduce non-deliveries. As a result, you can save money on delivery costs and make your store more profitable.
On a smaller scale, offering delivery or collection slots to customers allows store owners to manage their schedule and optimize delivery times. They can complete more orders quickly and deliver them on-time.
With that in mind, let’s take a look at how to easily add delivery or collection time slots in WooCommerce.
For this tutorial, we’ll be using the WooCommerce Delivery Slots plugin. It is a powerful plugin that adds the essential date and time-based features to the default WooCommerce delivery functionality.
First, you need to install and activate the WooCommerce Delivery Slots plugin. For more details, see our step by step guide on how to install a WordPress plugin.
Upon activation, you need to visit WooCommerce » Delivery Slots page in your WordPress dashboard.

Next, you need to select the General Settings tab. From here you can change where to display the date and time fields and which shipping methods to offer.
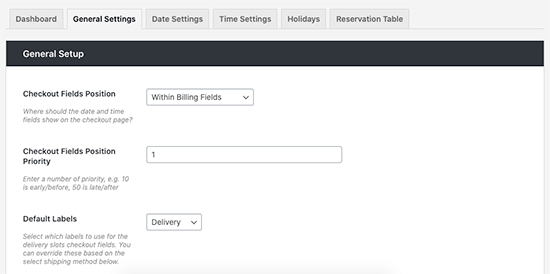
After that, switch to the Date Settings tab. On this screen, you can select the days of the week you’ll be offering delivery slots. You’ll also be able to add a maximum number of orders per day, set additional fees for same-day or next-day delivery, and more.

Now you can switch to the Time Settings tab to create your delivery time slots.
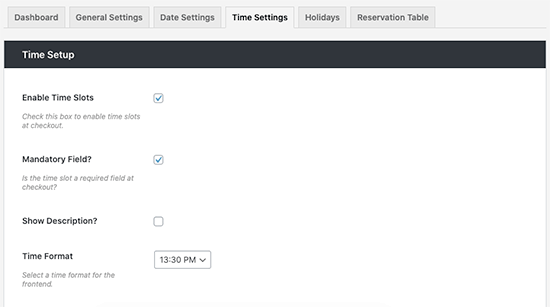
Make sure to ‘Enable Time Slots’ is checked and scroll down to the ‘Time Slot Configuration’ section to customize.
Here you’ll be able to fill the Slot Duration and Slot Frequency fields to dynamically generate slots. You can also leave them empty to create a single time slot.
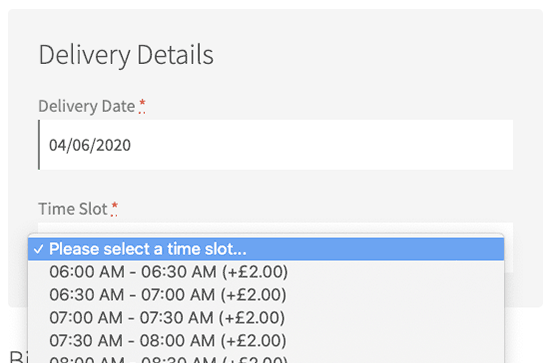
For this tutorial, we’re creating time slots every 30 minutes from 6 am – 10 am every day of the week. We’re also creating premium time slots every 30 minutes from 10 am – 12 p.m noon on Thursdays and Fridays which costs an extra fee.
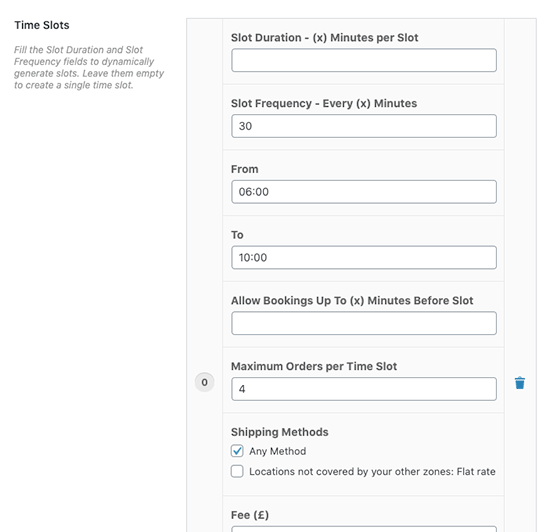
Tip: WooCommerce Delivery Slots allows you to fully customize your time slots, so you can add additional fees for certain slots, offer slots only for specific shipping methods, and set the maximum number of orders per slot.
Once you’re done creating your delivery time slots, go ahead and click Save Changes.
On the checkout page, your customers will now be able to select a delivery date and time slot to suit them.
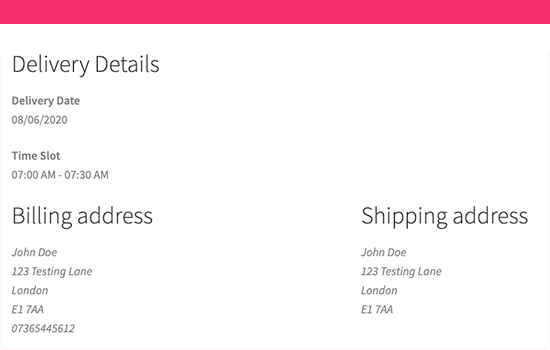
Once the customer has selected their time slot and purchased their items, they’ll be presented with an ‘Order received’ page after checkout.
This page contains a confirmation of their order, and the time slot they selected which will also be confirmed in their order email.
Tip: Make sure your WooCommerce email notifications are working. See our guide on how to fix WordPress not sending emails issue to set up and test your email notifications.
As the store owner, you will be able to see the selected delivery date in the orders overview and details. You can also go to WooCommerce » Delivery Slots » Deliveries page to see all deliveries.

The WooCommerce Delivery Slots plugin also allows you to enable delivery reservation. This enables customers to reserve a delivery slot in advance.
Simply go to WooCommerce » Delivery Slots page and switch to the ‘Reservation Table’ tab.
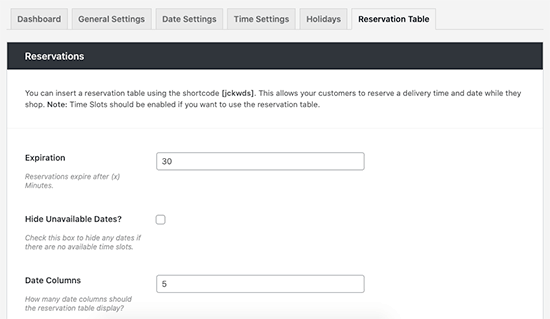
From here you’ll be able to adjust the settings for your table including setting limits on how long a reservation lasts before a purchase is made and changing its style to suit your store.
Once happy, click Save Changes and copy the shortcode [jckwds] at the top of this settings page.
You can now add this shortcode to any page in your site to allow customers to reserve their delivery time slot before purchase.
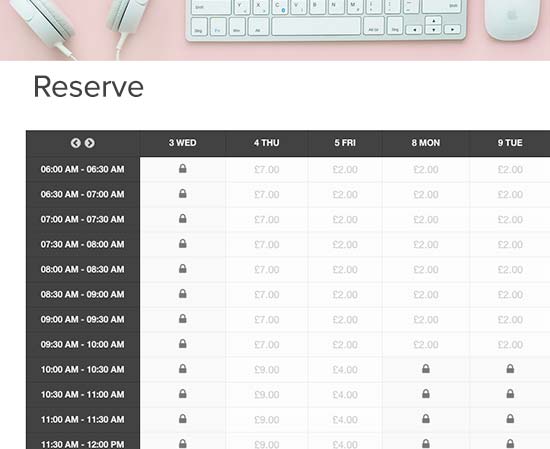
We hope this article helped you learn how to easily set up delivery time slots in WooCommerce. You might also like our list of the best WooCommerce plugins for your store and best email marketing services to grow your sales.
If you liked this article, then please subscribe to our YouTube Channel for WordPress video tutorials. You can also find us on Twitter and Facebook.
The post How to Setup Delivery Time Slots in WooCommerce (Step by Step) appeared first on WPBeginner.
As the saying goes behind every successful brand is a strong foundation. When it comes to websites, a strong foundation means partnering with a powerful WordPress hosting service company. With the increased number of hosting...
The post 10 Cheap WordPress Hosting Services in 2021 appeared first on 85ideas.com.
According to a 2019 LinkedIn survey, roughly half of employees work from home at least one day a week, while 82% want to have the option of doing so. There are plenty of companies that offer flexible work arrangements already, including Amazon, Lionbridge, Dell, Hilton, Working Solutions, Williams-Sonoma, Xerox, Salesforce, and American Express. Whether you’re […]
The post 7 Tips for Negotiating a Work-from-Home Arrangement with Your Boss appeared first on WPArena.
Living in a digital era, one can not afford to lose data at the hands of natural disasters, human error, or cyber-attack, which makes it necessary to have backup and disaster recovery plans. In short, these plans keep the businesses safe whenever any trouble occurs. Losing data for every business is bad, but the small […]
The post What Is The Importance Of Having Backup And Disaster Recovery Plans For Small Business appeared first on WPArena.
Do you want to create a custom homepage for your WordPress site?
By default, the WordPress homepage displays your blog posts, but you can edit it to show something different. For example, your homepage could be a landing page that highlights your products and services.
In this article, we’ll show you how to easily edit and customize your WordPress homepage.

Your homepage is the ‘front page’ of your WordPress website. It’s the first page that shows up when a user visits your domain name.
For instance, if you type in www.wpbeginner.com into your browser, the page you land on is our website’s homepage, where you can see our latest blog posts:

If you’ve decided to create a blog, then it makes perfect sense to just show your blog posts on the homepage.
But what if you’re using WordPress to build a small business website or even to run an online store? In those cases, you may prefer to highlight your products or promotions on your homepage.
Here’s a business website homepage example from OptinMonster, the best WordPress popup plugin out there. Their site has a great blog, but that isn’t the focus of their homepage. Instead, they’ve got a really clear call to action.

Perhaps you’ve already tried to set a custom page as the homepage in WordPress, but you’re struggling to make it look right.
If that’s the case, then you’re in the right place.
We’re going to take you step by step through setting up a homepage and customizing it to match your needs. That way, you can make a great first impression and encourage your visitors to take the actions that are most important to your site’s mission.
That might mean buying a digital product from you, signing up to join your membership site, or donating to your fundraising campaign.
We’re going to cover a few different methods that you can use to create your custom WordPress homepage.
You can use these quick links to jump straight to the different parts of the tutorial:
Some of the best WordPress themes will create a homepage design for you, and provide options so you can easily edit it.
You can find these options by visiting Appearance » Customize on the admin sidebar. This will launch the WordPress theme customizer with a live preview of your theme.

The Theme Customizer will have different options for different themes. Your preview and the available options may look different depending on the theme you are using. We’re using the free Hestia theme in this example.
To edit any part of the homepage, simply click the blue pencil icon next to it. Here, we’re editing the image, text, and button at the top of the homepage.

Note: As soon as you make edits, they’ll be shown in the preview of your site. Those changes won’t be live on your site until you publish them.
If you want to remove a section from the homepage, then you just need to click the blue eye icon in the top left corner of that section.

You can also remove sections and add them back in using the ‘Frontpage Sections’ tab.
Once you’re happy with your homepage, you need to click the ‘Publish’ button to make it live.

Here’s how our homepage looks, live on the website:

Using your theme’s built-in options is the quickest way to set up your homepage. However, some themes may not have many options, or you may not be satisfied with how your homepage looks.
Don’t worry, there are plenty of other ways for you to edit your homepage and give it the look you want.
The WordPress block editor is a simple way to create a custom homepage, although it’s limited by your theme’s design.
To use the block editor, simply go to the Pages » All Pages screen and edit the ‘Home’ page that you created earlier.

Now you can start creating the content for your page.
In this part of the tutorial, we’ll be using a few simple blocks to create a basic homepage.
First, we’ll add a welcome message to the page. You can do this by simply clicking on the page to start typing. WordPress will automatically create a paragraph block for you.

If you want to make the text larger, then it’s easy to do that in the block settings on the right hand side. Just click on one of the preset sizes, or you can click on the ‘Set custom size’ icon and type any size you like.
You can also change the color of your text, using the ‘Color’ options for the text or background.

Next, we’ll add an image to the page. You can do this by clicking the (+) symbol and then selecting the Image block.
You’ll find it in the Media section, or you can search for it using the search bar.

You can pick an image from your media library or upload a new one.
Next, we’ve added another paragraph block, with the text ‘Check out our latest posts here’.
We’ve then added a ‘Latest Posts’ block, which we’ve set to show the post excerpt and featured images, as well as the post titles. You can find out more about the Latest Posts block in our tutorial on displaying recent posts in WordPress.

You can add as many blocks as you want to your homepage. You may also want to use a ‘full width’ or ‘no sidebars’ template for your page if your theme has one.
For example, when using the Astra theme, you can customize the layout of the page from the Astra Settings pane. Other themes may provide a section in the Document settings pane.

Once you’re happy with your homepage, you should click the ‘Update’ or ‘Publish’ button on the top right of the screen to push your changes live.
Here’s how our finished homepage looks:

What if you want to go further with your homepage? One option is to try some of these best block plugins for WordPress to add new functionality, such as a contact form, testimonials, reviews, and more.
Another great option is to use a more powerful theme builder or page builder for WordPress to create something that looks gorgeous and professional.
In the next parts of this tutorial, we’ll cover SeedProd, a theme builder, and Divi by Elegant Themes, a page builder.
The easiest way to edit your homepage is by using SeedProd. It’s the best WordPress theme builder plugin and can create beautiful website layouts and custom templates without writing any code.
You can use SeedProd to create a fully custom WordPress theme, including a custom homepage template.
Note: There is a free version of SeedProd, but you will need the Pro version to access the theme builder and edit the homepage template.
First, you need to install and activate the SeedProd plugin. For more details, see our step by step guide on how to install a WordPress plugin.
Upon activation, you need to enter your license key. You can find this information under your account on the SeedProd website.

After that, you can use SeedProd to easily create a WordPress theme, including a completely custom homepage from scratch.
Creating a Custom WordPress Theme
You can create a new theme in SeedProd by navigating to the SeedProd » Theme Builder page. Here, you’ll use one of SeedProd’s ready-made themes as a starting point. This will replace your existing WordPress theme with a new, custom design.
You can do that by clicking the ‘Themes’ button.

You will be shown a list of professionally designed themes that are designed for different types of websites. For example, there are templates called ‘Modern Business’, ‘Marketing Agency’, and ‘Mortgage Broker Theme’.
Take a look through the options and select one that best matches your needs by clicking the checkmark icon. For this tutorial, we’ll choose the ‘Digital Strategy’ theme.

Once you have chosen a theme, SeedProd will generate all the theme templates you need. It will include a template for your static homepage, as well as one for your blog’s index page.
Editing the Homepage Template
SeedProd makes it easy to edit any of these templates using a drag and drop page builder.
Simply click the ‘Edit Design’ link found under the ‘Homepage’ template. This will open the template in SeedProd’s visual editor.

This simple drag and drop builder will show a live preview of your page to the right and a toolbar on the left. You can add new blocks by dragging them onto the page, rearrange them by dragging them up and down with your mouse, and customize any block by clicking on it.
Notice that the template has already provided an attractive layout and added plenty of relevant content on the page. Now you just have to edit it to suit the purpose of your website.
When you hover your mouse over a block, a toolbar will appear.

If you click on the block, then you can adjust its settings in the left pane.
For example, when you click on the headline, you can edit the text, change the alignment, alter the font size, and more.

When you change a setting, you can immediately see it in the preview on the right.
For example, we’ll change the text to ‘All About WordPress’.

Once you’ve done this, you can click the ‘Blocks’ icon near the top of the settings page. This will return you to the Blocks view.
Next, we’ll edit the button text. You can click on the button labeled ‘What we do’ and edit the text to say ‘See the courses’.

Now we’ll scroll down our homepage until we come to the list of bullet points about the products and services you offer.
You can edit these in the same way, by clicking on a block and editing the text.

Your homepage should now look something like the screenshot below.
If you need to add more detail, then you can add another row of bullet points by clicking the blue ‘+’ icon at the bottom.

The SeedProd template may have included more sections than you can use. You can easily delete any blocks or sections you don’t need by simply clicking the trash icon.
For example, you can hover your mouse over the ‘Trusted By’ section of the homepage. Once the toolbar appears, you can click on the Trash icon to delete that section.

Near the bottom of the homepage there is a FAQ section. This was created using an Accordion block, which makes it simple to customize the questions and answers you want to include on your homepage.
When you click on the block, you are able to edit the text for each question and answer.

Once you have finished customizing your homepage, make sure you click the ‘Save’ button at the top of the screen. Then you can return to the list of templates by clicking the ‘X’ icon.
As you can see, SeedProd’s templates, drag and drop interface, and useful blocks make it ideal for editing your website’s homepage. For even more ideas, take a look at our guide on how to create a landing page with WordPress.
Editing the Blog Index Template
You can edit your blog index template in a similar way. You can learn how to do this by visiting our guide on how to create a separate page for blog posts in WordPress.
Using Method 2, you should scroll down to the section on customizing your blog page. Here you’ll learn how to add new blocks using drag and drop, and how to change the settings for each block on the page.

We’ll show you how to edit the Posts block to list your posts in multiple columns and display or hide the featured image for your posts.
There are settings for how many posts to display, and whether to show a post excerpt. You can also filter the index by post type, category, tag, or author, and change the sort order.
Enabling the SeedProd Theme
Once you have finished customizing the theme templates, you will need to publish the new custom theme. Simply toggle the ‘Enable SeedProd Theme’ setting to the ‘YES’ position.

If you haven’t already changed your WordPress Home and Blog page settings, then you’ll see a notification message. When you click the ‘OK’ button these settings will be changed for you.
You can now visit your website to view your new home page.

Divi is a popular WordPress page builder plugin. It comes with a WordPress theme and a page builder plugin with dozens of gorgeous templates.
You can use the Divi page builder with any theme. For this tutorial, we’re going to use it with the Divi theme.
First, you’ll need to download, install, and activate the Divi theme from Elegant Themes. This includes the Divi builder, so you don’t need to install it separately. You will need to enter your username and API key under Divi » Theme Options » Updates in order to access the layout packs.
If you need help installing the theme, then take a look at our step by step guide on how to install a WordPress theme.
Once you’ve got the Divi theme and page builder up and running, you can set up your homepage. First, go to the Pages menu in your WordPress dashboard and then edit the homepage we created earlier.
Before you start editing your homepage, it’s a good idea to switch to the ‘Blank Page’ template under the ‘Template’ panel on the right. That way, your homepage won’t have a sidebar, title, menu, or any other default elements.

Next, you can click the ‘Use The Divi Builder’ button at the top of the screen.
Now, you’ll need to click the ‘Edit With The Divi Builder’ button in the center of the screen.

You should now see the Divi Welcome Screen. It includes a video tutorial on how to use Divi, a brief description of how to get started, and buttons to either start building your page or take a tour of Divi’s features.
We’ll click the ‘Start Building’ button at the bottom of the page.

Next, you’ll see a range of options you can use to create your page. We suggest using a premade layout as the basis for your homepage. This makes it really quick and easy to get your homepage set up.

Divi has an impressive range of different layouts to choose from. There are hundreds of different layout packs, and each of these has several different page layouts including homepages.
You can search through these by typing in a search term, or you can check the boxes to view only layouts that fit certain categories.

We’re going to use the ‘Travel Blog’ layout pack to create our homepage.
First, click on the pack that you want to use:

Next, you’ll see a description of the layout pack, plus the different page layouts that are available. You’ll probably want to use the ‘Home’ page or ‘Landing’ page for your homepage. We’re going to pick the ‘Home’ option.
Once you’ve chosen your layout, click the ‘Use This Layout’ button at the bottom of the page.

Divi will automatically import the layout for you. You’ll then see it live on your page, exactly as it’ll appear on your site. To edit any part of it, simply click on it.
Divi uses a system of rows (split into columns) and modules to create your page. With text modules, you can click on the text and type in whatever you want straight onto the screen.
Here, we’ve changed the header and the text below it:

With other modules, you can bring your mouse cursor over them and click the ‘Module Settings’ icon to edit them.
Here, we’re editing one of the number counters:

You can delete modules and rows in the same way, using the trash can icon.
You’ll likely want to use your own images on your homepage. You can change these by editing the module settings.
Note that the image at the top is set as the Background for a Fullwidth Header Module, so you’ll need to change it under Content » Background for that module:

Once you’re happy with the changes you’ve made to your page, you can click ‘Save’ at the bottom of the screen.

Sometimes the bottom row of buttons will be hidden.
If you can’t see them, then you’ll need to click the purple “…” button to open them up.

Here’s how our page looks live on the website:

By default, WordPress displays your blog posts on the homepage.
That means that after creating and customizing your homepage, you’ll need to tell your WordPress site to display that page when someone visits your domain.
Let’s take a look at how to set a separate homepage and blog page in WordPress.
Pro Tip: Do you already have visitors to your site? Then you might want to put your site into maintenance mode while you’re setting up your homepage. Alternatively, you could set up a staging site where you can create your homepage before publishing it live.
First, simply go to Pages » Add New and name your new page Blog. After that, you can go ahead and publish the blank page.

Once your homepage and blog page are ready, you need to tell WordPress to start using these pages.
You can do this by going to Settings » Reading page in your WordPress admin area. You need to select ‘A static page’ option under the ‘Your homepage displays’ section. After that, go ahead and select your home and blog pages.

Don’t forget to click on the ‘Save Changes’ button to store your settings.
WordPress will automatically display your latest posts on the blog page. For more details, you can see our guide on how to create a separate blog page in WordPress.
That’s it! You’ve created a great looking homepage in WordPress and set it up successfully.
We hope this tutorial helped you learn how to edit a WordPress homepage. You might also want to take a look at our guide on the must have WordPress plugins and our tips on how to improve WordPress SEO.
If you liked this article, then please subscribe to our YouTube Channel for WordPress video tutorials. You can also find us on Twitter and Facebook.
The post How to Edit a WordPress Homepage (Easily & Effectively) first appeared on WPBeginner.