How to Properly Setup Video SEO in WordPress (Step by Step)

Wp Plugins

Do you want to learn how to do video SEO in WordPress?

Video SEO is the process of optimizing your videos to rank higher in search engines. This can help you get more traffic from your video content back to your WordPress website.

In this article, we’ll show you how you can set up a video sitemap in WordPress to improve your video SEO, step by step.

How to do video SEO in WordPress

What is Video SEO?

Video SEO is the process of optimizing the videos on your site, so they’ll rank higher in the search results pages.

This is similar to general WordPress SEO best practices except it’s geared towards your video content.

There’s a lot you can do to optimize your videos before you embed them in your WordPress blog posts, like choosing the best video hosting.

However, once they’re live on your website, you need to make sure they’re going to bring you maximum traffic.

The best way to do this is by adding a video sitemap to WordPress.

A video sitemap is an XML sitemap that has information about the video content on your site.

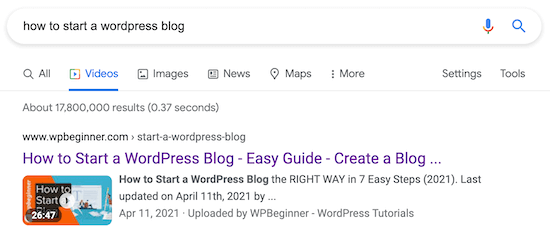
This can help you generate rich snippets that appear in the Google video search results, and increase your blog traffic across the board.

WordPress video SEO search results page

By creating a video sitemap, Google and other search engines will index your posts with the embedded video content. That way, your video can rank in the search engines and bring more traffic to your posts.

Note: if you use a third-party video host like YouTube, then your YouTube videos and embedded videos can both rank in the search results together.

If you regularly add videos in your posts and pages, then this is a must have feature.

A WordPress video sitemap plugin will automatically detect when a video is embedded in your blog content, and add that to the sitemap, so search engines like Google can prioritize it.

How to Setup Video SEO Sitemap in WordPress with AIOSEO

The best way to add video sitemaps to WordPress is with the All in One SEO plugin. It’s the best SEO plugin for WordPress used by over 2 million sites.

Google makes formatting these video sitemaps hard, but with the AIOSEO plugin it only takes a couple of clicks.

First thing you need to do is install and activate the plugin. For more details, see our guide on how to install a plugin in WordPress.

Note, there is a free version of All in One SEO available. But you need the premium version to enable and create video sitemaps.

After the plugin is activated, you’ll have a new All in One SEO menu item in your WordPress dashboard.

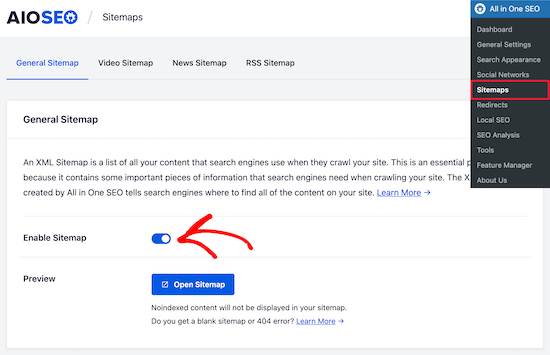
Navigate to All in One SEO » Sitemaps.

On the home screen, make sure that sitemaps are enabled. Click the ‘Enable Sitemap’ slider to turn on sitemaps.

AIOSEO enable sitemap

After that, select the ‘Video Sitemap’ menu option at the top of the screen.

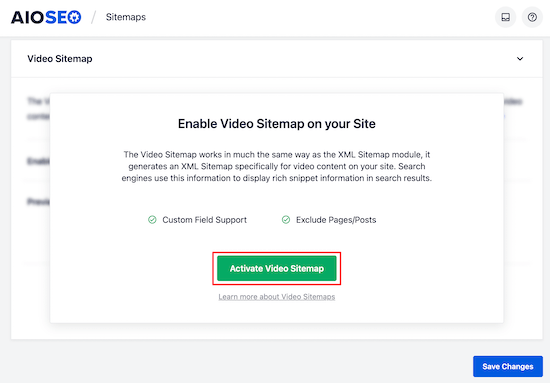
Next, click the ‘Activate Video Sitemap’ button to enable the video sitemap module.

Activate video sitemap module

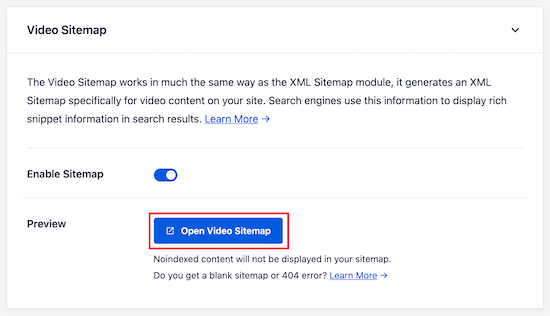
Once you’ve done that, you can view your video sitemap by clicking the ‘Open Video Sitemap’ button.

The index page will list all of your available video sitemaps.

Open video sitemap

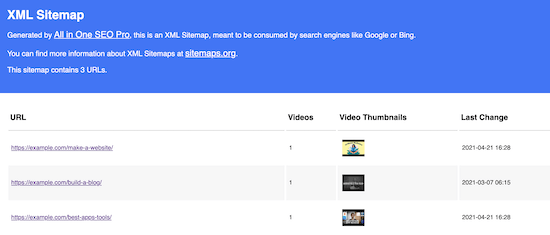
When you click on the sitemap link, it’ll show the list of available video content.

Here we can our example WordPress video sitemap contains a list of all blog posts that have an embedded video.

Video sitemap video list

You can further configure your video sitemap settings in the ‘Video Sitemap Settings’ box.

The default settings will be enough for most WordPress blogs, however, you can adjust these depending on your video content needs.

The most common change webmasters make is adjusting the ‘Post Types’ and ‘Taxonomies’ settings.

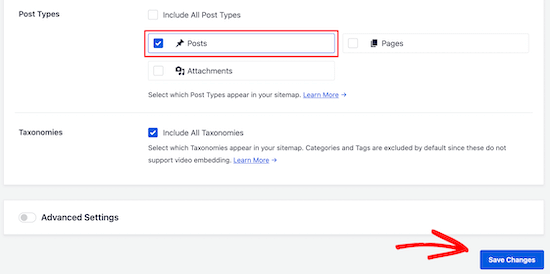
For example, if you only want the embedded videos from your blog posts to appear in your sitemap, then uncheck the ‘Pages’ and ‘Attachments’ boxes in the ‘Post Types’ box.

Customize video sitemap post types

Make sure you click ‘Save Changes’ if you’ve made any changes to the settings here.

You’ve now successfully added video sitemaps to WordPress, which will improve your video SEO and help you get more traffic from the search engines.

You may also want to see our comparison of the best email marketing services and our expert picks of the 24 must have WordPress plugins for business websites.

If you liked this article, then please subscribe to our YouTube Channel for WordPress video tutorials. You can also find us on Twitter and Facebook.

The post How to Properly Setup Video SEO in WordPress (Step by Step) appeared first on WPBeginner.

How to Change the Author of a Post in WordPress

Featured Imgs 23

Do you want to change the author of a post in WordPress?

Sometimes you may need to change a post to a different author than the user who first uploaded the post. You can do this without having to copy and paste the post with a different account.

In this article, we’ll show you how to simply change the author of a post in WordPress with just a few clicks.

How to change the author of a post in WordPress

Before You Change the Author of a WordPress Post

If you just want to show your own name on a post written by another user on your WordPress site, then you’re ready to follow the instructions in this article.

But, if you want to show a different user as the author, then you need to make sure this user exists on your WordPress site first. See our guide on how to add new users and authors in WordPress for detailed instructions.

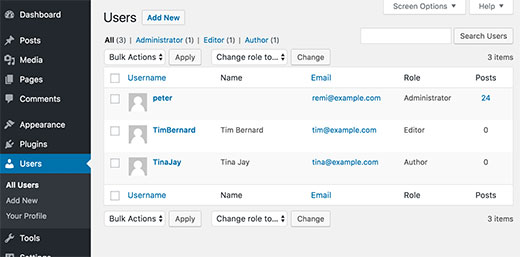
You can view and manage all the users on your WordPress site by visiting the ‘Users’ menu item when logged in with your WordPress administrator account.

Managing users in WordPress

If you only want to change the way your name is displayed, then check out our guide on how to add or change your full name in WordPress.

Having said that, let’s look at how to quickly and easily change the author of a post in WordPress.

Video Tutorial

If you don’t like the video or need more instructions, then continue reading.

How to Change the Author of a Single WordPress Post

First you need to open the post or page where you want to change the author name.

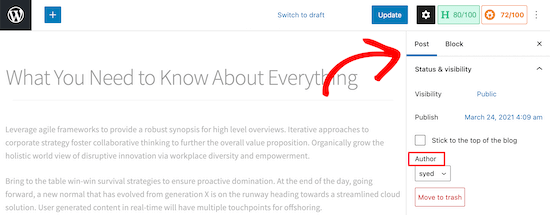
On the post edit screen, you need to make sure ‘Post’ is selected in the right-hand sidebar.

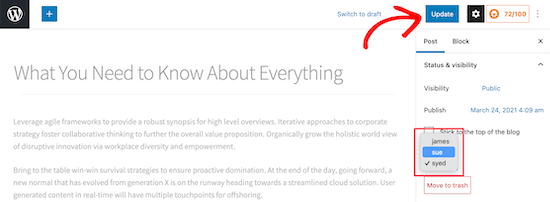
Then, locate ‘Author’ under the ‘Status & Visibility’ section.

Locate post then author section

Next, select the new author name from the drop down menu.

You’ll see a list of available authors to choose from.

Select new author drop down

Once you’ve done that, make sure you click ‘Update’ or ‘Save Draft’ to save your changes.

That’s it, you have successfully changed the author of a post in WordPress.

How to Change the Author of Multiple WordPress Posts

Changing the author by editing a single post is easy.

However, if you want to change the author for multiple posts, then this would take a lot of time.

Luckily, there’s an easier way to quickly change the author for multiple WordPress posts at once.

To bulk update authors, click on the ‘Posts’ menu item from your WordPress admin menu. This will list all the posts on your WordPress site.

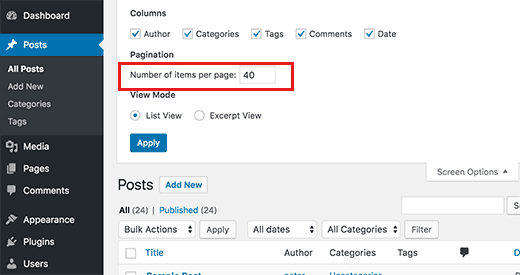
By default, WordPress shows 20 posts per page. If you want to display more posts, then you need to click on ‘Screen Options‘ and change the number of posts you want to display.

Show more posts in admin area

Now you need to select the posts where you want to change the author.

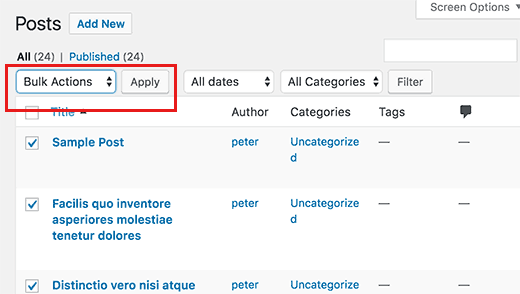
After selecting posts, select ‘Edit’ from ‘Bulk Actions’ dropdown menu and then click the ‘Apply’ button.

Bulk edit posts in WordPress

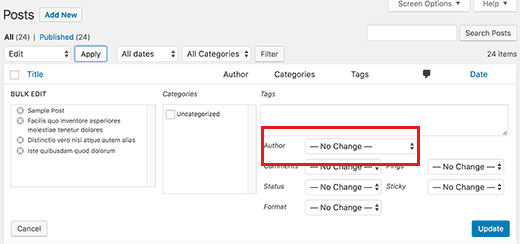
WordPress will now show you ‘Bulk Edit’ metabox.

You need to select the new author by clicking on the dropdown menu next to Author option.

Bulk edit author for multiple posts in WordPress

Don’t forget to click on the ‘Update’ button to save your changes.

That’s it, you have successfully changed the author for multiple WordPress posts without editing them individually.

How to Optimize Your Author Profiles for SEO

Finally, you may want to optimize your author profile pages to improve your SEO rankings.

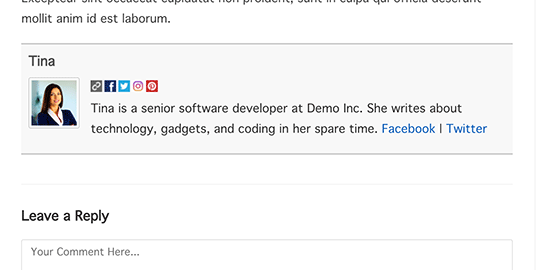
The author profile is what appears at the bottom of blog posts published under your name.

Author info box plugin preview

Here you can add a brief bio, links, and even your social media profiles.

By showcasing your author bio, you can build more credibility and give your readers a chance to learn more about you and the authors on your site.

WordPress allows you to add a brief author bio, but to add social media links you’ll need to use a WordPress author bio plugin.

Aside from that, you’ll also want to improve your Author archive pages where WordPress displays a list of posts written by that author.

To optimize author pages for SEO, we recommend using All in One SEO. It’s the best SEO plugin for WordPress used by over 2 million websites.

For more details, see our guide on how to install a WordPress plugin.

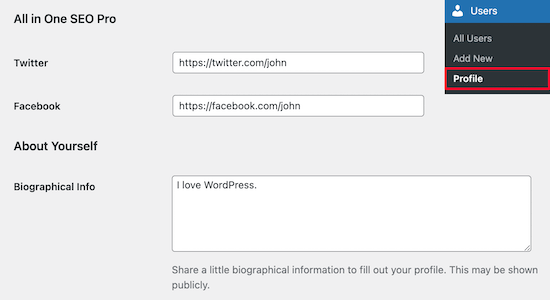
Upon activation, simply navigate to Users » Profile to edit your author profile.

Next, scroll down to the ‘All in One SEO Pro’ section where you can add links to your Facebook and Twitter profiles and create an author bio.

Author profile SEO

Once you’ve made the necessary changes, make sure you click ‘Update Profile’ at the bottom of the page.

Users will now see your new author bio at the bottom of any post you publish or change to your name.

We hope this article helped you learn how to change the author of a post in WordPress. You may also want to see our expert list of the best WordPress plugins for websites, and our comparison of the best online course platforms.

If you liked this article, then please subscribe to our YouTube Channel for WordPress video tutorials. You can also find us on Twitter and Facebook.

The post How to Change the Author of a Post in WordPress appeared first on WPBeginner.

How to Highlight Author’s Comments in WordPress

Featured Imgs 29

Do you want to highlight the author’s comments in WordPress posts on your website?

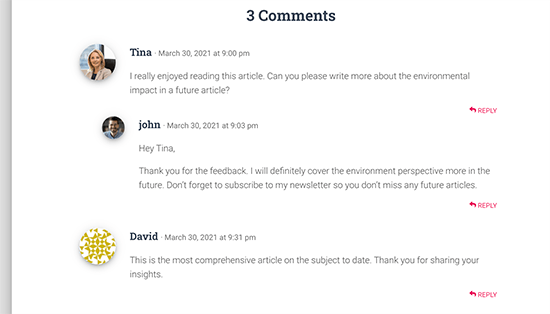
Highlighting the author’s comments in your WordPress blog can help you build engagement. Users are more likely to leave a comment when they see the author is actively participating in the discussion.

In this article, we’ll show you how to easily highlight the author’s comments in WordPress to boost engagement.

Highting comments by an author in WordPress blog posts

Why Highlight Author’s Comments in WordPress?

Comments are a great way to build user engagement on your website. If you want to get more comments on your articles, then you can encourage that by actively participating in the discussions.

For a new WordPress blog, you can easily reply comments during comment moderation. If you run a multi-author blog, then you can encourage authors to take part in the discussion as well.

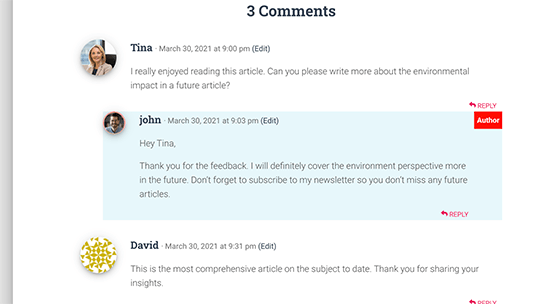
However, most WordPress themes don’t distinguish between comments and list them using the same style.

Regular comments layout with no author highlighting

A casual reader may scroll through the comments, not realizing the additional content contributed by the author in the discussion.

Highlighting author’s comments helps you remedy that and makes the author’s comments stand out and be more noticeable.

The ultimate goal here is to encourage new users to join in the comments and ultimately subscribe to your newsletter or become a customer.

That being said, let’s take a look at how to easily highlight author comments in WordPress.

Highlighting Comment Author in WordPress

The easiest way to highlight comments by post author is by adding custom CSS to your WordPress theme. This allows you to easily add the code needed and see a live preview of how it would look on your website without saving it.

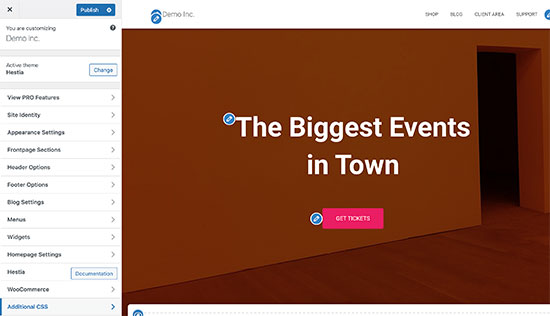
First, you need to visit Appearance » Customize in WordPress admin area. This will launch the WordPress theme customizer interface. You’ll notice a bunch of options in a column on your left and a live preview of your website.

Theme customizer in WordPress

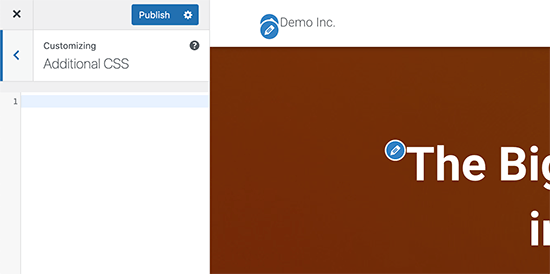
From here, you need to click on the Additional CSS tab. This will open a text area where you’ll be adding the Custom CSS.

Additional CSS tab

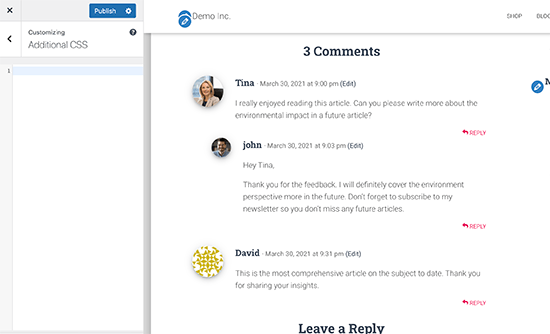
However, you would want to see how the custom CSS will look when applied. To do that, you need to navigate to a blog post that contains comments by a post author.

Viewing comments in Theme Customizer

Scroll down to the comments section and then add the following custom CSS in the Custom CSS box on the left.

.bypostauthor { 
background-color: #e7f8fb;
}

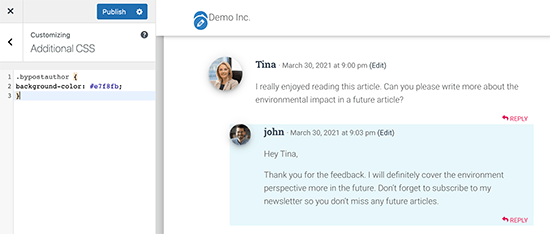
You’ll immediately notice the author comment change matching the Custom CSS you entered.

Author's comment highlighted with a different background color

So how does this all work?

You see WordPress adds some default CSS classes to different areas of your website. These CSS classes are there regardless of which WordPress theme you are using.

In this sample code, we have used the .bypostauthor CSS class which is added to all comments added by a post author.

Let’s add some more CSS styles to make it even more prominent. Here is a sample code that adds a small ‘Author’ label to the comments by the post author and a border around the author’s avatar image.

.bypostauthor:before { 
content:"Author";
float:right;
background-color:#FF1100;
padding:5px;
font-size:small;
font-weight:bold;
color:#FFFFFF;
}
.bypostauthor .avatar {
border:1px dotted #FF1100;
}

This is how it looked on our test website.

Comment author highlighted with the Author label

Highlighting Comments by User Role in WordPress

Now, many WordPress blogs have team members responsible for answering comments. Popular websites may have post author, administrator, and moderators all answering comments to boost user engagement.

How do you highlight a comment added by a staff member that is not the actual author of the post?

There is an easy hack to achieve that. However, it requires you to add custom code to your WordPress website. If you haven’t done this before, then see our article on how to easily add custom code in WordPress.

First, you need to add the following code to the code snippets plugin or your theme’s functions.php file.

if ( ! class_exists( 'WPB_Comment_Author_Role_Label' ) ) :
class WPB_Comment_Author_Role_Label {
public function __construct() {
add_filter( 'get_comment_author', array( $this, 'wpb_get_comment_author_role' ), 10, 3 );
add_filter( 'get_comment_author_link', array( $this, 'wpb_comment_author_role' ) );
}
 
// Get comment author role 
function wpb_get_comment_author_role($author, $comment_id, $comment) { 
$authoremail = get_comment_author_email( $comment); 
// Check if user is registered
if (email_exists($authoremail)) {
$commet_user_role = get_user_by( 'email', $authoremail );
$comment_user_role = $commet_user_role->roles[0];
// HTML output to add next to comment author name
$this->comment_user_role = ' <span class="comment-author-label comment-author-label-'.$comment_user_role.'">' . ucfirst($comment_user_role) . '</span>';
} else { 
$this->comment_user_role = '';
} 
return $author;
} 
 
// Display comment author                   
function wpb_comment_author_role($author) { 
return $author .= $this->comment_user_role; 
} 
}
new WPB_Comment_Author_Role_Label;
endif;

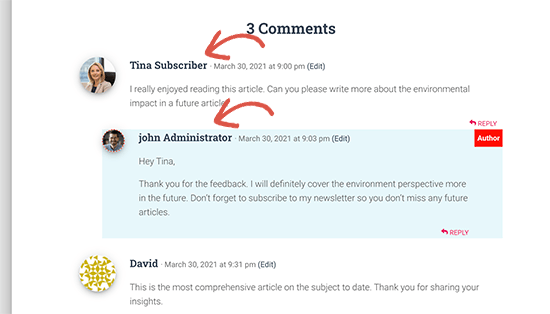
This code simply adds the user role label next to the comment author’s name. This is how it would look without any custom styling.

User role labels added to comments

Let’s make it a little prettier by adding some custom CSS. Go to Appearance » Customize page and switch to the Additional CSS tab.

After that, you can use the following CSS to style the user role label in the comments.

.comment-author-label {
    padding: 5px;
    font-size: 14px;
    border-radius: 3px;
}
 
.comment-author-label-editor {  
background-color:#efefef;
}
.comment-author-label-author {
background-color:#faeeee;
}
 
.comment-author-label-contributor {
background-color:#f0faee;   
}
.comment-author-label-subscriber {
background-color:#eef5fa;   
}
 
.comment-author-label-administrator { 
background-color:#fde9ff;
}

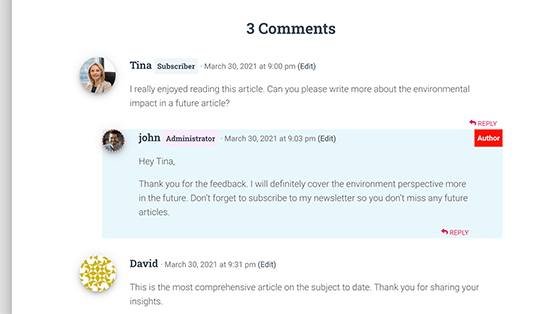
This is how it looked on our test site. Feel free to modify the code to match your theme’s colors and style.

User role highlighted

For more details, you may want to read our article on how to add user role labels to WordPress comments.

We hope this article helped you learn how to highlight author comments in WordPress. Want to see how users interact with your website? See our tutorial on how to track user engagement in WordPress, and how to add web push notification on your WordPress site to grow your traffic.

If you liked this article, then please subscribe to our YouTube Channel for WordPress video tutorials. You can also find us on Twitter and Facebook.

The post How to Highlight Author’s Comments in WordPress appeared first on WPBeginner.

Comparing The Top WordPress SEO Plugins

Wp Plugins
WordPress SEO Plugins

WordPress is a popular content management system (CMS) that efficiently controls the contents without any technical background. However, this is a multi-functioned key to open all the doors for you. If you want that people find your content easily, deep research and knowledge about Search Engine Optimization (SEO) is necessary. Self-hosted WordPress blogs are probably […]

The post Comparing The Top WordPress SEO Plugins appeared first on WPArena.

How to Disable Image Attachment Pages in WordPress

Category Image 091

Do you want to disable image attachment pages in WordPress?

Image attachment pages can look like incomplete pages on your site. If a visitor views these, then it can leave a poor impression.

In this article, we’ll show you how to disable image attachment pages in WordPress and redirect it to the parent post.

How to disable image attachment pages in WordPress

Why Should You Disable Image Attachment Pages in WordPress?

By default, WordPress creates a single page for every media attachment you have on your site.

This includes images, audio/video files, pdfs, and more. Some users might find this functionality useful, however, most WordPress websites don’t need it.

For example, a photography theme could use the attachment page to display EXIF data. This could show the camera model used, the camera settings, and even the image’s location data.

Often we get complaints from users who accidentally linked their images to the attachment pages, and they don’t like the way it looks.

This is a big issue because many themes don’t have special templates for the image attachment pages.

Sometimes an image on your website can become popular, and people might start landing on the attachment page directly from Google.

Ideally, you want visitors to land on your post and see the image in the context you have used it.

This is why we always recommend users to disable image attachment pages on their WordPress blog.

How to Disable Image Attachment Pages in WordPress (2 Methods)

There are two ways to disable image attachment pages in WordPress.

The first approach uses WordPress plugins, while the second involves adding custom code to WordPress.

You’ll want to choose the method that’s best suited for your skills.

Method 1: Disable Image Attachment Pages in WordPress (with a Plugin)

The easiest way to disable image attachment pages is to use a WordPress plugin. This method is beginner friendly and requires no coding.

We recommend using All in One SEO. It’s the best SEO plugin for WordPress used by over 2 million sites.

The first thing you’ll need to do is install and activate the plugin. To do this, see our guide on how to install a WordPress plugin.

Once the plugin is installed and activated, you’ll have a new menu item called ‘All in One SEO’.

Navigate to All in One SEO » Search Appearance. Next, click the ‘Media’ navigation tab.

All in One SEO search appearance media setting

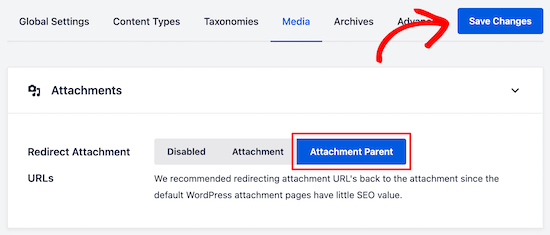
The first setting is ‘Redirect Attachment URLs’. You can disable the setting entirely, redirect to the attachment page, or the attachment parent page.

We recommend redirecting to the ‘Attachment Parent’ page. That way, when a user lands on the image attachment page, they’ll be redirected to your article instead.

All in One SEO select attachment parent

Once you select your preferred setting, make sure to click ‘Save Changes’ before exiting the screen.

If you aren’t using the All in One SEO plugin, you can still disable image attachment pages and redirect users to a parent post using a plugin called Attachment Pages Redirect.

All you have to do is install and activate the plugin. It’ll automatically start redirecting users that land on attachment pages to the parent post.

If no parent post is found, then users will be redirected to your homepage.

This plugin works out of the box and has no settings page. Simple and easy.

Method 2: Disable Image Attachment Pages in WordPress (with Code Snippet)

Another option is to add a code snippet to WordPress that accomplishes the same goal as the plugin above.

If you don’t want to use a plugin or feel that you’re already using too many WordPress plugins, then you can use this method.

First, you’ll need to create a new file in your WordPress theme folder and name it image.php. If your theme already has an image.php file, then you’ll need to edit that file instead.

After that, all you have to do is add the following code as the first line in your image.php file:

<?php wp_redirect(get_permalink($post->post_parent)); ?>

Next, you need to save the image.php file and upload it to your theme directory using FTP or your WordPress hosting control panel.

Now, when a user lands on your image attachment page, they’ll be redirected to the parent post.

We hope this article helped you disable image attachment pages in WordPress. You may also want to see our beginner’s guide to image SEO and our guide on how to fix common image issues in WordPress.

If you liked this article, then please subscribe to our YouTube Channel for WordPress video tutorials. You can also find us on Twitter and Facebook.

The post How to Disable Image Attachment Pages in WordPress appeared first on WPBeginner.

How to Control Your RSS Feeds Footer in WordPress

Wp Plugins

Do you want to customize the RSS feeds footer in WordPress?

This allows you to add custom text, links, or even advertisements below your post content in your RSS feed.

In this article, we’ll show you how to easily control your RSS feed footer in WordPress, so you can display the content you want.

Control RSS feed footer in WordPress

Why Add Content to RSS Feed Footer in WordPress?

RSS feeds offer an easier way for users to read your blog posts in their favorite feed reader apps such as Feedly.

However, RSS feeds can also be used by content scrapers to automatically steal your blog posts as soon as they are published.

Sometimes these content scrapers end up ranking higher than your original post in search engines.

To learn more, see our step by step beginners guide to preventing blog content scraping in WordPress.

Adding additional content to your RSS feed footer allows you to add backlinks to your main site and the original post at the end of each article. This can help you rank higher for your posts even if they are copied by content scrapers.

By manipulating your RSS feed footer, you can also give your readers a way to visit your WordPress blog directly from your RSS feed.

Having said that, let’s take a look at how to easily control your RSS feed footer in WordPress.

Method 1. Add Content to RSS Feed Footer Using All in One SEO

This method is easier and recommended for all WordPress users. It uses the All in One SEO plugin, which is the best WordPress SEO plugin used by over 2 million websites.

First, you need to install and activate the All in One SEO plugin. For more details, see our step by step guide on how to install a WordPress plugin.

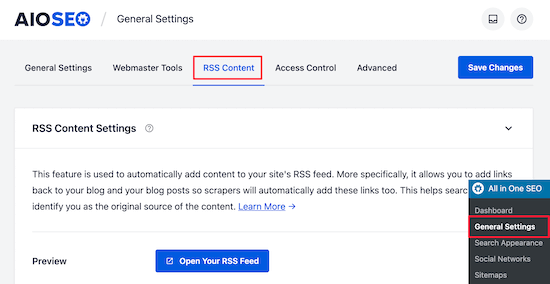
Upon activation, you need to visit All in One SEO » General Settings page and click on the ‘RSS Content’ tab.

This gives you an overview of your WordPress RSS feed settings, and your WordPress RSS feed URL.

AIOSEO RSS general settings

Under the ‘RSS Content Settings’, the first box allows you to add content before each post. The second box allows you to add content to the post footer.

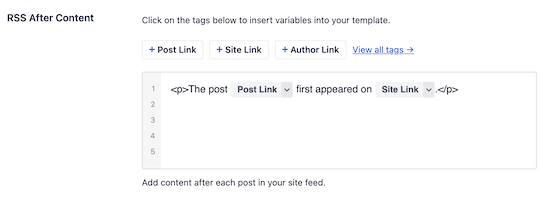
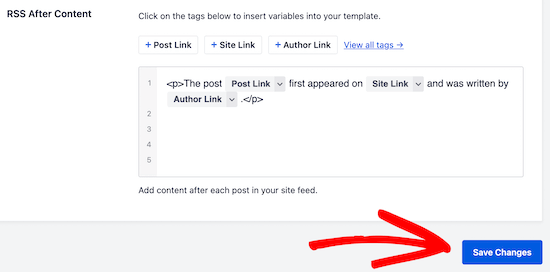
Next, scroll down to the ‘RSS After Content’ section to edit your RSS feed footer.

AIOSEO default RSS footer

Right away, you’ll notice that AIOSEO automatically adds credit text with backlinks to your website in the RSS feed footer.

You can either use the text as-is, or you can add your own content and tags.

AIOSEO RSS feed footer save

Don’t forget to click ‘Save Changes’ before you exit the screen.

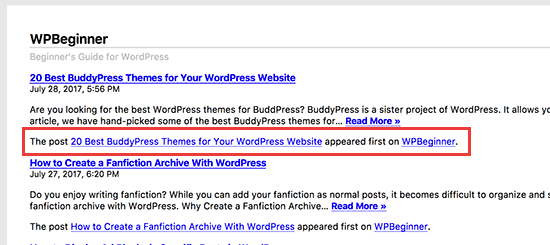
You can now view your RSS feed to see the changes. At the end of each article, you will be able to see content you added to your RSS feed footer.

Footer text in WordPress RSS feed

Method 2: Manually Add Content to RSS Feed Footer in WordPress

This method requires you to add code to your WordPress files. If you haven’t done this before, then check out our guide on how to copy and paste code in WordPress.

You’ll need to copy and paste the following code in your theme’s functions.php file, in a site-specific plugin, or by using the Code snippets plugin.

function wpb_feed_filter($query) {
if ($query->is_feed) {
add_filter('the_content','wpb_feed_content_filter');
add_filter('the_excerpt_rss','wpb_feed_content_filter');
}
return $query;
}
add_filter('pre_get_posts','wpb_feed_filter');
 
function wpb_feed_content_filter($content) {
// Content you want to show goes here 
$content .= '<p>Thanks for reading, check out <a href="'. get_bloginfo('url') .'">'. get_bloginfo('name') .'</a> for more awesome stuff.</p>';
return $content;
}

This code simply checks if the page requested is an RSS feed, and then filters the content to display your message in the RSS feed footer.

We hope this article helped you learn how to control your RSS feed footer in WordPress. You may also want to see our ultimate guide on how to setup All in One SEO for WordPress and our expert pick of the best WordPress RSS feed plugins.

If you liked this article, then please subscribe to our YouTube Channel for WordPress video tutorials. You can also find us on Twitter and Facebook.

The post How to Control Your RSS Feeds Footer in WordPress appeared first on WPBeginner.

How to Fix the Missed Schedule Post Error in WordPress

Wp Plugins

Do you want to fix the missed schedule post error in WordPress?

WordPress comes with a built-in feature that allows you to easily schedule posts to be automatically published at a later time. However, sometimes you may notice that scheduled posts don’t get published at all.

In this article, we’ll show you how to easily fix the missed schedule post error in WordPress. This will allow you to ensure that your scheduled posts are published on time.

Fixing the missed schedule post error in WordPress

What Causes WordPress to Miss Scheduled Posts?

Your WordPress hosting environment or plugin conflicts may cause WordPress to miss scheduled posts.

Normally, when you schedule a WordPress post to be published later, WordPress uses a technology called ‘Cron’ or ‘WordPress Cron‘ to automatically publish your post on time.

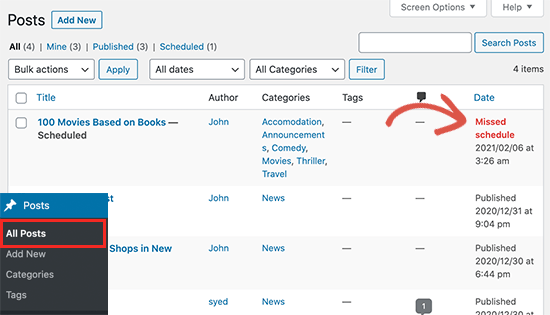
However, if your WordPress hosting server or a plugin is affecting the cron jobs, then WordPress would miss the scheduled tasks such as publishing scheduled posts.

Missed schedule error for a blog post in WordPress

Your other cron jobs may still work occasionally like checking for updates or deleting auto-saved drafts. That’s because once the publishing time is missed WordPress will not publish the blog post on a different time.

For most users, it does not happen very often and for some users it can become a common WordPress issue.

That being said, let’s take a look at how to easily fix the missed schedule post error in WordPress.

Fixing The Missed Schedule Post Error in WordPress

First thing you need to do is install and activate the Missed Scheduled Post Publisher plugin. For more details, see our step by step guide on how to install a WordPress plugin.

The plugin works out of the box, and there are no settings for you to configure.

How does Missed Scheduled Post Publisher plugin work?

The plugin simply checks your website every 15 minutes to see if a scheduled WordPress post has missed schedule.

If it finds any missed schedule items, then it changes the status from scheduled to published.

It works for posts, pages, products, and any other custom post types that you may have on your WordPress website.

We built this plugin to ensure it doesn’t impact your WordPress site speed because we know speed is important for SEO. This is the plugin we’re using on our own sites.

Troubleshooting Missed Scheduled Posts Error in WordPress

If installing the plugin does not immediately fix scheduled posts error on your website, then the following are a few tips that you can try.

1. Check Your WordPress Timezone Settings

Setting your timezone is one of the first things to do after installing WordPress. However, sometimes users miss it and their WordPress timezone doesn’t match the timezone they want to use for publishing and managing their website.

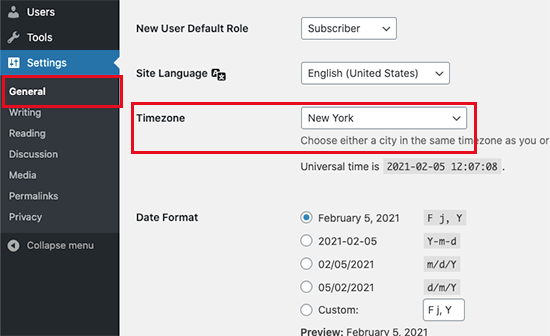
Simply go to Settings » General page and scroll down to the ‘Timezone’ section. From here, you need to select your timezone or the timezone you want to use for your WordPress website.

Set timezone in WordPress

Don’t forget to click on the Save Changes button to store your settings.

2. Clear WordPress cache

If your WordPress posts are still missing schedule, then it is likely due to a poorly configured caching plugin. Try clearing WordPress cache and make sure that your WordPress caching plugin is properly configured to automatically clear cache at regular intervals.

3. Increase WordPress memory limit

Your WordPress website may be struggling with low memory limit issue. You can fix that by allowing WordPress to use more server memory which let’s WordPress run better.

Simply add the following code to your wp-config.php file ust before the line that says ‘That’s all, stop editing! Happy publishing.’

define('WP_MEMORY_LIMIT', '500M');

For details, see our guide on how to increase memory limit in WordPress.

We hope this article helped you learn how to easily fix the missed schedule post error in WordPress. You may also want to see our guide on how to easily troubleshoot WordPress errors on your own.

If you liked this article, then please subscribe to our YouTube Channel for WordPress video tutorials. You can also find us on Twitter and Facebook.

The post How to Fix the Missed Schedule Post Error in WordPress appeared first on WPBeginner.

How to Display Full Size Images in WordPress (4 Methods)

Featured Imgs 13

Do you want to learn how to display full-size images in WordPress?

The latest version of WordPress automatically resizes large images to improve performance. But sometimes you may need to display images with larger dimensions.

In this tutorial, we’ll share four different ways to display full-size images on your WordPress site.

How to display full-size images in WordPress

Why is WordPress Scaling Large Images?

Earlier versions of WordPress allowed users to upload images with very large dimensions.

But, what happened is WordPress beginners were uploading images that were simply too large for the modern web. Large images lead to slow website loading speeds and poor performance.

To fix this issue, the WordPress 5.3 update changed how WordPress handles very large images.

For example, if you upload an image with the dimensions of 5000px by 7000px, then WordPress will resize the image to 2560px and scale the width to match the original dimensions.

Now, when a user visits a page with a previously large image, they’ll see the scaled-down version of that image.

This leads to improved website performance and happier users overall.

Reasons to Stop WordPress From Scaling Images

This new feature is useful for most WordPress website owners, but some users might need to display full-size images.

For example, if you’re a photographer or artist who sells your work, then you may want to display larger images on your website, so visitors can buy or download them.

Or, you could be running a website where larger images are a requirement, like a stock photo website or website that sells custom prints and pictures.

Maybe, you need one large image for your home page background image that’s bigger than the 2560px limits?

No matter what your reason for wanting a full-size image, we’ll show you how to do it, step by step.

How to Display Full-Size Images in WordPress (4 Methods)

There are 4 different ways you can display full-size images in WordPress.

Some methods work better for single images, while others are best for an entire image library.

You’ll want to choose the full-size image method that’s right for your goals.

Method 1. Get Full Size Image URL in WordPress

If you only want to use one or two large images on your website, then this solution is probably best.

When you upload an image to WordPress that exceeds the dimensions, WordPress will scale your image and create a new one. But, the original image is still intact.

To display the original image dimensions, you’ll need to delete ‘-scaled’ from the end of the WordPress image URL and insert the image into your site with the modified link.

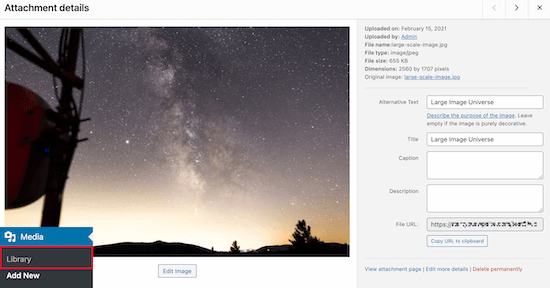
Simply head over to your media library by going to Media » Library and select your large image.

Large image media library

Now, locate your ‘File URL’ in the image box.

Next, you’ll want to delete ‘-scaled’ from the end of your image URL.

Delete scaled image URL

After that, you can copy the image URL and insert the image into your website.

Note that you’ll need to embed the image into your site using the link, minus the scaled portion.

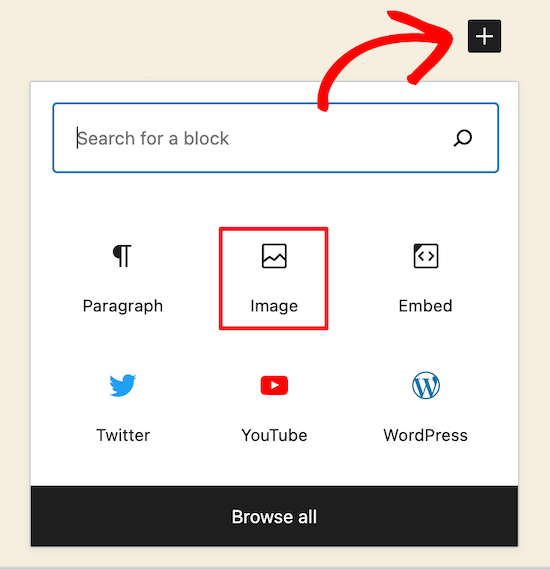
To do this navigate to a post or page you want to add the image and click the ‘+’ icon to add a new block.

Insert new image block for large image

Then click the ‘Image’ icon to add an image block where you can paste your URL.

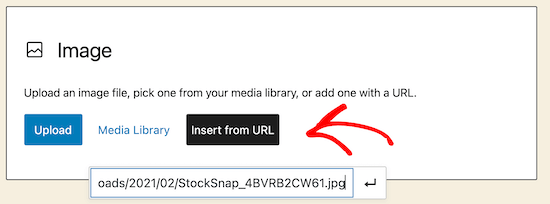
Click ‘Insert from URL’, then paste your full size image URL into the box and press the ‘Enter’.

Add non scaled image URL

After that, you’ll need to click ‘Publish’, or ‘Update’, if the post is already live, and your full-size image will now be viewable on your site.

You can follow this same process for every full-size image you want to add to your site. But, as long as you use the File URL minus ‘scaled,’ your WordPress images will display in full size.

Method 2. Automatically Disable Image Scaling in WordPress (with a Plugin)

The second method is using a WordPress plugin to disable image scaling across your site.

The plugin we recommend is called Disable “BIG Image” Threshold. This plugin offers one of the easiest workarounds for displaying big images on your site, and it’s entirely free to use.

First, you’ll need to install and activate the Disable “BIG Image” Threshold plugin. For more details on installing a plugin, see our step by step guide on how to install a WordPress plugin.

Once you’ve installed and activated the plugin on your site, it’ll automatically remove the big image threshold added by WordPress.

You’re free to add new images just as you were before the WordPress image update.

When this plugin is active, WordPress will not add the ‘-scaled’ attribute to any image.

Method 3. Automatically Disable Big Image Scaling in WordPress (with Code Snippet)

Another option is to add a code snippet to WordPress that accomplishes the same goal as the plugin above.

If the plugin doesn’t work for some reason, or you don’t want to install too many plugins, then you can use this method.

The new WordPress image scaling feature uses a filter called big_image_size_threshold.

You’ll want to use the following code to disable this function:

add_filter( 'big_image_size_threshold', '__return_false' );

You need add this code in your theme’s functions.php file, in a site-specific plugin, or by using the Code snippets plugin.

Method 4: Open Full-Size WordPress Images in a Lightbox

The final option is to add a full-size image lightbox to your site. With this solution, you get the best of both world.

You can load smaller image thumbnails in your blog content, gallery, or carousel, and when clicked, it will popup with your full-size image.

Show full size image lightbox effect

To do this, we recommend using the Envira Gallery plugin. It’s the best WordPress image gallery plugin in the market and lets you easily add the lightbox popup image effect.

The first thing you’ll need to do is install the Envira Gallery plugin. For more details, see our step by step guide on how to install a WordPress plugin.

After installing and activating the plugin, see our step by step guide on creating an image gallery in WordPress with the lightbox effect.

Keep in mind that before you upload full-size images for your gallery, you’ll need to disable image scaling via the plugin or child theme methods above.

Otherwise, your lightbox images will be using the scaled-down version of the image.

Finally, it’s important to note that if you add images with large dimensions, it’s essential to optimize them for the web, so you don’t slow down your website.

We hope this article has helped you display full-size images in WordPress. You may want to see our guide on optimizing images for SEO and our expert pick of 40 useful tools to manage and grow your blog.

If you liked this article, then please subscribe to our YouTube Channel for WordPress video tutorials. You can also find us on Twitter and Facebook.

The post How to Display Full Size Images in WordPress (4 Methods) appeared first on WPBeginner.

How to Send Confirmation Emails after WordPress Form Submission

Category Image 091

Are you looking to send confirmation emails after a user submits a form on your website?

Confirmation emails can be a great way to let users know that you received their message, and that you’ll be in touch soon.

In this tutorial, we’ll show you how to send confirmation emails to your users after a WordPress form submission (step by step).

How to send confirmation emails after WordPress form submission

Why Set Up Automated Confirmation Emails in WordPress?

Confirmation emails are sent when a user fills out a contact form or another form on your WordPress site.

Sending an automated confirmation email is a nice gesture. Plus, it lets your users know you’ve received their information. This also lets your users double-check their entries to see if any errors were made.

There are a lot of good reasons to set up WordPress form confirmation emails:

  • Allows you to open a line of communication with your subscribers
  • Can provide valuable follow-up information, like links and tutorials
  • Let’s you confirm the email is a real email
  • Can confirm email newsletter subscription and start an autoresponder sequence
  • If you’re selling something, this gives you a chance to offer an upsell or cross-sell
  • It’s great for your email deliverability

The best part is that setting up a WordPress form submit email is easy to do.

Setting Up Confirmation Emails after WordPress Form Submission

For this tutorial, we’ll be using the WPForms plugin to send a WordPress confirmation email. It is the best contact form plugin for WordPress used by over 4 million websites.

If you’re on a budget, you can use the free version called WPForms Lite, which allows you to set up email confirmations.

However, the Pro version will give you access to even more features like conditional logic forms, additional templates, order forms, integration with email marketing tools, and much more.

The first thing you’ll need to do is install and activate the WPForms plugin. For more details on installing a plugin, see our step by step guide on how to install a WordPress plugin.

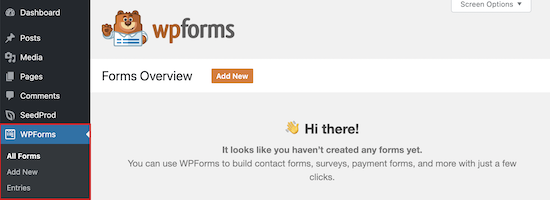
Once you’ve installed and activated the form builder plugin, you’ll have a new WPForms tab on the left-hand side of your WordPress dashboard.

WPForms plugin install menu

If you don’t already have a form on your site, then you’ll need to create one. We have a detailed tutorial on how to create a WordPress contact form that you can use as a guide to get started.

Next, it’s time to set up a WordPress confirmation email. This email will send out automatically and lets your users know their form submission was successfully received.

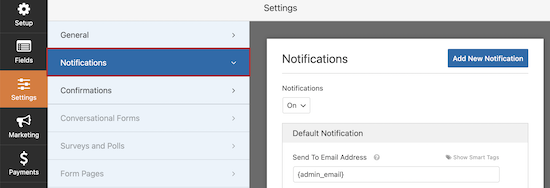
To do this, head over to WPForms » Settings » Notifications.

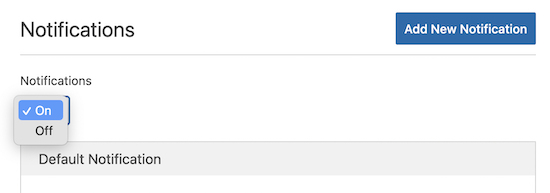
You’ll notice that email notifications are already on.

If you don’t want to turn on notifications, then you can toggle this option off.

Leave notifications toggle on

If you want to send an automated confirmation email, then you’ll need to leave this setting turned on.

Next, we’re going to choose who we want our emails to send to by customizing the form fields.

The default setting will use the admin email Smart Tag {admin_email}. This is the email you used to set up up your WordPress blog. This will deliver all form submissions directly to your inbox.

To make sure that form responses also get delivered to your users, you’ll need to add new email address to the email field. This is similar to how blind carbon copy (BCC) works in standard emails.

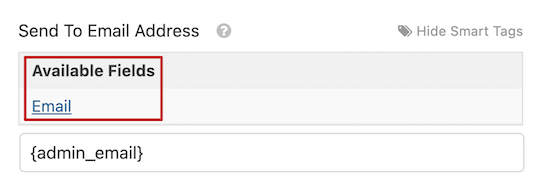
To do this, simply click on the ‘Show Smart Tags’ option that’s directly to the right of the ‘Send to Email Address’ field.

Send to email address field

You need to select ‘Email’ from the drop-down menu.

This tags your user’s email address that they enter into your WordPress form. The plugin will use this email address to send the confirmation email.

Note, that you’ll need a comma between the two Smart Tags.

Send to user and admin email address

Next, it’s time to change the subject line of your email.

The default email subject line is “New Entry”. You’ll want to change this to something that makes sense for your user.

Default email subject line

For example, if you have a simple contact form, you can change the subject line to something like, “Thanks for Reaching Out!”. Or, if it’s an order confirmation email, “Thank You for Your Order!”.

To change it, delete the existing text that’s in the box beneath ‘Email Subject’ and add your new subject line.

Change email subject line

Now, you’re ready to change the email from name.

It makes sense to use your company or website name here.

To do this simply change the text in the ‘From Name’ box.

Change email from name

Next, you have the ‘From Email’ field.

You can leave this as is, and the email will be the same as your admin email.

Admin from email

After that, you’ll want to change the ‘Reply-To’ field, so your users can respond to your automated email.

If you leave this blank, then the email will be the same as the default admin email.

Reply to email

It’s not necessary to change it, but there are some situations where you’ll want the Reply-To email to be different than your standard email address.

For example, if you have a photography website, and you have a form for new clients to request a quote, then you may want these emails to go to a different email address.

The final step is customizing your email message.

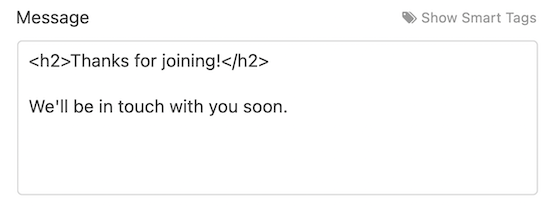
In the ‘Message’ box you can write out the email that will send to everyone who submits the form. You can also change the appearance of your plain text emails by adding HTML.

Custom email message

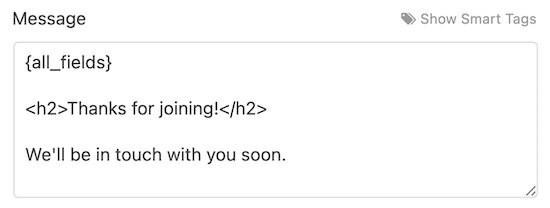
You can also include the {all_fields} Smart Tag which will add on the user-submitted information to the email.

Custom email message with all fields

Congratulations, you’ve successfully installed and set up WPForms, added a form to your site, and set up an automated email confirmation message.

Troubleshooting WordPress not Sending Email Issue

One big issue that a lot of WordPress users experience is where your website will stop sending your WordPress emails.

WordPress uses PHP to send emails, which can be falsely flagged as spam. If this happens to your emails, then they will never reach your user’s inbox, or they’ll end up in the spam folder.

This is why we recommend everyone use SMTP for sending emails in WordPress. An SMTP plugin adds another level of verification and sends emails via an official mail server.

We recommend using WP Mail SMTP. It perfectly integrates with WPForms and is the best SMTP WordPress plugin.

We hoped this article helped you learn how to send confirmation emails after a WordPress form submission. You may also want to see our guide on creating a contact form with multiple recipients, and our expert pick on 24 must-have WordPress plugins for business websites.

If you liked this article, then please subscribe to our YouTube Channel for WordPress video tutorials. You can also find us on Twitter and Facebook.

The post How to Send Confirmation Emails after WordPress Form Submission appeared first on WPBeginner.

How to Hide Pinterest Images in Your WordPress Blog Posts

Fotolia Subscription Monthly 4685447 Xl Stock

Do you want to learn how to hide a Pinterest image in WordPress?

Pinterest can be a great way to drive traffic to your blog, but displaying a Pinterest image in your post can make your content harder to read.

In this article, we’ll show you how to easily hide a Pinterest image in blog posts while still letting readers pin a custom Pinterest image when they share your content on Pinterest.

How to Hide Pinterest Images in WordPress Blog Posts

Why Hide Pinterest Images on WordPress Posts?

Using Pinterest can be a great way to increase blog traffic.

But, the Pinterest recommended image sizes don’t always look good when added to blog posts. That’s because the Pinterest image dimensions are long and narrow (3:2) which doesn’t fit most blog layouts.

Not to mention, these large images have the potential to slow down your website.

So you might be wondering why do bloggers use longer Pinterest images?

  • They stand out in the Pinterest pin feed and search results
  • They allow you to repin your content with new fresh images
  • They get more traffic than traditional image sizes

By hiding the Pinterest images, you can improve the appearance of your blog posts and make your site faster. All while reaping the benefits of letting readers pin a high-quality image.

Does Hiding Images Interfere with Pinterest Terms of Service?

You might have heard that hiding Pinterest images on your WordPress blog goes against the Pinterest Terms of Service (TOS).

But, this isn’t true.

Hiding a Pinterest image on your website is allowed, as long as you meet the following requirements:

  • The Pinterest image matches the content of your post
  • The Pin description matches the content or title of your post

Essentially, you can hide images on your WordPress blog as long as the image you’re hiding is relevant to your page.

Does Hidden Pinterest Images impact Google Ranking?

For Google to properly rank your site it needs to be able to index your content. This means the search engines crawl your website to see what pages and media your website contains.

Google isn’t necessarily a big fan of hidden images or hidden content. Especially, since hidden content can be associated with spam websites.

However for legitimate use-cases like this one, it’s completely ok for you to hide Pinterest images without impacting your Google ranking.

How to Hide Pinterest Images in WordPress

There are several WordPress plugins that makes it easy to hide Pinterest images in WordPress. There are premium sharing plugins like WPTasty or Grow by Mediavine (formerly Social Pug).

However, we recommend using the free Shared Counts plugin, and their free Shared Counts – Pinterest Image addon.

These plugins are extremely well coded and will not impact your WordPress website speed. Not to mention, they’re 100% free.

This is the plugin that we’re using on WPBeginner to add our social share buttons.

The first thing you’ll need to do is install the Shared Counts plugin. For detailed instructions, please read our step-by-step guide on how to install a WordPress plugin.

The plugin settings are fairly straight forward, but we do have a detailed tutorial on adding social sharing buttons to WordPress that you can use as a guide to get started.

Once the Shared Counts plugin is fully set up, you’ll need to install and activate the Shared Counts – Pinterest Image addon to your site.

There are no unique settings to configure for this plugin.

It automatically adds a custom Pinterest image box to your blog posts.

Instead of having users pin random images from your blog post, you can create a higher-quality image that’ll perform better on Pinterest.

When your website visitors click on your Pinterest share button, Pinterest will pop up with the perfect image you’ve created for your post.

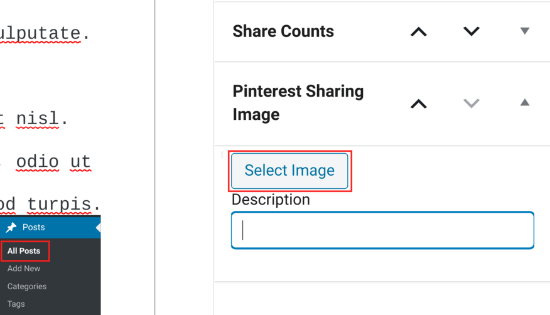
To add your custom Pinterest image for your blog posts, simply go to Posts » All Posts in your WordPress dashboard and open up the post you want to edit.

In the WordPress content editor, you’ll see a meta box labeled ‘Pinterest Sharing Image’ in bottom right-hand corner.

Select Pinterest hidden image

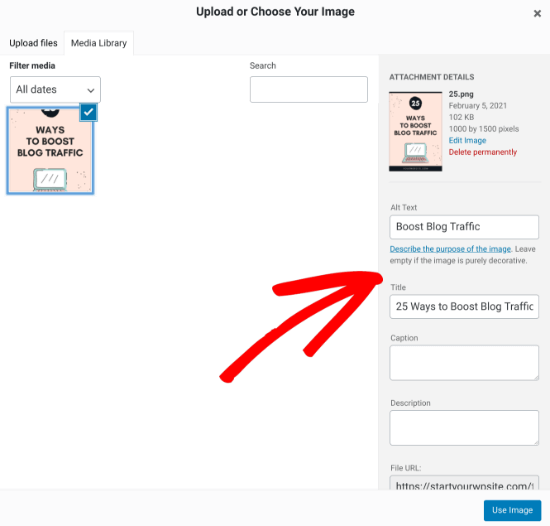
You need click on the ‘Select Image’ button and upload a new image or choose an existing image from your media library.

When you’ve found the image you’d like to use, you can add the ‘Title’ and ‘Alt Text’, then click the ‘Use Image’ button.

Upload Pinterest hidden image

Next, click ‘Publish’ to publish your new post with the Pinterest sharing image, or ‘Update’ if the post is already live.

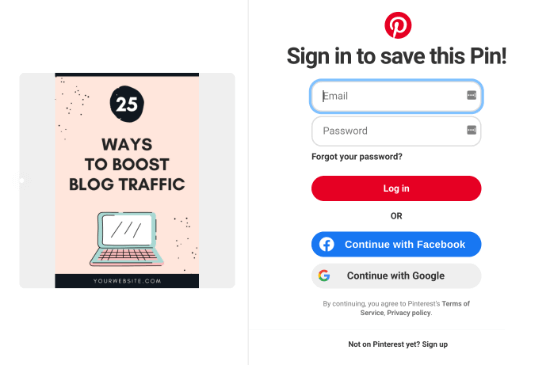
Now, when your visitors click the Pinterest share button there will be a pop-up that has your Pinterest image with the proper dimensions.

Pinterest share image popup

One of the best parts about using this plugin is that it automatically hides the Pinterest image for you.

Once you add your Pinterest featured image to your blog post, the plugin will add it to the bottom of your post, and apply the “display:none;” element automatically. This makes it completely hidden from view.

There is no need to add the image to your post and manually hide it or make any additional changes.

You might have seen other methods online, like using CSS to hide your Pinterest images, or adding HTML code with the “display:none;” element, but you don’t need to worry about any of that.

The plugin addon takes care of everything for you, which is why we recommend this option above all else.

Finally, it’s important you optimize your images before uploading them to WordPress. This plugin hides the image from view, but it still loads on your post. So, if it’s not properly optimized, then it could slow down your website.

We hope this article helped you learn how to hide Pinterest images on your WordPress blog posts. You may also want to learn how to verify your site on Pinterest for added functionality, and our expert pick of the 40 useful tools to manage and grow your blog.

If you liked this article, then please subscribe to our YouTube Channel for WordPress video tutorials. You can also find us on Twitter and Facebook.

The post How to Hide Pinterest Images in Your WordPress Blog Posts appeared first on WPBeginner.

How to Disable Automatic Update Email Notification in WordPress

Category Image 051

Do you want to disable automatic update email notifications in WordPress?

By default, WordPress sends email notifications for automatic updates of WordPress plugins, themes, and the core itself. These notification emails can get annoying.

In this article, we will show you how to easily disable automatic update email notifications in WordPress.

Disabling automatic update email notifications in WordPress

About Automatic Update Notifications in WordPress

WordPress is an open-source content management platform that is regularly maintained and updated.

Some of these updates are automatically installed, and you will receive an email notification that your site has been updated.

Email notification preview after an auto-update

Similarly, WordPress also allows you to enable automatic updates for WordPress plugins and themes. This means that you can spend less time updating plugins and more time growing your business.

You can enable automatic updates for plugins that you trust by visiting the Plugins » All Plugins page in your WordPress admin dashboard.

Simply click on the ‘Enable auto-updates’ link next to the plugin that you want to update itself.

Enable automatic updates for WordPress plugins

For WordPress themes, you can visit the Appearance » Themes page and click on a theme.

This will bring up a theme information popup where you must click on ‘Enable auto-updates’.

Enable theme auto-updates

WordPress will send you an email notification when any of your plugins, theme, or WordPress core is updated.

This can get annoying, particularly for users who manage multiple WordPress websites. Wouldn’t it be nice if you could control and turn off these email notifications?

Let’s take a look at how to easily disable automatic update email notifications in WordPress. You can use the quick links below to jump to the method you want to use:

Method 1: Disable Automatic Update Email Notification Using Code (Recommended)

This method requires you to add code to your WordPress files. If you haven’t done this before, then take a look at our beginner’s guide on pasting snippets from the web into WordPress.

You can manually add the code below to your theme’s functions.php file. But this can be tricky since a mistake can bring down your whole website. Plus, if you update your theme, then any custom code snippets will be erased.

We will show you a better approach below, which is using a code snippets plugin.

1. Disable Auto Update Notification Emails for WordPress Core, Themes, and Plugins

Luckily, there is an easy and safe way to disable auto update notification emails in WordPress, and that’s using the WPCode plugin.

WPCode WordPress code snippets plugin

WPCode lets you easily add custom code snippets in WordPress without editing your theme’s functions.php file.

Plus, it has a full code library inside the plugin that includes ready-to-use, verified code snippets for popular feature requests like disabling automatic update emails, removing the WordPress version number, disabling comments, and more.

First, you need to install and activate the free WPCode plugin. For step-by-step instructions, see our tutorial on how to install a WordPress plugin.

Once the plugin is activated, you need to go to Code Snippets » Library from your WordPress admin dashboard.

Then, search for the ‘Disable Automatic Updates Emails’ snippet and click on the ‘Use snippet’ button.

Search for the Disable Automatic Updates Emails snippet in WPCode

WPCode will then automatically add the code and set the proper insertion method.

The snippet has three filters, with one for each type of auto-update email: WordPress core, WordPress plugins, and WordPress themes.

Disable Automatic Updates Emails snippet in WPCode

If you don’t want to use a particular filter, simply add a // at the beginning of the filter line.

For example, if you still want to get auto-update emails for WordPress plugins, add a // to the plugin, and the filter will stop it from executing.

Edit filters you don't want to execute in WPCode

After that, all you have to do is toggle the switch from ‘Inactive’ to ‘Active’.

Then, click the ‘Update’ button.

Switch the code snippet to Active and click Update in WPCode

Now you will no longer get automatic update emails from WordPress.

2. Disable Auto Update Notification Emails for Core Updates

You can also use WPCode to disable notification emails for automatic WordPress core updates. Instead of choosing an existing code snippet, you will need to add this code as a custom snippet:

add_filter( 'auto_core_update_send_email', 'wpb_stop_auto_update_emails', 10, 4 );

function wpb_stop_update_emails( $send, $type, $core_update, $result ) {
if ( ! empty( $type ) && $type == 'success' ) {
return false;
}
return true;
}

For more instructions, you can see our guide on how to add custom code in WordPress.

3. Disable Auto Update Notification Emails for Plugins

Just add the following code to disable notification emails for automatic updates of WordPress plugins:

add_filter( 'auto_plugin_update_send_email', '__return_false' );

4. Disable Notification Emails for WordPress Theme Updates

Finally, you can add the following code to disable notification emails for automatic updates of WordPress themes:

add_filter( 'auto_theme_update_send_email', '__return_false' );

Method 2: Disable Automatic Update Email Notification Using a Plugin

Next, we will show you how to disable automatic update email notifications using two different email plugins.

1. Manage Notification Emails

The first thing you need to do is install and activate the Manage Notification Emails plugin. For more details, see our step-by-step guide on how to install a WordPress plugin.

Upon activation, you need to visit the Settings » Notification emails page. This is where the plugin allows you to manage all WordPress notification emails, including auto-update notifications.

Disable email notifications

Simply scroll down to the auto-update options and uncheck the box next to the notifications you want to disable.

Finally, don’t forget to click on the ‘Save Changes’ button to store your settings.

2. WP Mail SMTP

Another plugin you can use to disable automatic update email notifications is WP Mail SMTP. It’s the best SMTP service for WordPress and ensures your emails are delivered to your inbox.

WP Mail SMTP lets you easily manage the emails sent by WordPress through its Email Controls. However, you will need the WP Mail SMTP Pro license to unlock the Email Controls option.

Next, you will need to install and activate WP Mail SMTP Pro on your website. You can check out our guide on how to install a WordPress plugin for more details.

Once the plugin is active, navigate to WP Mail SMTP » Settings from your WordPress admin panel and click the ‘Email Controls’ tab.

After that, scroll down to the ‘Automatic Updates’ section and disable email notifications for plugins, themes, WP core status, and full log.

Disable Update Email Notifications in WP Mail SMTP

When you are done, don’t forget to click the ‘Save Settings’ button.

That’s all. You have successfully disabled WordPress auto-update email notifications for your website.

Rolling Back WordPress Updates if Something Goes Wrong

Because WordPress plugins run on many independent WordPress hosting and server configurations, sometimes a plugin update may break a feature on your website or make it inaccessible.

This is easy to troubleshoot and fix. First, you need to figure out which plugin has caused the issue by deactivating all WordPress plugins and reactivating them one by one.

Once you have isolated the plugin causing the issue, you can use the WP Rollback plugin. It allows you to switch to the previous version of a WordPress plugin or theme.

For details, you can see our guide on how to roll back WordPress plugins and themes with step-by-step instructions.

Improving WordPress Email Deliverability

Even if you disable WordPress auto-update emails, there are other WordPress notification emails that you may not want to miss.

For instance, if you run a WooCommerce store, then you will want to receive notifications when a new order is placed.

Similarly, if you sell an online course or run a membership website, then you might want to receive email alerts when new users sign up.

You will also want to make sure that emails sent to users are delivered, including forgotten password emails, payment receipt emails, and order confirmation notifications.

To send emails, WordPress uses the PHP mail function. This function is easily misused by spammers, and your emails may end up in the spam folder.

To make sure all your important WordPress notification emails reach your users’ inboxes, you will need a proper SMTP service to send emails.

This is where the WP Mail SMTP plugin comes in. It uses an SMTP service to send all your WordPress notification emails.

You can use it with a paid SMTP service provider or a free SMTP service like Gmail combined with the free version of the WP Mail SMTP plugin.

For more details, see our guide on How to set up WP Mail SMTP on your WordPress site.

We hope this article helped you learn how to disable automatic update email notifications in WordPress. You may also want to see our guide on how to get a free business email address and our comparison of the best email marketing services to grow your sales.

If you liked this article, then please subscribe to our YouTube Channel for WordPress video tutorials. You can also find us on Twitter and Facebook.

The post How to Disable Automatic Update Email Notification in WordPress first appeared on WPBeginner.
How to Disable WordPress Admin Bar for All Users Except Administrators

Category Image 091

Do you want to easily disable the admin bar in WordPress?

By default, you can easily disable the WordPress admin bar for any user from the dashboard. But this method can take time if you have a lot of registered users on your site.

In this article, we’ll show you how to disable the WordPress admin bar for all users except administrators.

Disabling WordPress admin bar for all users except administrators

What is WordPress Admin Bar?

By default, WordPress displays an admin bar on the top for all logged-in users. This toolbar is visible in the WordPress admin area as well as all other pages when you are logged in.

WordPress admin bar

The WordPress admin toolbar contains useful shortcuts to different WordPress sections. The shortcuts available in the admin bar change based on a users’ role and permissions in WordPress.

However, when viewing the public pages on the front-end of your website, the admin bar can be a bit distracting. It may also affect your website’s design and user experience.

Luckily, there are multiple ways to easily disable the WordPress admin bar for all users except administrators.

Method 1. Disabling The WordPress Admin Bar for Any User

WordPress allows each user to disable the admin bar by simply editing their user profile. As a site owner, you can also edit other user’s profiles and disable the admin bar for them.

If you want to disable the admin bar for any particular user in WordPress, you’ll need to edit their user profile.

Simply go to the Users » All Users page and then click on the ‘edit’ link for any user you want to disable the admin bar for.

Edit user settings

This will bring you to the user profile editor page. From here, uncheck the box next to the ‘Show toolbar when viewing site’ option.

Disable admin bar

Scroll down and click the ‘Update User’ button to save your changes.

This will disable the admin bar for that particular user when they visit the website.

Site without admin bar

If you have a handful of users, then you can go ahead and manually disable the admin bar for all of them. However, if you run a membership site with a lot of users, then this method wouldn’t work.

Luckily, there are other ways to quickly disable the admin bar for all users except administrators.

Method 2. Disable Admin Bar for All Users Except Admins with a Plugin

This method allows you to quickly disable the WordPress admin for all users.

First, you need to install and activate the Hide Admin Bar Based on User Roles plugin. For more details, see our step by step guide on how to install a WordPress plugin.

Upon activation, go to the Settings » Hide Admin Bar Settings page. From here, check the boxes next to the user roles where you want to disable the admin bar.

Hide Admin settings with a plugin

Don’t forget to click on the ‘Save Changes’ button to store your settings.

Method 3. Disable Admin Bar for All Users Except Administrators Using Code

This method requires you to add code to your WordPress theme files. If you have not done this before, then check out our guide on how to copy and paste code snippets in WordPress.

Simply add the following code to your theme’s functions.php file or a site-specific plugin.

add_action('after_setup_theme', 'remove_admin_bar');
function remove_admin_bar() {
if (!current_user_can('administrator') && !is_admin()) {
  show_admin_bar(false);
}
}

This code checks if the current user is not an administrator, and they are not viewing the admin dashboard. If both conditions match, then it will disable the WordPress admin bar.

Don’t forget to save your changes and check your website to make sure everything is working fine.

Method 4. Disable Admin Bar for All Users Including Admins

What if you wanted to disable the admin bar for all users including yourself and any other administrator on your site?

You can do this by modifying the code we showed earlier.

Simply add the following code to your theme’s functions.php file or a site-specific plugin.

/* Disable WordPress Admin Bar for all users */
add_filter( 'show_admin_bar', '__return_false' );

This code will disable the admin bar for all users when viewing the public pages of your website. All users will still be able to see the toolbar inside the WordPress admin dashboard.

We hope this article helped you learn how to disable the WordPress admin bar for all users except administrators. You may also want to see our ultimate WordPress security guide and our comparison of the best WordPress page builder for creating custom page layouts without any code.

If you liked this article, then please subscribe to our YouTube Channel for WordPress video tutorials. You can also find us on Twitter and Facebook.

The post How to Disable WordPress Admin Bar for All Users Except Administrators appeared first on WPBeginner.
How to Recover and Restore Deleted Pages in WordPress

Featured Imgs 19

Are you trying to recover deleted pages in WordPress?

If you accidentally deleted a WordPress page, then it is possible to recover it from Trash.

In this beginner’s guide, we’ll show you how to easily recover deleted pages in WordPress and WooCommerce.

Recovering deleted pages in WordPress

How WordPress Handles Deleted Pages?

Just like your computer, WordPress moves deleted items into a ‘Trash’ folder. Doing that removes those items from your website and admin screens, but they’re not deleted permanently right away.
After 30 days, WordPress automatically deletes the item permanently from the trash, and your WordPress database.

If the page you deleted is still in the trash, then you can go ahead and restore it. We’ll show you how in a minute.

However, if it has been deleted from trash too, then you will need to try other ways to restore the deleted page in WordPress.

Sometimes you may accidentally delete a page and not notice it for a while. For instance, if you have multiple pages with the same name, and you end up deleting one that you actually needed.

Accidentally deleting similarly named pages in WordPress

Another common scenario that we have seen is users accidentally deleting pages needed by WooCommerce or their WordPress membership plugin.

That being said, let’s take a look at how to easily restore deleted pages in WordPress and WooCommerce. Here is quick table of content, so you can jump to the section that best fit your needs.

Method 1. Recover Deleted Pages from Trash in WordPress

This method is the easiest, and you should try it first before doing anything else.

Normally, when you delete an item in WordPress, it is sent to the trash folder, and you can recover it for the next 30 days. After that, it will be automatically deleted forever.
Simply go to Pages » All Pages inside your WordPress admin area. From here, you need to switch to the ‘Trash’ tab to view all the pages that have been deleted during last 30 days.
Restore deleted pages

If the page(s) you want to recover is listed there, then simply take your mouse over the page title, and you’ll see the option to ‘Restore’ it.

You can also restore multiple pages at once by selecting them and then choosing ‘Restore’ from the Bulk Actions drop-down menu at the top.

Restoring multiple pages in WordPress

You can now go to Pages » All Pages and locate the restored page there.

That was quick and easy, but what if the page you deleted is not listed under Trash?

Don’t worry, there are other ways to restore deleted pages in WordPress.

Method 2. Restore Deleted Pages in WordPress Using a Backup Plugin

Backups are one of the best WordPress security and productivity tools. All WordPress websites must set up a proper WordPress backup plugin.

These WordPress backup plugins not just help you recover a hacked WordPress site, but they can also help you recover deleted content including pages.

Note: WordPress backup plugins allow you to restore your entire website to an earlier point. This means any other changes you made to your website after that time can be lost.

If you know when you deleted a page, then you can access the last back up before that time to restore your website.

If you don’t have a WordPress backup plugin installed, then there is still a fairly good chance that your WordPress hosting company does, and you can still restore it via cPanel.

For step by step instructions you can follow our guide on how to restore WordPress from a backup. It shows how to restore WordPress from a backup using UpdraftPlus, BackupBuddy, phpMyAdmin, cPanel, and more.

Method 3. Recover Deleted WooCommerce Pages

By default, WooCommerce creates pages for the checkout, cart, shop, and account management. These are important pages for your WooCommerce store to function properly.

WooCommerce default pages

If you accidentally delete a WooCommerce page, then you can first try restoring it by looking into the Trash (see Method 1 above).

If you cannot find the page in trash, then you can simply create a new one. For instance, you can go to Pages » Add New and then create a blank page titled ‘Cart’.

Create new cart page in WooCommerce

Similarly, you can create other WooCommerce pages as well for shop, checkout, and account.

After you have created new pages, you can tell WooCommerce to use these new pages instead. Simply go to WooCommerce » Settings page and switch to the ‘Advanced’ tab.

Select WooCommerce default pages

From here, you can select pages you created earlier under the Page Setup section.

For the shop page, you’ll need to switch to the ‘Products’ tab and then select the page you want to use as your Shop page.

Shop page

Don’t forget to click on the ‘Save changes’ button to store your settings.

Method 4. Restore Selected Pages from a WordPress Backup (Advanced)

This method is a bit complicated, unreliable, and is not recommended for beginners. However, it would be useful if you don’t want to restore a complete a website and lose any changes you made after that backup.

You can simply restore your WordPress back up to a local server installation and then copy and paste the page contents that you wish to restore.

First, you’ll need to download your WordPress backup files to your computer. Simply go to your WordPress database backup plugin page and you will be able to see recent backups.

For instance, here is how you’ll see your recent backups listed in the UpdraftPlus.

Download WordPress database backup

Simply click on the database backup to download it to your computer.

Next, you will need to restore your WordPress site to a local server. You can install WordPress on your computer using WAMP (or MAMP for Mac).

After that, you can use can install your WordPress backup plugin on local server installation and restore using the backup files.

Optionally, if you have only the database backup, then you can restore that using phpMyAdmin as well.

Once you have restored the WordPress database, you will need to update WordPress Site and Home URLs in the database. To do that, simply open phpMyAdmin on your local server by typing the following URL:

http://localhost/phpmyadmin/

After that, you need to select your WordPress database from the left column and then click on the wp_options table. Switch to the browse tab and locate the rows containing ‘siteurl’ and ‘home’ under the option_name column.

Change site URLs

You’ll notice that the option_value column contains the URL of your live website. You need to edit both of these rows and replace your option_value to match your local server WordPress site.

After that click on the ‘Go’ button to save your changes.

You can now login to your localhost installation, and you’ll see all your old pages listed under Pages » All Pages.

Editing a WordPress page

Go a head and edit the page you want to restore. All you need to do is copy the content and paste it to your live WordPress website as a new page.

Copy page content

Don’t forget to update or publish changes on your live website.

We hope this article helped you learn how to recover deleted pages in WordPress. You may also want to see our complete WordPress security guide to keep your WordPress site safe and secure, and our list of the must have WordPress plugins for all websites.

If you liked this article, then please subscribe to our YouTube Channel for WordPress video tutorials. You can also find us on Twitter and Facebook.

The post How to Recover and Restore Deleted Pages in WordPress appeared first on WPBeginner.