

In my previous article, I explained how to fine-tune OpenAI GPT-4o model for natural language processing tasks.
In OpenAI DevDay, held on October 1, 2024, OpenAI announced that users can now fine-tune OpenAI vision and multimodal models such as GPT-4o and GPT-4o mini. The best part is that fine-tuning vision models are free until October 31.
In this article, you will see an example of how to vision fine-tune the GPT-4o model on your custom visual question-answering dataset. So, let's begin without ado.
You will need to install the OpenAI Python library.
!pip install openaiIn this article, we will be using the following Python libraries. Run the following script to import them into your Python application.
from openai import OpenAI
import pandas as pd
import json
import os
from sklearn.utils import shuffle
from sklearn.metrics import accuracy_scoreWe will fine-tune the GPT-4o model on a visual question-answering dataset you can download from Kaggle.
The following script imports the CSV file containing the question, the image ID, and the corresponding answer to the question.
#Data download link
#https://www.kaggle.com/datasets/bhavikardeshna/visual-question-answering-computer-vision-nlp

dataset = pd.read_csv(r"D:\Datasets\dataset\data_train.csv")
dataset.head()
Output:
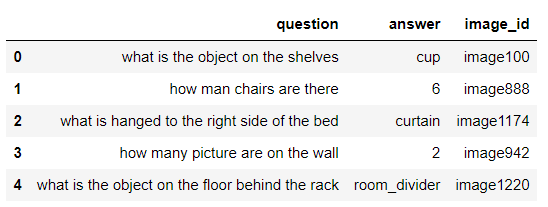
Here is the image with the id image100. You can see cups on the shelves.

For vision fine-tuning, you must pass image URLs to the OpenAI API. Hence, we will upload our images to a cloud service (Github for this article). The dataset consists of over 1500 images. However, I only uploaded the first 495 images to GitHub. You can upload more images if you want.
We will fine-tune the GPT-4o model on 300 images and will test the model on 100 images.
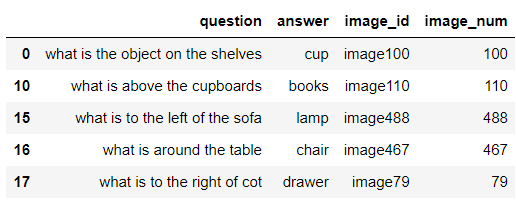
The following script extracts the digit part from the image_id column of the dataset and filters the images with IDs less than 495, as I uploaded only the first 495 images to GitHub.
dataset['image_num'] = dataset['image_id'].str.extract('(\d+)').astype(int)
filtered_data = dataset[dataset['image_num'] < 495]

filtered_data.head()
Output:
You must convert your dataset into the following JSON format for vision fine-tuning OpenAI models.
{
  "messages": [
    { "role": "system", "content": "You are an assistant that identifies uncommon cheeses." },
    { "role": "user", "content": "What is this cheese?" },
    { "role": "user", "content": [
        {
          "type": "image_url",
          "image_url": {
            "url": "https://upload.wikimedia.org/wikipedia/commons/3/36/Danbo_Cheese.jpg"
          }
        }
      ]
    },
    { "role": "assistant", "content": "Danbo" }
  ]
}
We will convert our CSV file into the above JSON format. First, we will divide the dataset into training and test files with 300 and 100 records, respectively.
Next, we will iterate through all the rows in the training set and set the system role, which instructs the model on how to respond to model queries.
Subsequently, we will set the first user role content with the value from the question column and the second with the image URL. Note that we concatenate the base GitHub URL with the image ID to generate the full URL.
Finally, we set the assistant role content with the value from the answer column.
We will perform the above tasks for all the training set records and create our training JSON file.
We will use the test data later for model evaluation.
# Base URL for the images
base_url = "https://raw.githubusercontent.com/usmanmalik57/daniweb-articles/refs/heads/main/vqa_images/"

# Shuffle the dataset
shuffled_dataset = shuffle(filtered_data)

# Split the dataset: first 300 for training, next 100 for testing
training_data = shuffled_dataset[:300]
test_data = shuffled_dataset[300:400]

# Create the JSONL structure for training data and save each entry on a single line
training_output_file = r'D:\Datasets\dataset\training_data.jsonl'

with open(training_output_file, 'w') as f:
    for index, row in training_data.iterrows():
        # Update image URL
        image_url = f"{base_url}image{row['image_num']}.png"
        entry = {
            "messages": [
                {"role": "system", "content": "You are an assistant that answers questions related to images."},
                {"role": "user", "content": row['question']},
                {"role": "user", "content": [
                    {"type": "image_url", "image_url": {"url": image_url}}
                ]},
                {"role": "assistant", "content": row['answer']}
            ]
        }
        # Write each entry as a single line in the JSONL file
        f.write(json.dumps(entry) + '\n')

print(f"Training JSONL file saved as {training_output_file}")
Output:
Training JSONL file saved as D:\Datasets\dataset\training_data.jsonl
We are now ready to fine-tune the GPT-4o model.
The vision fine-tuning process remains the same as text fine-tuning as I have explained in a previous article. The only difference lies in the training file which contains image URLs for vision fine-tuning.
Let's quickly walk through the fine-tuning process.
First, create a client object for the OpenAI class and pass it your OpenAI API key.
Next, you need to upload the training file to the OpenAI server. You can do so using the files.create() method of the OpenAI client object. This method returns the training file data, including the training file ID.
client = OpenAI(
    # This is the default and can be omitted
    api_key = os.environ.get('OPENAI_API_KEY'),
)

training_file = client.files.create(
  file=open(training_output_file, "rb"),
  purpose="fine-tune"
)
To start fine-tuning, call the fine_tuning.jobs.create() method and pass it the ID of the training file you just uploaded to the OpenAI server.
fine_tuning_job_gpt4o = client.fine_tuning.jobs.create(
  training_file=training_file.id,
  model="gpt-4o-2024-08-06"
)
The training process will start in the background. Using the fine_tuning.jobs.list_events() method, you can see various training events.
# List up to 10 events from a fine-tuning job
print(client.fine_tuning.jobs.list_events(fine_tuning_job_id = fine_tuning_job_gpt4o.id,
                                    limit=10))
Once the fine-tuning is completed, you will receive an email containing the model ID of your fine-tuned model. Alternatively, you can retrieve the model ID using your fine-tuning job ID, as the following script shows.
ft_model_id = client.fine_tuning.jobs.retrieve(fine_tuning_job_gpt4o.id).fine_tuned_modelLet's now evaluate the model on the test data.
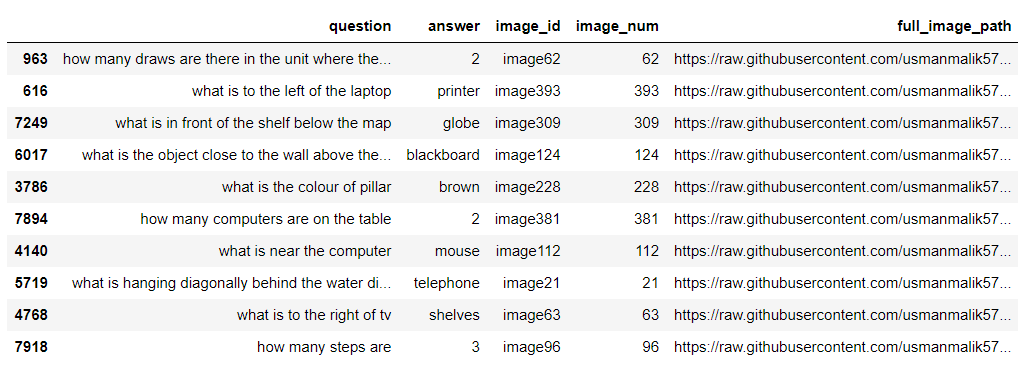
We will add the full_image_path column to the test data, which contains image URLs from the GitHub repository of images.
test_data['full_image_path'] = test_data['image_num'].apply(lambda x: f"{base_url}image{x}.png")
test_data.head(10)
Output:
Next, we will define the get_single_prediction() function, which accepts as parameters the query (question), the full image path, the OpenAI model ID, and the system role and returns the answer to the user's query.
def get_single_prediction(query, image_path, model_id, system_role):

    try:
        # Make the API call to get the response from the model
        response = client.chat.completions.create(
          model= model_id,
          temperature = 0,
          messages=[
                {"role": "system", "content": system_role},
                {"role": "user", "content": [
                    {"type": "text", "text": query},
                    {"type": "image_url", "image_url": {"url": image_path}
                    }
                ]}
          ]
        )


        # Extract the prediction from the API response
        prediction = response.choices[0].message.content.strip().lower()
        return prediction
    except Exception as e:
        print(f"Error making prediction: {e}")
        return None  # In case of failure
Let's first make a prediction using the default GPT-4o model.
image_path = test_data["full_image_path"].iloc[1]
query = test_data["question"].iloc[1]
system_role = "You are an assistant that answers questions related to images."
model_id = "gpt-4o-2024-08-06"
response = get_single_prediction(query, image_path, model_id, system_role)

print(f"Image path: {image_path}")
print(f"User Query: {query}")
print(f"Model Response: {response}")
Output:

The above output shows that the default GPT-4o model correctly predicts the answer. However, the output is not a single word as it was in our dataset.
Let's now make a prediction for the same image using our fine-tuned model.
image_path = test_data["full_image_path"].iloc[1]
query = test_data["question"].iloc[1]
system_role = "You are an assistant that answers questions related to images."
model_id = ft_model_id
response = get_single_prediction(query, image_path, model_id, system_role)

print(f"Image path: {image_path}")
print(f"User Query: {query}")
print(f"Model Response: {response}")
Output:

The model response contains the single word printer, which shows that the fine-tuned model has learned the patterns from the dataset.
We will define the make_predictions() function, which predicts all the records in the test data. The function accepts the dataset, the model ID, and the system role as parameter values.
The function iterates through each record in the dataset and uses the get_single_prediction() function to predict the response. The function then appends the response to the predicted_answers[] list. Finally, the actual_answers list containing the actual answers is compared with the predicted_answers list to calculate the model's accuracy.
def make_predictions(dataframe, model_id, system_role):
    actual_answers = []
    predicted_answers = []

    # Initialize a counter to track record numbers
    record_number = 1

    # Iterate through each row in the dataframe
    for _, row in dataframe.iterrows():
        image_path = row['full_image_path']
        query = row['question']
        actual_answer = row['answer'].lower()

        # Get the predicted answer from the API
        predicted_answer = get_single_prediction(query, image_path, model_id, system_role)

        if predicted_answer:
            # Append actual and predicted answers for accuracy calculation
            actual_answers.append(actual_answer)
            predicted_answers.append(predicted_answer)
        else:
            print(f"Skipping record #{record_number} due to prediction error.")
            record_number += 1
            continue

        # Print the status indicating the record number processed and the response
        print(f"Record #{record_number} processed. Response: {predicted_answer}")

        # Increment the record number for the next iteration
        record_number += 1

    # Calculate accuracy using sklearn's accuracy_score
    accuracy = accuracy_score(actual_answers, predicted_answers) * 100
    print(f"Accuracy: {accuracy:.2f}%")

    return accuracy, predicted_answers
Let's first calculate the default model accuracy on the test data. Notice that the following system prompt contains more details than the fine-tuning prompt since we want the default model to generate predictions similar to those in our dataset's answers column.
model_id = "gpt-4o-2024-08-06"
system_role = """
You are an assistant that answers questions related to images.
Return your response in a single word without period at the end.
For digits you should return digit number and not word. "
"""
gpt_4o_predictions = make_predictions(test_data, model_id, system_role)
Output:
Accuracy: 29.00%The above output shows that the model achieves 29% accuracy for precisely predicting the answers to questions related to images in our dataset.
Let's now make predictions using our fine-tuned model. Here we will use the same system prompt we used for fine-tuning the model.
model_id = ft_model_id
system_role = "You are an assistant that answers questions related to images."
gpt_4o_fine_tuned_predictions = make_predictions(test_data, model_id, system_role)
Output:
Accuracy: 36.00%The above output shows that the model achieves 36% accuracy, which is much better than the default model.
Note: These results may seem poor, with very low accuracy values. However, here, the accuracy is calculated based on exact string matching, which is difficult to get right. Furthermore, the accuracy for this dataset is in the range of 15-25% on Kaggle with the default neural networks, which shows that our fine-tuned model performed quite well.
You can further increase the model performance by fine-tuning on the complete dataset.
Let's plot actual answers, the default and fine-tuned mo,del predictions side by side to further understand the.
comparis furtheron_df = pd.DataFrame({
    'Actual Answers': test_data['answer'],
    'Default GPT-4o': gpt_4o_predictions[1],
    'Fine-tuned GPT-4o': gpt_4o_fine_tuned_predictions[1]
})

# Display the new DataFrame
comparison_df.head(20)
Output:
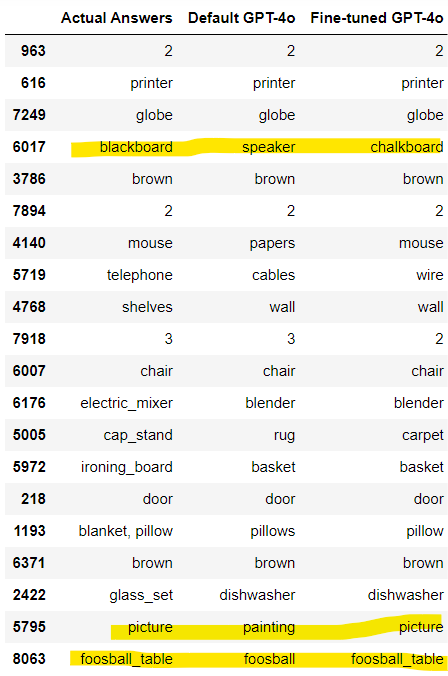
The above output shows that the default and fine-tuned models sometimes predicted the correct answer but in different words. For example, our fine-tuned model predicted chalkboard for blackboard, which are semantically similar.
To overcome this problem, we will ask the GPT-4o model to return True if two predictions are semantically similar. This will give us a better picture of the model's performance.
The following script defines the compare_answer function that takes the actual answer and the prediction as inputs and returns True if the two are semantically similar.
def compare_answer(answer, prediction):

    content = f"""
    Compare the actual answer and prediction and check if the actual answer and prediction have the same meaning.
    They dont have to be the exact match but the meaning must be similarl.
    Actual answer {answer}.
    Prediction: {prediction}.
    Return True if the have same meaning, else return False. Do not return anything else.

    """
    response = client.chat.completions.create(
        model= "gpt-4o-2024-08-06",
        temperature=0,
        max_tokens=10,
        messages=[
            {"role": "user", "content": content}
        ]
    )

    response = response.choices[0].message.content.strip().lower() == 'true'
    print(f"{answer} -> {prediction} -> {response}")
    return response
Next, we will define the count_matching_answers() function which takes two lists as inputs and returns the count of semantically similar values in corresponding items of the two lists.
def count_matching_answers(answers, predictions):
    count = 0
    # Iterate through both lists together using zip
    for answer, prediction in zip(answers, predictions):
        # Call the compare_answer function and increment count if True
        if compare_answer(answer, prediction):
            count += 1
    return count
Let's first check the count of semantically similar outputs for the default GPT-4o model.
matching_count = count_matching_answers(test_data['answer'], gpt_4o_predictions[1])
print(f"Number of matching answers: {matching_count}")
Output:
Number of matching answers: 36The model shows an accuracy of 36%, better than the 29% achieved previously.
Similarly, the script below calculates the accuracy for the fine-tuned GPT-4o model.
matching_count = count_matching_answers(test_data['answer'], gpt_4o_fine_tuned_predictions[1])
print(f"Number of matching answers: {matching_count}")
Output:
Number of matching answers: 40The accuracy now reaches 40% for our fine-tuned model.
OpenAI recently released a much-awaited feature: vision fine-tuning of the OpenAI models. In this article, you saw how to fine-tune the OpenAI GPT-4o model for visual question-answering. Try fine-tuning the GPT-4o model on your custom dataset and see if you get improved results. The fine-tuning is free until October 31, 2024, so trying wouldn't cost a dime anyway ;)