On September 19, 2024, Alibaba released the Qwen 2.5 series of models. The Qwen 2.5-72B base and instruct models outperformed larger state-of-the-art models like Llama 3.1-405B on multiple benchmarks. It is safe to assume that Qwen 2.5-72B is a state-of-the-art open-source large language model.
This article will show you how to use Qwen 2.5 models in your Python applications. You will see how to import Qwen 2.5 models from the Hugging Face library and generate responses. You will also see how to perform text classification and summarization tasks on custom datasets using the Qwen 2.5-7B. So, let's begin without ado.
Note: If you have a GPU with larger memory, you can also try Qwen 2.5-7B using the scripts provided in this code.
Installing and Importing Required Libraries
You can run the scripts in this article on Google Colab. In this case, you only need to install the following libraries.
!pip install rouge-score
!pip install --upgrade openpyxl
!pip install pandas openpyxl
The following script imports the libraries you need to run scripts in this article.
from transformers import AutoModelForCausalLM, AutoTokenizer
import pandas as pd
from sklearn.metrics import accuracy_score
from rouge_score import rouge_scorer
A Basic Example of Using Qwen 2.5 Instruct Model in Hugging Face
Before moving to text classification and summarization on custom datasets, let's first see how to generate a single response from the Qwen 2.5-7B model.
Importing the Model and Tokenizer from Hugging Face
The first step is to import the model weights and tokenizer from the Hugging Face library, as the following script demonstrates.
model_name = "Qwen/Qwen2.5-7B-Instruct"

model = AutoModelForCausalLM.from_pretrained(
    model_name,
    torch_dtype="auto",
    device_map="auto"
)
tokenizer = AutoTokenizer.from_pretrained(model_name)
Note: To use the Qwen 2.5-72B model you can use Qwen/Qwen2.5-7B-Instruct path.
Generating a Response from the Qwen 2.5 Model
The next step is to generate a response from the model. To do so, you need two prompts: a system prompt and a user prompt. The system prompt tells the model his role, while the user prompt is the question that the user asks.
You need to create a list containing the user and system prompts dictionaries. Next, you can call the apply_chat_template() method to convert the messages into a format that the Qwen models understand.
The following defines the system and user prompts that print a Python function. The output shows the formatted messages.
system_prompt = "You are an expert Python coder"

user_prompt = "Give me a Python recursive function calculate factorial of a number"

messages = [
    {"role": "system", "content": system_prompt},
    {"role": "user", "content": user_prompt}
]
text = tokenizer.apply_chat_template(
    messages,
    tokenize=False,
    add_generation_prompt=True
)

print(text)
Output:
<|im_start|>system
You are an expert Python coder<|im_end|>
<|im_start|>user
Give me a Python recursive function calculate factorial of a number<|im_end|>
<|im_start|>assistant
Once you have the message list, you can tokenize it using the Qwen tokenizer you imported earlier. The tokenizer returns model inputs that you can pass to the model.generate() method. Finally, you can decode the model outputs using the tokenizer.batch_decode() method to receive the final string output.
Based on the user input, the script below returns a recursive method for printing the factorial of a number.
model_inputs = tokenizer([text], return_tensors="pt").to(model.device)

generated_ids = model.generate(
    **model_inputs,
    max_new_tokens=512
)
generated_ids = [
    output_ids[len(input_ids):] for input_ids, output_ids in zip(model_inputs.input_ids, generated_ids)
]

response = tokenizer.batch_decode(generated_ids, skip_special_tokens=True)[0]

print(response)
Output:

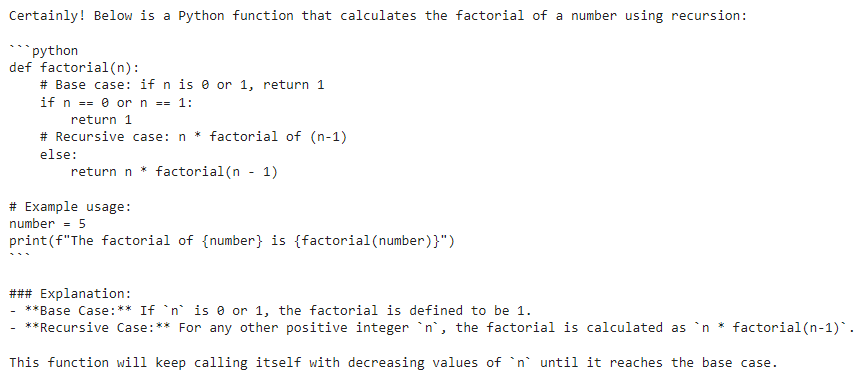
Let's test the function returned by the Qwen model.
def factorial(n):
    # Base case: factorial of 0 or 1 is 1
    if n == 0 or n == 1:
        return 1
    # Recursive case: n * factorial of (n-1)
    else:
        return n * factorial(n-1)

# Example usage:
number = 6
print(f"The factorial of {number} is {factorial(number)}")
Output:
The factorial of 6 is 720
The above output shows that the method functions perfectly.
Now that you know how to generate responses from a Qwem 2.5 model. Let's apply the Qwen 2.5 model to your custom datasets for text classification and summarization.
Text Classification with Qwen 2.5 Model
We will perform sentiment classification of tweets about US Airlines using the Qwen 2.5-7B model.
Importing and Preprocessing the Dataset
We will use the US Airline Sentiment dataset for the twitter sentiment classification tasks.
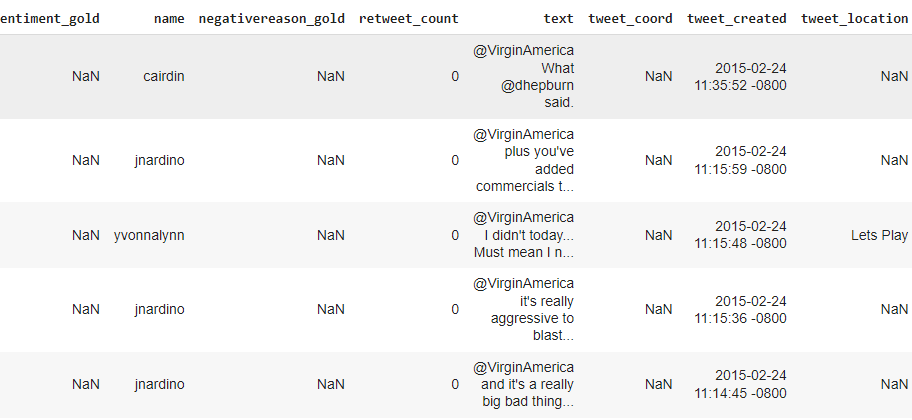
The following script imports the dataset into a Pandas Dataframe.
## Dataset download link
## https://www.kaggle.com/datasets/crowdflower/twitter-airline-sentiment?select=Tweets.csv

dataset = pd.read_csv(r"/content/Tweets.csv")
dataset.head()
Output:

We will perform sentiment classification on 100 tweets divided into 34, 33, and 33 neutral, positive, and negative tweets, respectively. The script below preprocesses the dataset.
# Remove rows where 'airline_sentiment' or 'text' are NaN
dataset = dataset.dropna(subset=['airline_sentiment', 'text'])

# Remove rows where 'airline_sentiment' or 'text' are empty strings
dataset = dataset[(dataset['airline_sentiment'].str.strip() != '') & (dataset['text'].str.strip() != '')]

# Filter the DataFrame for each sentiment
neutral_df = dataset[dataset['airline_sentiment'] == 'neutral']
positive_df = dataset[dataset['airline_sentiment'] == 'positive']
negative_df = dataset[dataset['airline_sentiment'] == 'negative']

# Randomly sample records from each sentiment
neutral_sample = neutral_df.sample(n=34)
positive_sample = positive_df.sample(n=33)
negative_sample = negative_df.sample(n=33)

# Concatenate the samples into one DataFrame
dataset = pd.concat([neutral_sample, positive_sample, negative_sample])

# Reset index if needed
dataset.reset_index(drop=True, inplace=True)

# print value counts
print(dataset["airline_sentiment"].value_counts())
Output:
airline_sentiment
neutral     34
positive    33
negative    33
Name: count, dtype: int64
Predicting Tweets Sentiment with Qwen 2.5
Next, we will define the generate_model_response() function, which accepts the system and user prompt as parameters and returns the Qwen 2.5-7B model response.
def generate_model_response(system_prompt, user_prompt):

  messages = [
      {"role": "system", "content": system_prompt},
      {"role": "user", "content": user_prompt}
  ]

  text = tokenizer.apply_chat_template(
      messages,
      tokenize=False,
      add_generation_prompt=True
  )
  model_inputs = tokenizer([text], return_tensors="pt").to(model.device)

  generated_ids = model.generate(
      **model_inputs,
      max_new_tokens=512
  )
  generated_ids = [
      output_ids[len(input_ids):] for input_ids, output_ids in zip(model_inputs.input_ids, generated_ids)
  ]

  response = tokenizer.batch_decode(generated_ids, skip_special_tokens=True)[0]

  return response
Subsequently, we will iterate through all the tweets in the preprocessed dataset and predict the sentiment of each tweet using the generate_model_response() function.
Finally, we compare the predicted sentiments with the actual tweet sentiments and display the model accuracy.
def find_sentiment(dataset):

    tweets_list = dataset["text"].tolist()

    all_sentiments = []

    i = 0
    exceptions = 0
    while i < len(tweets_list):

        try:
            tweet = tweets_list[i]

            system_prompt = "You are an expert in annotating tweets with positive, negative, and neutral emotions"

            user_prompt = """What is the sentiment expressed in the following tweet about an airline?
            Select sentiment value from positive, negative, or neutral. Return only the sentiment value in small letters.
            tweet: {}""".format(tweet)

            sentiment_value = generate_model_response(system_prompt, user_prompt)
            all_sentiments.append(sentiment_value)
            i = i + 1
            print(i, sentiment_value)

        except Exception as e:
            print("===================")
            print("Exception occurred:", e)
            exceptions += 1

    print("Total exception count:", exceptions)
    accuracy = accuracy_score(all_sentiments, dataset["airline_sentiment"])
    print("Accuracy:", accuracy)

find_sentiment(dataset)
Output:
Total exception count: 0
Accuracy: 0.79
The above output shows that the model achieves an accuracy of 79% for zero-shot classification of tweets. This performance is even better than 76% achieved by GPT-4o in this article.
In the next section, you will see how to perform text summarization with Qwen 2.5-7B model.
Text Summarization with with Qwen 2.5
We will summarize a BBC news article using the Qwen 2.5-7B model and evaluate model performance using ROUGE scores.
Importing the Dataset
We will summarize articles from the News Articles with Summary dataset.
The script below imports the dataset into your Python application.
# Kaggle dataset download link
# https://github.com/reddzzz/DataScience_FP/blob/main/dataset.xlsx

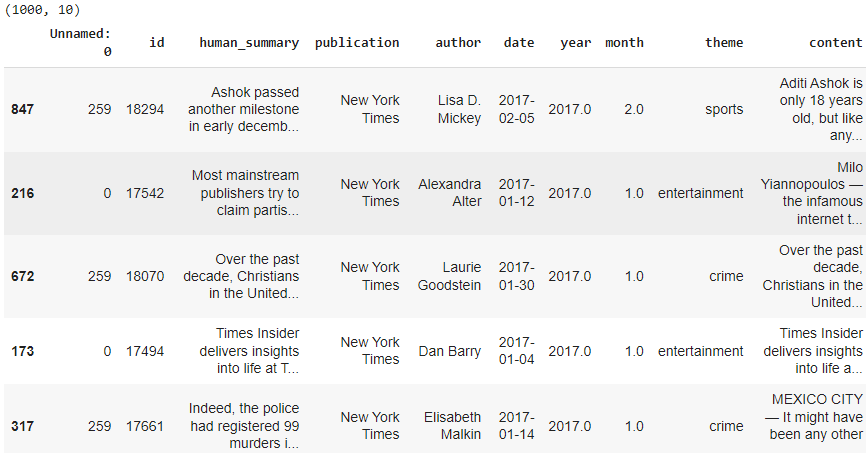
dataset = pd.read_excel(r"/content/dataset.xlsx")
dataset = dataset.sample(frac=1)
print(dataset.shape)
dataset.head()
Output:

Summarizing News Articles with Qwen 2.5
The process will remain the same. We will generate model summaries from the Qwen 2.5-7B model using the generate_model_response() function that we defined earlier.
Next, we will compare the model-generated summaries with human summaries and evaluate the model's performance using ROUGE scores.
The following script defines the calculate_rouge() function, which will accept summaries generated by humans and models and return ROUGE scores for comparison.
# Function to calculate ROUGE scores
def calculate_rouge(reference, candidate):
    scorer = rouge_scorer.RougeScorer(['rouge1', 'rouge2', 'rougeL'], use_stemmer=True)
    scores = scorer.score(reference, candidate)
    return {key: value.fmeasure for key, value in scores.items()}
The following script defines the generate_summary() function, which iterates through the first 20 articles in the dataset, generates summaries using the Qwen model, and compares them with the human summary to calculate ROUGE scores.
Finally, the average ROUGE scores for all the articles is printed on the console.
# Function to generate summary using OpenAI API
def generate_summary(dataset):

    results = []

    i = 0

    for _, row in dataset[:20].iterrows():
      article = row['content']
      human_summary = row['human_summary']

      i +=1
      print(f"Summarizing article {i}")

      system_prompt = "You are an expert in summarizing news articles"
      user_prompt = f"Summarize the following article in 1150 characters. The summary should look like human created:\n\n{article}\n\nSummary:"

      generated_summary = generate_model_response(system_prompt, user_prompt)

      rouge_scores = calculate_rouge(human_summary, generated_summary)

      results.append({
          'article_id': row.id,
          'generated_summary': generated_summary,
          'rouge1': rouge_scores['rouge1'],
          'rouge2': rouge_scores['rouge2'],
          'rougeL': rouge_scores['rougeL']
      })

    return results

results = generate_summary(dataset)

results_df = pd.DataFrame(results)

mean_values = results_df[["rouge1", "rouge2", "rougeL"]].mean()
print(mean_values)
Output:
rouge1    0.325830
rouge2    0.068624
rougeL    0.168639
Conclusion
Qwen-2.5 models have demonstrated state-of-the-art results for text generation and natural language processing tasks.
In this article, you saw how to generate a response from the Qwen 2.5-7B model from Hugging Face and how to perform text classification and summarization on your custom datasets. I suggest you try using the Qwen 2.5-72B model to see if you get better results.
Feel free to share your feedback.


