Navigating State Management in Vuex The Ultimate Guide

Featured Imgs 23

State management is a critical aspect of modern web development, especially for complex applications where managing state across multiple components can become cumbersome. Vuex, the state management library for Vue.js applications, provides a robust solution for handling state management in a centralized and predictable manner. This guide will walk you through the essentials of Vuex, …

The post Navigating State Management in Vuex The Ultimate Guide first appeared on Lucid Softech.

WP Engine Launches Improved Agency Directory

Featured Imgs 23

WP Engine’s Agency Partner Program, the world’s largest WordPress agency ecosystem, is designed to help digital agencies grow and improve their efficiency with access to industry-leading incentives. With the launch of our newly revamped Agency Partner Directory, we’re excited to provide yet another resource for driving leads and creating value for our agency partners.  Our

The post WP Engine Launches Improved Agency Directory appeared first on WP Engine.

How ERP Solution Handles Multiple-Location Operations: Unlock Efficiency Across Every Site

Featured Imgs 23

Running a business with multiple locations can feel like navigating a maze blindfolded—every corner has its own set of surprises. Managing inventory, coordinating teams, and ensuring smooth financial operations across different sites is no small feat.

So, how ERP solution handles multiple-location operations is a game-changer. It streamlines everything from data management to supply chain coordination, bringing order to the chaos and ensuring that every location is aligned with the same goals.

10 Ways ERP Enhances Multi-Location Operations: Simplify, Optimize, and Grow

Managing operations across multiple locations can quickly become overwhelming without the right tools in place. As businesses grow and expand their reach, the complexity of handling data, inventory, finances, and customer interactions multiplies.

Enter ERP (Enterprise Resource Planning) systems—powerful software solutions designed to centralize, streamline, and optimize business processes. With ERP, multi-location businesses can break down operational barriers, making it easier to maintain consistency, improve communication, and drive growth.

Below, we’ll explore 10 critical ways an ERP solution can transform how you manage multiple locations, enabling your business to operate more efficiently, accurately, and strategically.

1. Centralized Data Management

In the world of multi-location operations, centralized data management is the backbone of efficient ERP systems. It ensures that all locations are working with the same, up-to-date information, leading to better decision-making and smoother operations.

Real-time Data Synchronization

  • Instant Updates: Changes made in one location are immediately reflected across the entire system.
  • Reduced Errors: Eliminates the risk of working with outdated information.
  • Improved Collaboration: Teams across different locations can work together seamlessly.

Single Source of Truth Across Locations

  • Data Consistency: All locations access the same centralized database, ensuring uniformity.
  • Simplified Auditing: Easier to track changes and maintain data integrity.
  • Enhanced Decision Making: Leadership can trust the data for strategic planning.
Section Image

2. Inventory Management Across Locations

Effective inventory management is crucial for businesses operating in multiple locations. ERP solutions provide tools to optimize stock levels and predict demand accurately.

Stock Transfers and Tracking

  • Inter-location Transfers: Easily move inventory between locations to meet demand.
  • Real-time Visibility: Track the status and location of all inventory items.
  • Automated Alerts: Set up notifications for low stock levels or overstock situations.

Demand Forecasting for Each Location

  • Data-driven Predictions: Use historical data and trends to forecast future demand.
  • Location-specific Insights: Tailor inventory levels to the unique needs of each location.
  • Seasonal Adjustments: Account for location-specific seasonal variations in demand.

3. Financial Consolidation and Reporting

ERP solutions streamline financial processes across multiple locations, providing a clear picture of the overall financial health of the organization.

Multi-currency Support

  • Automatic Conversions: Handle transactions in different currencies seamlessly.
  • Exchange Rate Management: Keep exchange rates updated for accurate financial reporting.
  • Currency Risk Assessment: Analyze the impact of currency fluctuations on your business.

Location-specific and Consolidated Financial Statements

  • Granular Reporting: Generate financial reports for individual locations.
  • Roll-up Capabilities: Easily consolidate financial data from all locations.
  • Customizable Dashboards: Create visual representations of financial data for quick insights.

4. Supply Chain Optimization

ERP systems help businesses streamline their supply chain operations across multiple locations, leading to cost savings and improved efficiency.

Coordinated Purchasing Across Locations

  • Bulk Ordering: Combine orders from multiple locations for better negotiating power.
  • Supplier Management: Maintain a centralized database of suppliers for all locations.
  • Purchase Order Automation: Streamline the purchasing process with automated workflows.

Streamlined Distribution and Logistics

  • Route Optimization: Plan the most efficient delivery routes across locations.
  • Warehouse Management: Optimize storage and picking processes in multiple warehouses.
  • Shipment Tracking: Provide real-time updates on shipments to all relevant locations.

5. Customer Relationship Management

ERP solutions enable businesses to maintain consistent customer relationships across all locations, enhancing customer satisfaction and loyalty.

Unified Customer View Across All Locations

  • Centralized Customer Database: Access customer information from any location.
  • Interaction History: View all customer interactions, regardless of the contact point.
  • 360-degree Customer Profiles: Understand customer preferences and history for personalized service.

Consistent Customer Experience Regardless of Location

  • Standardized Processes: Ensure the same high-quality service at every location.
  • Cross-location Support: Seamlessly transfer customer issues between locations.
  • Unified Communication Channels: Maintain consistency in customer communications across all touchpoints.

6. Human Resource Management

ERP systems help standardize HR processes across multiple locations, ensuring consistency and efficiency in managing human capital.

Standardized HR Processes Across Locations

  • Uniform Policies: Implement consistent HR policies across all locations.
  • Centralized Employee Records: Maintain a single database for all employee information.
  • Automated Workflows: Streamline processes like onboarding and performance reviews.

Employee Self-Service Portals

  • 24/7 Access: Allow employees to access their information and perform HR tasks anytime.
  • Reduced Administrative Burden: Empower employees to manage their own data and requests.
  • Mobile Accessibility: Provide access to HR services through mobile devices for remote workers.

7. Compliance and Risk Management

ERP solutions help businesses navigate the complex landscape of regulations and risk management across multiple locations.

Location-specific Regulatory Compliance

  • Customizable Rule Sets: Configure compliance rules based on local regulations.
  • Automated Compliance Checks: Ensure all transactions and processes adhere to local laws.
  • Audit Trails: Maintain detailed records for compliance audits.

Centralized Risk Assessment and Mitigation

  • Risk Dashboard: Monitor potential risks across all locations in real-time.
  • Scenario Planning: Analyze the impact of potential risks on different locations.
  • Incident Reporting: Standardize the process of reporting and addressing risk incidents.

8. Scalability and Flexibility

ERP systems designed for multi-location operations offer the scalability and flexibility needed to grow and adapt to changing business needs.

Easy Addition of New Locations

  • Rapid Deployment: Quickly set up new locations with pre-configured templates.
  • Data Migration Tools: Easily integrate existing data from new locations.
  • Training Resources: Provide standardized training materials for new location staff.

Customization for Location-specific Needs

  • Modular Design: Add or remove features based on each location’s requirements.
  • Configurable Workflows: Adapt processes to fit local business practices.
  • API Integration: Connect with location-specific third-party tools and services.

9. Business Intelligence and Analytics

ERP solutions provide powerful analytics capabilities to gain insights across multiple locations and drive data-informed decisions.

Cross-location Performance Comparisons

  • Benchmarking Tools: Compare KPIs across different locations.
  • Performance Dashboards: Visualize performance metrics for easy comparison.
  • Best Practice Identification: Identify top-performing locations and replicate their strategies.

Data-driven Decision Making

  • Predictive Analytics: Use data from all locations to forecast trends and outcomes.
  • What-if Scenarios: Model the impact of potential decisions across multiple locations.
  • Real-time Reporting: Access up-to-date data for timely decision-making.
Section Image

10. Cloud-based ERP Solutions for Multi-Location Operations

Cloud-based ERP solutions offer unprecedented advantages for businesses operating across multiple locations, providing seamless accessibility and significant cost savings.

Accessibility from Anywhere

Cloud-based ERP systems break down geographical barriers, allowing organizations to access critical business information and processes from any location with an internet connection.

  1. Global Access: Access the ERP system from any device (computer, tablet, smartphone) in any location.
  2. Real-time Collaboration: Enable teams across different locations to work together seamlessly on shared data and processes.
  3. Mobile Functionality: Leverage mobile apps for on-the-go access to key ERP functions and data.

Reduced IT Infrastructure Costs

By moving to the cloud, businesses can significantly lower their total cost of ownership for ERP systems, eliminating the need for extensive on-premises infrastructure.

  1. Eliminated Hardware Costs: Remove the need for on-site servers and related hardware maintenance.
  2. Automatic Updates: Receive software updates and security patches automatically without IT intervention.
  3. Scalable Resources: Easily scale computing resources up or down based on business needs without additional hardware investments.

Enhanced Security and Reliability

Cloud-based ERP solutions offer robust security measures and high reliability, crucial for businesses operating across multiple locations.

  1. Advanced Security Protocols: Benefit from enterprise-grade security measures implemented by cloud providers.
  2. Disaster Recovery: Ensure business continuity with built-in backup and recovery solutions.
  3. High Availability: Access your ERP system 24/7 with minimal downtime, crucial for global operations.

Rapid Deployment and Scalability

Cloud-based ERP solutions enable businesses to quickly set up new locations and scale their operations efficiently.

  1. Quick Setup: Deploy the ERP system to new locations rapidly without the need for on-site IT infrastructure.
  2. Standardized Processes: Implement standardized business processes across all locations easily.
  3. Flexible Scalability: Add or remove users, modules, or entire locations as your business needs change.

By leveraging cloud-based ERP solutions, businesses can effectively manage their multi-location operations with greater flexibility, efficiency, and cost-effectiveness, driving growth and competitiveness in the global marketplace.

Implementation Challenges and Best Practices

Implementing an ERP solution is a complex process, and when it comes to managing multiple locations, the complexity multiplies.

Each site may have different operational procedures, cultures, and technological infrastructures, making it difficult to achieve seamless integration across the board.

Common challenges include:

  1. Data Migration and Integration: Moving historical data from old systems to a new ERP platform often leads to compatibility issues, data duplication, or even loss of vital information.
  2. Customization and Standardization: Balancing the need for location-specific customizations while maintaining overall business standardization can be tricky.
  3. Resource Constraints: Whether it’s a lack of technical expertise or budget overruns, resource limitations often slow down the implementation process.
Section Image

However, these challenges can be managed with a well-thought-out strategy. Here are some best practices to follow:

  1. Conduct a Comprehensive Needs Assessment: Before diving into implementation, identify the specific needs of each location and ensure the ERP system aligns with these needs while maintaining uniformity across locations.
  2. Phased Rollout: Instead of deploying ERP across all locations at once, opt for a phased approach, starting with a pilot location. This allows for troubleshooting and adjustments before scaling up.
  3. Cross-functional Team Involvement: Form a team of key stakeholders from different locations to represent their unique needs and ensure a smooth transition.

Change Management Across Locations

Change management is often one of the most underestimated factors in ERP implementation. The introduction of a new ERP system can disrupt established workflows and trigger resistance from employees, especially in organizations with multiple locations.

Each location may have its own culture and way of doing things, making the adoption of a unified ERP system even more challenging.

Best Practices for Change Management:

  1. Clear Communication: Keep employees at all levels informed about the goals and benefits of the ERP system. Explain how the system will make their jobs easier and what improvements it will bring. Transparency reduces uncertainty and resistance.
  2. Localized Approach: While the overarching change management strategy should remain consistent, recognize that each location is different. Tailor your communication and engagement tactics to fit each location’s unique culture and workforce.
  3. Leadership Alignment: Secure the support of local leaders and managers, as their influence will be key to driving adoption at each site. Employees are more likely to embrace change if they see their leaders actively supporting it.
  4. Employee Involvement: Get employees involved early in the process by soliciting their feedback and concerns. Employees who feel like they are part of the decision-making process are more likely to support the change.

Training and Adoption Strategies

The success of any ERP system heavily depends on how well employees are trained to use it. Lack of proper training often leads to underutilization, confusion, and errors, which can significantly reduce the return on investment (ROI) of the system.

For multi-location businesses, training becomes even more critical because employees across different sites may have varying levels of technological proficiency and business needs.

Best Practices for Training and Adoption:

  1. Role-specific Training Programs: Different roles within the organization require different levels of interaction with the ERP system. Tailor training sessions to address the specific needs of each department or team, ensuring that everyone is equipped with the skills relevant to their role.
  2. Hands-on, Interactive Learning: Create training environments where employees can practice using the ERP system in real-world scenarios. This could include simulated tasks or sandbox environments where mistakes are allowed and lessons can be learned before going live.
  3. Ongoing Training and Support: ERP adoption isn’t a one-time event. Continuous learning should be encouraged with regular refresher courses, updates on new features, and an accessible helpdesk or support team to address any issues that arise post-implementation.
  4. Feedback and Iteration: Create a feedback loop that allows employees to voice any difficulties they encounter. Use this information to refine the training program or make necessary adjustments to the system’s configuration.

By addressing the challenges of ERP implementation with robust change management and effective training strategies, businesses can ensure a smooth transition and maximize the benefits of their ERP solution across all locations.

Simplify and Optimize Multi-Location Operations with a Robust ERP System

Managing multiple locations doesn’t have to be overwhelming. A robust ERP system can simplify complex processes by centralizing data, streamlining inventory management, and enhancing financial reporting across all locations.

With real-time synchronization, coordinated supply chains, and unified customer management, ERP empowers businesses to operate efficiently and strategically, no matter how many sites they oversee.

Whether you’re aiming to scale, improve decision-making, or maintain consistent customer experiences, an ERP solution can turn multi-location challenges into opportunities for growth. Invest in an ERP system today and unlock the full potential of your business operations.

How to Ensure Your ERP Implementation Is a Success Story: From Planning to Execution

Featured Imgs 23

Did you know that around 75% of ERP implementations fail to meet their objectives? It’s a staggering statistic, but it doesn’t have to be your story. A well-executed ERP system can transform the way your business operates, from streamlining processes to boosting efficiency.

But here’s the catch: it’s not just about choosing the right software—it’s about the right strategy. Whether you’re a global enterprise or a growing startup, understanding how to ensure your ERP implementation is a success story is the key to unlocking its full potential.

Ensuring a Successful ERP Implementation: 10 Key Tips

Implementing an ERP system is a significant investment for any organization. To maximize the benefits and ensure a smooth transition, follow these key tips:

1. Define Clear Objectives

Start by setting clear, measurable goals for what you want to achieve with the ERP system. Whether it’s improving operational efficiency, enhancing data accuracy, or streamlining processes, having well-defined objectives will guide your implementation and help measure success.

2. Involve Key Stakeholders

Engage all relevant stakeholders early in the process. This includes not just the IT team but also end-users, managers, and other departments affected by the ERP system. Their input is crucial for tailoring the system to your organization’s specific needs and ensuring user buy-in.

3. Choose the Right ERP Vendor

Selecting the right ERP vendor is crucial. Research and evaluate different vendors based on their track record, support services, scalability, and how well their solution aligns with your business requirements. Request demos and speak with current users to get a real-world perspective.

4. Develop a Comprehensive Plan

Create a detailed plan for the implementation. It should outline each phase of the project, including timelines, milestones, and responsibilities. A well-structured plan helps keep the project on track and ensures that all aspects of the implementation are covered.

5. Allocate Sufficient Resources

Ensure you have the necessary resources in terms of budget, time, and personnel. An ERP implementation can be resource-intensive, so it’s important to allocate adequate resources to avoid delays and ensure a successful rollout.

6. Prioritize Data Migration and Integration

Accurate data migration and integration are critical to the success of your ERP system. Invest time in cleaning and organizing your data before migration to prevent issues and ensure that your new system operates with accurate and reliable information.

7. Provide Comprehensive Training

Invest in thorough training for all users to ensure they are comfortable with the new system. Well-trained employees are more likely to use the ERP system effectively and contribute to its success.

Section Image

8. Monitor and Adjust

After the ERP system is live, continuously monitor its performance and gather feedback from users. Be prepared to make adjustments as needed to address any issues and optimize the system’s performance.

9. Establish Strong Support Channels

Having robust support channels in place can make a big difference. Ensure that your ERP vendor offers reliable support and that your internal team is equipped to handleany technical issues that arise.

10. Celebrate Milestones and Successes

Acknowledge and celebrate key milestones throughout the implementation process. Recognizing achievements boosts morale and keeps the team motivated as you work towards full system integration.

Common Challenges in ERP Implementation

ERP implementation can be a game-changer, but it’s not without its challenges. Many businesses face unexpected hurdles that can derail even the best-laid plans. Anticipating these challenges is key to ensuring a smooth process.

Below, we’ll highlight the most common issues that arise during ERP implementation and how being prepared can help you overcome them for a successful rollout.

Overcoming Resistance to Change

One of the most common hurdles encountered during ERP implementation is resistance to change. Employees may be hesitant to adopt new systems due to fear of the unknown, an inherent dislike of change, or concerns about job security.

To overcome this challenge, consider:

  1. Involving employees early in the process
  2. Offering transparent communication about the changes
  3. Providing incentives for adapting to the new system

A supportive environment fosters engagement and mitigates resistance. After all, when employees feel like part of the solution, they are more likely to embrace change.

Additionally, providing training sessions that not only cover the technical aspects of the new ERP system but also emphasize its benefits can significantly alleviate fears.

Workshops and hands-on demonstrations can empower employees, allowing them to explore the system in a low-pressure setting.

Furthermore, establishing a feedback loop where employees can voice concerns and suggest improvements can create a sense of ownership and collaboration, further easing the transition.

Section Image

Managing Implementation Costs

While investing in an ERP system can yield significant returns, implementation costs can escalate quickly. To avoid budget overruns, implement strategies such as:

  1. Conducting a cost-benefit analysis before embarking on the project
  2. Creating a detailed budget plan that factors in all variables
  3. Regularly reviewing expenses during the implementation

Engaging with a dedicated project manager who specializes in ERP implementations can provide invaluable insights and help keep the project on track.

Additionally, leveraging cloud-based ERP solutions can sometimes offer a more cost-effective alternative, reducing the need for extensive hardware investments and allowing for scalable solutions that grow with your business.

Ensuring Data Accuracy and Security

Data integrity is a cornerstone of any ERP implementation. If your data is faulty or vulnerable, the entire system’s effectiveness will be compromised. Best practices for ensuring data accuracy and security include:

  1. Conducting a thorough data audit before implementation
  2. Implementing robust security measures to safeguard data
  3. Regularly updating and backing up data

Regular training on data handling best practices can also help mitigate human error, which is often a significant factor in data inaccuracies.

In an era where data breaches are increasingly common, investing in advanced security technologies, such as encryption and multi-factor authentication, is essential to protect sensitive information and maintain compliance with regulations.

Section Image

Measuring the Success of Your ERP Implementation

Measuring the success of your ERP implementation is essential to ensure it delivers real value. But how can you be sure it’s meeting your goals? Simply going live isn’t enough.

Below, we’ll explore the key ways to assess your ERP’s performance and ensure it’s driving the improvements your business needs. 

Key Performance Indicators for ERP Success

To truly understand the impact of your ERP implementation, you must define clear KPIs (Key Performance Indicators). KPIs provide measurable outcomes that reflect the success of your initiative, such as:

  1. Reduction in operational costs
  2. Improvements in data accuracy
  3. Satisfaction levels among employees and customers

Monitoring these indicators will help gauge overall success and identify areas needing adjustments or enhancements.

The Role of Continuous Improvement in ERP Success

Finally, embracing a culture of continuous improvement is crucial for maintaining the success of your ERP system. This involves:

  1. Encouraging feedback from users
  2. Staying updated with technological advancements
  3. Implementing a systematic approach to suggest and make improvements

ERP is not a one-time project but an ongoing journey of optimization, and a culture that values continuous improvement will lead to sustained success for your enterprise.

Turn Your ERP Implementation Into a Triumph, Not a Turmoil

A successful ERP implementation doesn’t happen by chance—it requires careful planning, the right team, and ongoing evaluation. From defining your objectives to selecting the best software and building a skilled implementation team, each step plays a vital role in your success.

By following these strategies, you can turn your ERP implementation into a powerful tool that drives growth and efficiency across your organization. Ready to see real results? Get started today.

What Lessons can be Learned from ERP Implementation Failures: Avoid Critical Mistakes

Featured Imgs 23

From global giants like Nike to household names like Hershey, no one is immune to the potential pitfalls of an ERP failure.

But here’s the silver lining: failure is often the best teacher. What lessons can be learned from ERP implementation failures? Plenty. Each misstep from past projects provides invaluable insights that businesses today can leverage to avoid similar disasters.

Buckle up as we dive into the real-world lessons every business should learn to ensure their ERP success.

Key Lessons Learned from ERP Implementation Failures

ERP implementation is a transformative journey for any business, but without learning from past failures, it can easily derail.

Let’s explore the essential lessons that can be learned from ERP failures, offering actionable insights that can help businesses avoid common pitfalls and ensure successful implementation.

1. Define Clear Objectives from the Start

One of the most common reasons ERP projects fail is the lack of clearly defined objectives. Many organizations embark on the ERP journey without setting measurable goals, leading to confusion and misalignment across departments.

To ensure success, it’s vital to have clear, quantifiable objectives that guide the entire project.

Why it Matters:

Without clear goals, businesses lose sight of what they want to achieve, leading to scope creep, delays, and wasted resources. When objectives are well-defined, everyone involved in the project—from executives to end-users—understands what success looks like.

​Actionable Tip:

Before selecting an ERP system, gather all stakeholders to outline specific outcomes, such as improving supply chain efficiency by 20% or reducing operating costs by 15%. These objectives will serve as the benchmark for the project’s success.

Section Image

2. Invest in Change Management

Change is one of the most challenging aspects of any ERP implementation, and resistance to change can cripple even the best-planned projects. People naturally resist new systems, workflows, and processes, so addressing organizational resistance head-on is critical for success.

​Why it Matters:

ERP implementations often fail when employees are not adequately prepared or motivated to embrace the new system. Without proper change management, you may face:

  1. Pushback from teams
  2. Low adoption rates
  3. Poor user engagement

    …..all of which can undermine the system’s effectiveness.

    Actionable Tip:

    Develop a comprehensive change management plan that includes regular communication, training sessions, and employee involvement in decision-making. Involving staff early ensures they feel empowered and reduces resistance during the transition.

    3. Ensure Top-Down Commitment

    ERP projects require unwavering commitment from leadership, as they are typically:

    1. Complex
    2. Time-consuming
    3. Resource-intensive

    Without strong support from the top, it becomes difficult to maintain momentum, manage cross-departmental collaboration, or secure necessary resources.

    ​Why it Matters:

    Top-down commitment ensures that the project has visibility, resources, and authority at all levels of the organization. When leaders actively participate in the process, they demonstrate the importance of the ERP project, motivating teams to stay aligned and focused on the goals.

    Actionable Tip:

    Assign a dedicated executive sponsor to oversee the ERP implementation, ensure accountability, and provide guidance. Regularly communicate the project’s progress to leadership to keep them engaged and invested in its success.

    4. Select the Right ERP System for Your Needs

    Choosing the wrong ERP system is a critical error that can lead to failure. No two businesses are alike, and an ERP system that works for one may not suit another. Selecting a system that aligns with your specific business processes, size, and industry requirements is essential to success.

    ​Why it Matters:

    A mismatched ERP system can create inefficiencies, frustrate users, and ultimately fail to deliver the promised results. Choosing a system tailored to your business ensures that it will integrate smoothly with your existing processes and support long-term growth.

    Actionable Tip:

    Conduct a thorough needs assessment before committing to any ERP platform. Consider factors like:

    1. Scalability
    2. Flexibility
    3. Industry-specific features

    Consulting with ERP vendors or using ERP consulting services can ensure you choose a solution tailored to your specific needs.

    5. Prioritize User Training and Ongoing Support

    No ERP system, no matter how well designed, can be successful without adequate training and support for its users. Employees must understand how to effectively use the system to perform their roles, and ongoing support ensures they can adapt to updates and changes over time.

    ​Why it Matters:

    Many ERP failures stem from inadequate user training. When employees don’t know how to use the system, productivity drops, and the company fails to realize the full benefits of the ERP. Proper training ensures employees are equipped to leverage the ERP system to its fullest potential.

    Actionable Tip:

    Develop a robust training program tailored to different user roles. Provide hands-on sessions, documentation, and a support helpdesk to assist users throughout the implementation process. Post-launch, ensure there are regular refresher courses and updates to keep staff proficient as the system evolves.

    Real-World Examples of ERP Failures and Lessons Learned

    While ERP systems promise efficiency and streamlined operations, history shows that even some of the world’s largest companies have experienced high-profile ERP failures.

    Section Image

    Hershey’s ERP Failure: A Halloween Nightmare

    One of the most infamous ERP failures is Hershey’s botched implementation in 1999. The confectionery giant decided to implement a $112 million ERP system from SAP, along with customer relationship and logistics software, in a highly compressed timeline.

    Unfortunately, the launch occurred just before the critical Halloween season—a major sales period for the company.

    ​What Went Wrong:

    Hershey’s main error was the aggressive timeline. By rushing the implementation, the company did not allow enough time for thorough testing of the new system.

    Moreover, rolling out the ERP system during their peak sales period created a logistical nightmare. As a result, Hershey’s could not deliver $100 million worth of candy to retailers, leading to significant financial losses and a 19% drop in stock price.

    Key Lessons Learned:

    1. Never Rush Implementation: Adequate time is essential for testing and troubleshooting the ERP system. Rushing through these critical steps can lead to severe operational breakdowns, as seen in Hershey’s case.
    2. Avoid Peak Business Periods: ERP rollouts should never coincide with peak sales seasons. This minimizes the impact of any unforeseen issues and allows teams to focus on resolving potential challenges without the added pressure of high demand.

    Nike’s $400 Million ERP Failure: A Lesson in Supply Chain Management

    Nike, the global sportswear brand, experienced one of the costliest ERP failures in 2000. The company invested $400 million in an ambitious ERP implementation aimed at improving its supply chain and demand planning processes.

    However, the system malfunctioned shortly after the rollout, leading to inventory shortages for some products and overproduction of others.

    ​What Went Wrong:

    Nike’s failure was due to poor integration between the ERP system and its supply chain management software.

    This mismatch caused significant miscalculations in demand forecasting, resulting in an overstock of unwanted products and a shortage of high-demand items. The resulting inefficiencies cost the company around $100 million in lost sales and a 20% drop in stock price.

    Key Lessons Learned:

    1. Ensure Seamless Integration: One of the most critical aspects of ERP implementation is ensuring that all systems, including supply chain management software, are well-integrated. Poor coordination between systems can lead to major disruptions, as seen with Nike.
    2. Start Small and Scale Gradually: Instead of rolling out a full-scale ERP implementation, consider a phased approach. This allows for testing and adjustments on a smaller scale before the system is deployed company-wide.

    Lidl’s $500 Million ERP Failure: Incompatible Vision and System

    German supermarket chain Lidl experienced one of the most expensive ERP failures in recent history. Lidl had been using a custom-built inventory management system but decided to switch to an off-the-shelf ERP system from SAP to standardize operations across its global locations.

    The project, which began in 2011, was abandoned after seven years and a $500 million investment.

    ​What Went Wrong:

    The failure stemmed from a mismatch between Lidl’s business processes and the standard functionality of SAP’s ERP system. Lidl used a unique method for inventory valuation that SAP’s system couldn’t accommodate without extensive customization.

    These customizations made the system overly complex, causing delays, operational issues, and escalating costs.

    Key Lessons Learned:

    1. Adapt Processes to Fit the ERP System: One of the main advantages of ERP systems is their ability to standardize processes. If a company’s processes are too rigid or unique, it may be more efficient to adjust those processes to fit the ERP system rather than customizing the system to fit the business.
    2. Know When to Cut Losses: After seven years and half a billion dollars, Lidl made the tough decision to scrap the project. While costly, knowing when to stop and cut your losses can prevent even further financial damage.

    Revlon’s ERP Meltdown: Losing Control of Operations

    Revlon, a multinational cosmetics company, faced an ERP disaster in 2018 after implementing a new SAP system in its North Carolina manufacturing plant.

    The system caused significant disruptions to Revlon’s production and distribution processes, leading to an inability to fulfill orders, supply chain breakdowns, and a class-action lawsuit from shareholders.

    ​What Went Wrong:

    The ERP system was not thoroughly tested before going live. Additionally, Revlon underestimated the complexity of integrating the new ERP with its legacy systems, leading to widespread disruptions in production and distribution.

    As a result, the company lost market share, and its stock value plummeted.

    Key Lessons Learned:

    1. Conduct Thorough Testing: No matter how well an ERP system appears to function, testing is crucial to ensuring compatibility with existing systems and processes. Skipping this step can lead to catastrophic results.
    2. Prepare for Contingencies: ERP implementation is complex, and unexpected challenges are inevitable. Having contingency plans in place can mitigate the impact of system disruptions and help maintain business continuity.

    These real-world ERP failures illustrate the importance of careful planning, testing, and execution when implementing ERP systems.

    The lessons learned from Hershey, Nike, Lidl, and Revlon serve as cautionary tales for businesses looking to avoid the same fate.

    Key takeaways include allowing adequate time for testing, ensuring system integration, avoiding peak business periods for rollout, and knowing when to adjust or abandon a project if necessary.

    By heeding these lessons, companies can greatly reduce the risks associated with ERP implementation and achieve long-term success.

    Common Reasons for ERP Implementation Failures

    Implementing an ERP system is a significant undertaking, and despite the potential benefits, many businesses fall short. Understanding the common reasons for ERP implementation failures is essential to avoiding these pitfalls.

    Below, we break down the key reasons and how businesses can navigate them for a successful ERP rollout.

    1. Lack of Clear Objectives

    Many companies dive into ERP implementation without clearly defined goals, leading to confusion and misalignment. Without knowing exactly what they aim to achieve, businesses struggle to measure success or make informed decisions throughout the project.

    For example, businesses might implement features that aren’t critical, while neglecting areas that could truly benefit from automation or efficiency improvements.

    To succeed, companies should begin the process by setting clear, measurable objectives that align with their business needs. Whether the goal is improving inventory management, enhancing customer service, or reducing operational costs, having concrete objectives will guide the project and ensure everyone is working toward the same outcome.

    2. Inadequate Planning and Scope Creep

    Poor planning and scope creep are common reasons for ERP failures. Many companies underestimate the complexity of ERP implementation, skipping critical stages such as:

    1. Thorough project planning
    2. Resource allocation

    As a result, deadlines are missed, costs spiral out of control, and the project loses direction.

    Scope creep, where additional features are added mid-project, can further exacerbate these challenges. While it’s tempting to add “nice-to-have” features, doing so without proper consideration can overwhelm the project team and stretch resources too thin.

    The solution is comprehensive planning from the very beginning. Businesses should create a detailed project roadmap that outlines milestones, timelines, and budget constraints. Consulting with experts for your technology decisions can also help ensure you make the right choice.

    3. User Resistance and Poor Change Management

    Even the most advanced ERP systems can fail if employees resist the change. ERP implementation often involves significant changes in processes, roles, and daily operations. Without proper change management, businesses risk low user adoption and disengagement.

    Employee resistance usually stems from fear—fear of the unknown, fear of job loss, or fear of learning new technology. Without effective communication and involvement from the start, users may be reluctant to embrace the new system, leading to poor utilization and, ultimately, project failure.

    Effective change management involves involving employees early in the process, clearly communicating the benefits of the ERP system, and offering ongoing support.

    Training is also key—employees need to feel confident in their ability to use the system, so comprehensive and role-specific training should be provided throughout the implementation and beyond.

    4. Incompatible ERP Software Selection

    Choosing the wrong ERP system is a critical mistake that can lead to operational inefficiencies and frustration. Not all ERP systems are created equal, and selecting one that doesn’t fit your company’s specific needs can create friction between the system and your existing processes.

    For instance, some businesses may select a system based on cost rather than considering how well it integrates with their existing infrastructure.

    The best approach is to conduct a thorough needs assessment before selecting an ERP system. Engage all departments to identify their specific needs, and choose software that offers the flexibility, scalability, and industry-relevant features to support your long-term goals. 

    5. Insufficient Training and Support

    Even the most feature-rich ERP system will fail if users aren’t properly trained. Many ERP failures occur because companies don’t invest enough in user training and ongoing support.

    When employees don’t understand how to use the system, productivity drops, mistakes happen, and the ERP’s full potential remains untapped.

    For instance, some employees may stick to old processes, avoiding the ERP system entirely, while others might make errors that cause inefficiencies or data integrity issues. This lack of adoption undermines the entire purpose of the ERP system.

    To avoid this, companies should prioritize user training from the very beginning. Training should be tailored to different roles, ensuring that each employee knows how to use the system features relevant to their job.

    Master ERP Implementation by Learning from Common Failures

    ERP implementation failures can be avoided if you understand the common pitfalls and learn from past mistakes. Defining clear objectives, investing in change management, ensuring top-down leadership commitment, selecting the right ERP system, and prioritizing user training are all critical to success.

    With the right approach, your business can achieve seamless ERP success and unlock its full potential.

    What Makes a Good ERP System: 6 Powerful Features You Need to Know

    Featured Imgs 23

    Did you know that NASA was one of the earliest adopters of ERP systems to manage their space missions, using it to track massive amounts of data? Today, businesses across all industries rely on ERP solutions to streamline operations, improve efficiency, and boost decision-making.

    But with so many options on the market, understanding what makes a good ERP system is critical. From scalability to real-time analytics, the right system doesn’t just improve operations—it transforms the way you do business.

    6 Key Features of a Good ERP System

    A robust ERP system is essential for streamlining operations, improving decision-making, and boosting overall business efficiency. The following key features form the foundation of any effective ERP system and ensure its long-term value for your organization:

    1. Integration Capabilities: The Power of Unity

    The strength of any ERP system lies in its ability to integrate various business functions into a single platform. Without seamless integration, departments often operate in silos, leading to inefficiencies and redundant processes.

    Why Integration Matters

    Integration enables departments such as finance, human resources, sales, procurement, and supply chain to communicate effortlessly. This eliminates the need for multiple standalone systems and reduces the manual transfer of data, which can result in errors and delays.

    For example, when a sales order is processed, the system should automatically update:

    • Inventory
    • Accounting
    • Customer service records

    Key Benefits of Integration:

    • Improved collaboration between departments
    • Real-time data access across all functions
    • Reduced errors and redundancies, enhancing operational accuracy
    • Faster decision-making through up-to-date data availability

    Pro Tip: Choose an ERP system that offers pre-built integrations for your existing tools (such as CRM, eCommerce, or POS systems) to streamline operations without needing extensive development work.

    2. Scalability: Growing with Your Ambitions

    As businesses grow, their ERP systems must grow with them. Scalability ensures that your ERP solution can handle increasing data, more users, and complex processes without sacrificing performance.

    Why Scalability is Crucial

    In fast-growing businesses, operational requirements evolve. A scalable ERP system prevents bottlenecks and futureproofs your technology stack, eliminating the need for costly upgrades or switching to new platforms when you expand.

    What to Look for in Scalability:

    1. Adding users easily as your team expands
    2. Handling higher data volumes as your business scales
    3. Supporting multi-location or global operations, including multi-currency and multi-language functionality
    4. Expanding feature sets as needed without overwhelming the system

    Pro Tip: When evaluating ERP scalability, ensure the system can handle your projected growth over the next 5–10 years to avoid premature system migration.

    3. User-Friendliness: Simplicity Meets Sophistication

    No matter how powerful an ERP system is, it’s only valuable if users can navigate and utilize it effectively. User-friendliness plays a key role in ensuring your team adopts the system and maximizes its potential.

    Why User Experience is Vital

    A complicated system can lead to frustration and underutilization. A user-friendly ERP, on the other hand, reduces the learning curve, minimizes training costs, and increases productivity across the board.

    User-Friendly Features to Look For:

    • Simple navigation with clearly labeled menus and shortcuts
    • Clean, customizable dashboards for different roles (finance, HR, sales)
    • Minimal data entry requirements, with automation where possible
    • Mobile-friendly interfaces for on-the-go access

    Key Benefits:

    • Faster employee adoption, reducing downtime during the transition
    • Lower training costs, as employees require less time to learn the system
    • Improved efficiency, since users can complete tasks with fewer clicks and steps

    Pro Tip: Choose an ERP with role-based dashboards that allow employees to access the tools and information most relevant to their job functions.

    4. Customization Options: Tailored to Your Unique Needs

    Every business is unique, and a one-size-fits-all ERP system won’t always fit the bill. Customization allows you to tailor the system to align with your company’s specific workflows and processes.

    Why Customization Matters

    A customizable ERP system ensures that the solution fits your business model rather than forcing your business to adapt to a rigid system.

    Whether it’s compliance requirements, departmental workflows, or specific data needs, customization offers the flexibility to align the system with your operations.

    Types of Customization to Consider:

    • Custom workflows for approval processes or task automation
    • Industry-specific modules, such as manufacturing, healthcare, or retail
    • Custom fields and reports that align with your KPIs
    • API integrations to connect with third-party applications

    Key Benefits:

    • Increased flexibility: Your ERP adapts to your needs, not the other way around
    • Enhanced efficiency: Tailored workflows reduce unnecessary steps
    • Regulatory compliance: Customization ensures alignment with industry regulations

    Pro Tip: When selecting an ERP, ask how much of the customization can be done by your team (without developer intervention), and whether these customizations are retained during updates.

    5. Real-Time Data Processing: The Pulse of Your Business

    In today’s fast-paced business environment, having access to real-time data is crucial for making informed decisions quickly. An ERP system that processes and updates data in real time offers a significant competitive advantage.

    Why Real-Time Data Matters

    Without real-time data, businesses often rely on outdated information, leading to delays in decision-making and potential financial losses. With real-time data processing, your ERP system gives you up-to-the-minute insights into every aspect of your business.

    Real-Time Features to Look For:

    • Instant updates to inventory, financials, and sales data
    • Real-time reporting dashboards for decision-makers
    • Automated alerts for low stock levels, missed deadlines, or budget overages
    • Live financial updates, improving forecasting and budgeting accuracy

    Key Benefits:

    • Improved decision-making, based on current data
    • Faster response times to market or operational changes
    • Increased operational agility, as managers can act on issues in real time

    Pro Tip: Ensure the ERP system supports mobile alerts and notifications, so managers can react to critical data changes even when away from the office.

    6. Reporting and Analytics: Turning Data into Decisions

    Data is one of the most valuable assets for any business, but it’s only as useful as the insights you can derive from it. A good ERP system offers advanced reporting and analytics tools to turn raw data into actionable insights.

    Why Reporting and Analytics are Key

    Businesses generate large volumes of data every day. Comprehensive reporting and analytics tools within an ERP system allow you to break down this data, analyze trends, and make strategic decisions based on accurate, up-to-date information.

    Essential Reporting and Analytics Features:

    • Customizable reports that align with your KPIs
    • Dashboards with data visualization (graphs, charts) for quick insights
    • Drill-down capabilities to explore data in more detail
    • Predictive analytics that use historical data to forecast trends
    • Automated report generation for recurring financial or operational reports

    Key Benefits:

    • Informed decision-making, driven by data-backed insights
    • Identification of trends and opportunities for growth
    • Streamlined reporting, reducing manual effort and ensuring consistency
    • Increased foresight, helping you anticipate challenges before they arise

    Pro Tip: Look for an ERP system that allows you to schedule automated reports to be sent to key stakeholders at regular intervals, saving time on manual reporting.

    By ensuring your ERP system includes these essential features—seamless integration, scalability, user-friendly design, customization options, real-time data processing, and advanced reporting—you’re positioning your business for long-term success.

    An ERP system that excels in these areas not only supports current operations but also drives growth, efficiency, and strategic decision-making well into the future.

    ERP System Selection Criteria

    Selecting the right ERP system is crucial to ensure the success of your business. Not all ERP systems are created equal, and the selection process should align with your company’s size, industry, and operational goals.

    Section Image

    Key Selection Factors:

    1. Company Size and Industry Fit: Larger enterprises often need complex, customizable ERP systems, whereas small and medium-sized businesses might benefit from more streamlined, off-the-shelf solutions. Additionally, industries like manufacturing, healthcare, or retail may require industry-specific ERP features like compliance tracking, production planning, or customer relationship management.
    2. Cost and Budget Considerations: Evaluate the total cost of ownership, including initial licensing, customization, implementation, and ongoing maintenance. It’s important to decide whether a subscription-based cloud ERP or a one-time license for an on-premise solution fits your financial plan better.
    3. Implementation Timeline and Complexity: Depending on the size of your company and the complexity of your operations, the implementation process can range from a few weeks to several months. Consider how disruptive a long implementation process might be and what resources you have available to manage it.

    By carefully evaluating your specific business needs, you can choose an ERP system that aligns with your operational goals and growth trajectory.

    ERP Implementation Challenges

    Implementing an ERP system is a complex process that requires careful planning, resources, and management. A well-executed ERP implementation can bring significant benefits, but poor planning can lead to delays, cost overruns, and disruption to your business.

    Common Implementation Challenges:

    1. Resistance to Change: Employees may be reluctant to adapt to a new system. Ensuring adequate training and support can ease the transition.
    2. Underestimating Resources: Businesses often underestimate the time, manpower, and costs associated with ERP implementation, leading to delays and budget overruns.
    3. Data Migration Issues: Improper data migration can lead to inaccurate records and system errors, affecting the functionality of the ERP system.

    To ensure a smooth implementation, it’s important to set realistic timelines, involve key stakeholders, and provide comprehensive training for all users.

    Future-Proofing Your ERP System

    In a rapidly evolving business environment, it’s important to invest in an ERP system that can adapt to future changes.

    Future-proofing your ERP system ensures that your business remains competitive and can take advantage of emerging technologies like AI, machine learning, and IoT.

    Technological Advancements to Consider:

    1. AI and Machine Learning Integration: Predictive analytics powered by AI can help businesses forecast trends, optimize processes, and improve decision-making.
    2. IoT Integration: The Internet of Things allows businesses to collect real-time data from connected devices, enabling better resource management and operational efficiency.
    3. Cloud Scalability: Cloud-based ERP systems offer greater flexibility, allowing businesses to scale their operations and adopt new features with ease.
    4. ERP Selection Consultant: Engaging with an ERP software selection consultant can provide expert guidance in choosing the right technology.

    Selecting an ERP system with a clear roadmap for future updates and technological advancements ensures that your business will stay ahead of the curve.

    Seal Your Success with the Right ERP System:

    Choosing the right ERP system can transform your business by streamlining operations, improving decision-making, and driving growth. From seamless integration and scalability to user-friendliness and real-time data processing, the features that make a good ERP system are key to ensuring long-term success.

    To fully unlock your business’s potential, selecting an ERP system that fits your specific needs is crucial. Take the next step—seal your success with the right ERP solution, and set the stage for growth, agility, and innovation.

    How to Choose the Right ERP System for Your Business: A Step-by-Step Guide to Success

    Featured Imgs 23

    Today, we have cloud-based ERP solutions that fit into the palm of your hand, showing just how far the technology has come. However, with over 60% of ERP implementations taking longer than expected, making the wrong choice can be costly and time-consuming.

    When learning how to choose the right ERP system for your business, it’s essential to focus on aligning the system with your specific needs and goals. From understanding your company’s requirements to evaluating vendors and ensuring scalability, we’ve got you covered.

    4 Key Steps to Choosing the Right ERP System for Your Business Success

    When it comes to selecting the right ERP system for your business, the decision-making process can feel overwhelming. But it doesn’t have to be.

    By focusing on a few core steps, you can simplify the journey and ensure that the system you choose perfectly aligns with your business’s long-term goals.

    1. Assessing Your Business Needs for ERP Implementation

    Embarking on the journey to implement an Enterprise Resource Planning (ERP) system is a significant undertaking for any business. The key to success lies in a thorough assessment of your organization’s needs before diving into the selection process.

    This crucial step ensures that the ERP system you choose aligns perfectly with your business objectives and addresses your specific challenges.

    Steps to Identify Pain Points:

    1. Conduct a Cross-Departmental Survey
      • Create a comprehensive questionnaire for employees across all departments.
      • Ask about daily challenges, repetitive tasks, and bottlenecks they face.
      • Example questions:
        • “What tasks consume most of your time?”
        • “Where do you see the most errors occurring?”
    2. Analyze Workflow Inefficiencies
      • Document current processes step-by-step.
      • Use flowcharts to visualize workflows and identify redundancies.
      • Look for:
        • Manual data entry points
        • Duplicate efforts across departments
        • Delays in information flow
    3. Review Key Performance Indicators (KPIs)
      • Examine KPIs that are consistently underperforming.
      • Examples:
        • Order fulfillment time
        • Inventory turnover rate
        • Customer satisfaction scores
    4. Gather Customer Feedback
      • Analyze customer complaints and support tickets.
      • Conduct customer surveys to understand their pain points.
      • Look for patterns in feedback that might indicate internal issues.
    5. Perform Competitive Analysis
      • Research competitors’ processes and capabilities.
      • Identify areas where your business lags behind industry standards.

    Defining Goals and Objectives for ERP Implementation

    Once you’ve identified your pain points, it’s time to set clear, actionable goals for your ERP implementation. These objectives will serve as your North Star throughout the selection and implementation process.

    SMART Goal-Setting Framework:

    Use the SMART criteria to ensure your goals are well-defined and achievable:

    • Specific: Clearly state what you want to accomplish.
    • Measurable: Define concrete criteria for measuring progress.
    • Achievable: Set realistic goals within your resources and constraints.
    • Relevant: Ensure goals align with your overall business strategy.
    • Time-bound: Establish a timeframe for achieving each goal.

    Examples of SMART Goals for ERP Implementation:

    1. Improve Order Processing Efficiency
      • Goal: Reduce order processing time by 50% within 6 months of ERP implementation.
      • Measurement: Track average time from order receipt to shipment.
    2. Enhance Inventory Accuracy
      • Goal: Achieve 98% inventory accuracy within 3 months of go-live.
      • MeasurementConduct regular cycle counts and compare to system data.
    3. Streamline Financial Reporting
      • GoalGenerate consolidated financial reports across all departments within 2 business days of month-end by Q4.
      • MeasurementTrack time taken to produce month-end reports.
    4. Boost Customer Satisfaction
      • GoalIncrease customer satisfaction scores by 25% within the first year of ERP implementation.
      • Measurement: Conduct quarterly customer satisfaction surveys.
    5. Improve Data Accessibility
      • GoalProvide real-time data access to 95% of employees within their respective domains by month 3 post-implementation.
      • MeasurementTrack system usage and conduct user surveys.

    Aligning ERP Goals with Business Strategy:

    • Ensure each ERP goal supports broader business objectives.
    • Consider long-term scalability when setting goals.
    • Involve stakeholders from all levels in the goal-setting process.

    By thoroughly assessing your business needs through pain point identification and clear goal setting, you create a solid foundation for ERP success. This process not only guides your ERP selection but also sets the stage for measuring the impact of your implementation.

    Remember, the key to a successful ERP project lies in understanding where you are, envisioning where you want to be, and charting a clear path to get there. With these insights in hand, you’re well-equipped to begin your ERP selection journey.

    2. Exploring the Best System for Your Business Growth

    Choosing the right Enterprise Resource Planning (ERP) system is crucial for your business’s efficiency and growth. Understanding the different types of ERP systems available is the first step in making an informed decision.

    Below, we will explore two key distinctions in ERP systems: deployment options (on-premises vs. cloud-based) and scope (industry-specific vs. general).

    Section Image

    Deployment Options: On-Premises vs. Cloud-Based Solutions

    The choice between on-premises and cloud-based ERP solutions is one of the most significant decisions you’ll make in your ERP journey. Let’s explore each option in detail.

    On-Premises ERP Solutions

    Imagine building a custom house on your own land. That’s essentially what an on-premises ERP system is like for your business.

    Key Characteristics:

    • Hardware: Installed and maintained on your company’s own servers
    • Data Control: Complete control over your data and its security
    • Customization: High degree of customization possible
    • Upgrades: Manual upgrades required, often at additional cost
    • Initial Cost: Higher upfront investment in hardware and software licenses
    • Ongoing Costs: Lower recurring costs, but maintenance and upgrades can be expensive

    Pros:

    1. Full Control: You have complete control over your system and data
    2. Customization: Extensive customization options to fit specific needs
    3. Data Security: Data stays within your own infrastructure
    4. Performance: Can be optimized for your specific hardware
    5. Compliance: Easier to comply with certain industry regulations

    Cons:

    1. High Initial Cost: Significant upfront investment in hardware and software
    2. Maintenance: Requires in-house IT team for maintenance and updates
    3. Scalability: Scaling up can be complex and costly
    4. Access: Limited remote access capabilities
    5. Disaster Recovery: Requires separate investment in disaster recovery solutions

    Cloud-Based ERP Solutions

    Think of cloud-based ERP as renting a fully furnished, serviced apartment. Everything you need is provided and maintained by the landlord (in this case, the ERP vendor).

    Key Characteristics:

    • Hardware: Hosted on the vendor’s servers, accessed via the internet
    • Data Storage: Data stored in the cloud, managed by the vendor
    • Upgrades: Automatic updates and upgrades, usually included in subscription
    • Initial Cost: Lower upfront costs, usually based on a subscription model
    • Ongoing Costs: Predictable monthly or annual fees
    • Accessibility: Can be accessed from anywhere with an internet connection

    Pros:

    1. Lower Initial Costs: Minimal upfront investment required
    2. Scalability: Easy to scale up or down based on business needs
    3. Accessibility: Access from anywhere, on any device with internet
    4. Automatic Updates: Always on the latest version without manual upgrades
    5. Reduced IT Burden: Vendor handles maintenance and security

    Cons:

    1. Data Control: Less control over data and its storage
    2. Customization: May have limitations on customization options
    3. Internet Dependent: Requires stable internet connection for access
    4. Ongoing Costs: Subscription fees can add up over time
    5. Data Transfer: Moving from one cloud provider to another can be challenging

    Choosing Between On-Premises and Cloud-Based ERP

    Consider these factors when making your decision:

    • Budget: Initial budget vs. long-term operational costs
    • IT Resources: Availability of in-house IT expertise
    • Customization Needs: Degree of customization required
    • Data Control: Regulatory requirements and data sensitivity
    • Scalability: Anticipated business growth and need for flexibility
    • Accessibility: Remote work requirements and global operations

    Scope: Industry-Specific vs. General ERP Systems

    The second major distinction in ERP systems is between industry-specific and general solutions. This choice depends on the unique needs of your business and industry.

    Industry-Specific ERP Systems

    These are like specialized tools designed for a particular job. They’re tailored to meet the unique needs of specific industries.

    Key Characteristics:

    • Functionality: Built-in features tailored to industry-specific processes
    • Compliance: Often includes industry-specific compliance tools
    • Best Practices: Incorporates industry best practices out-of-the-box
    • Implementation: Usually faster to implement due to pre-configured settings
    • User Adoption: Often easier for employees familiar with industry terminology

    Pros:

    1. Targeted Features: Addresses industry-specific challenges directly
    2. Compliance Ready: Built-in tools for industry regulations
    3. Faster Implementation: Less customization required
    4. Industry Expertise: Vendors often have deep industry knowledge
    5. Best Practices: Incorporates proven industry-specific workflows

    Cons:

    1. Limited Flexibility: May be restrictive if your business model changes
    2. Cost: Often more expensive than general ERP systems
    3. Vendor Lock-in: Switching to a different system can be challenging
    4. Over-Specialization: May have unnecessary features for some businesses

    General ERP Systems

    Think of these as versatile, all-purpose tools that can be adapted to various business needs.

    Key Characteristics:

    • Flexibility: Adaptable to various industries and business models
    • Customization: Highly customizable to fit specific needs
    • Modules: Often modular, allowing businesses to choose needed components
    • Updates: May receive more frequent updates due to larger user base
    • Integration: Usually easier to integrate with a wide range of third-party tools

    Pros:

    1. Versatility: Can be adapted to various business models and industries
    2. Cost-Effective: Often less expensive than industry-specific solutions
    3. Wider Support: Larger pool of implementation partners and resources
    4. Scalability: Can easily adapt as your business grows or changes
    5. Integration: Generally offers more integration options

    Cons:

    1. Customization Required: May need significant customization for industry-specific needs
    2. Longer Implementation: Setup and configuration can take longer
    3. Less Specialized Features: May lack some industry-specific functionalities out-of-the-box
    4. Learning Curve: Employees may need more training to adapt to generic terminology

    Choosing Between Industry-Specific and General ERP

    Consider these factors in your decision:

    • Industry Uniqueness: How specialized are your industry’s processes?
    • Business Model: How closely do you follow standard industry practices?
    • Growth Plans: Are you planning to expand into new markets or industries?
    • Budget: What’s your budget for implementation and customization?
    • IT Expertise: Do you have the resources to customize a general ERP?

    Choosing between on-premises and cloud-based ERP, as well as between industry-specific and general systems, are critical decisions in your ERP journey.

    Each option has its strengths and challenges, and the right choice depends on your unique business needs, resources, and future plans.

    Remember, the best ERP system is one that aligns with your business processes, supports your growth, and provides the functionality you need at a cost you can afford. Take the time to thoroughly assess your needs and evaluate your options before making this important decision.

    3. Looking for Key Features in an ERP System

    Selecting the right Enterprise Resource Planning (ERP) system is a critical decision that can significantly impact your business’s efficiency, productivity, and growth.

    To ensure you choose a system that meets your needs both now and in the future, it’s essential to understand the key features that make an ERP system truly valuable. Below, we will walk you through the must-have features to consider in your ERP selection process.

    Section Image

    1. Core Modules: The Building Blocks of Your ERP

    Think of core modules as the vital organs of your ERP system. Each plays a crucial role in keeping your business operations running smoothly and efficiently.

    🧮 Accounting and Finance

    • General Ledger: The backbone of your financial system
    • Accounts Payable/Receivable: Manage cash flow effectively
    • Financial Reporting: Generate real-time financial insights
    • Budgeting and Forecasting: Plan for the future with confidence

    📦 Inventory Management

    • Real-time Tracking: Know your stock levels at all times
    • Automated Reordering: Never run out of critical items
    • Multi-location Management: Track inventory across warehouses
    • Lot Tracking: Ensure quality control and traceability

    👥 Customer Relationship Management (CRM)

    • Contact Management: Keep all customer information in one place
    • Sales Pipeline Tracking: Monitor and optimize your sales process
    • Customer Service Tools: Provide top-notch support
    • Marketing Automation: Streamline your marketing efforts

    🏭 Manufacturing (if applicable)

    • Bill of Materials: Manage product components efficiently
    • Production Planning: Optimize your manufacturing processes
    • Quality Control: Ensure consistent product quality
    • Shop Floor Control: Monitor and manage production in real-time

    🚚 Supply Chain Management

    • Procurement: Streamline purchasing processes
    • Supplier Management: Build strong relationships with vendors
    • Logistics: Optimize your distribution network
    • Demand Forecasting: Anticipate and meet customer demand

    👨‍💼 Human Resources

    • Employee Records: Centralize all employee information
    • Payroll Processing: Ensure accurate and timely payments
    • Time and Attendance: Track employee work hours
    • Performance Management: Foster employee growth and development

    2. Customization and Flexibility: Tailoring Your ERP to Your Needs

    No two businesses are exactly alike, which is why customization and flexibility are crucial features in an ERP system.

    🛠 Customization Options

    • User Interface Personalization: Allow users to tailor their workspace
    • Custom Fields: Add fields specific to your business needs
    • Workflow Customization: Design processes that match your operations
    • Report Builder: Create custom reports for unique insights

    🏗 Scalability

    • User Scalability: Easily add or remove users as your team grows
    • Functional Scalability: Activate new modules as needed
    • Performance Scalability: Handle increasing data volumes smoothly

    3. Integration Capabilities: Creating a Unified Business Ecosystem

    Your ERP shouldn’t exist in isolation. It should play well with other systems to create a seamless flow of information across your organization.

    🔗 API Availability

    • Robust APIs: Allow for custom integrations with other software
    • Pre-built Connectors: Out-of-the-box integrations with popular tools
    • Data Import/Export: Easy movement of data in and out of the system

    🤝 Third-party Integrations

    • E-commerce Platforms: Sync with your online store
    • Payment Gateways: Process payments seamlessly
    • Business Intelligence Tools: Enhance your data analysis capabilities

    4. Mobile Accessibility and Cloud Compatibility: ERP on the Go

    In today’s fast-paced business environment, access to your ERP system shouldn’t be limited to the office.

    📱 Mobile Features

    • Mobile Apps: Access key features on smartphones and tablets
    • Responsive Design: Use the full system on any device
    • Offline Capabilities: Work even without an internet connection

    ☁️ Cloud Capabilities

    • Real-time Updates: Access the latest data from anywhere
    • Automatic Backups: Keep your data safe and accessible
    • Scalable Resources: Easily adjust your system resources as needed

    5. Security and Data Privacy: Protecting Your Most Valuable Asset

    With cyber threats on the rise, robust security features are non-negotiable in an ERP system.

    🔒 Security Features

    • Role-based Access Control: Limit access based on user roles
    • Two-factor Authentication: Add an extra layer of security
    • Encryption: Protect data both in transit and at rest
    • Audit Trails: Track all system activities for accountability

    🛡 Data Privacy Compliance

    • GDPR Compliance: Meet European data protection standards
    • Industry-specific Compliance: Adhere to regulations in your field
    • Data Retention Policies: Manage data lifecycle according to regulations

    By focusing on these essential features, you’ll be well-equipped to select an ERP system that not only meets your current needs but also supports your future growth and success. Happy ERP hunting!

    4. Choosing the Perfect ERP Vendor

    Selecting the right ERP vendor is as critical as choosing the right system. Your ERP is a long-term investment, and the vendor you select will play a key role in how smoothly the implementation goes and how effectively the system supports your business over time.

    Here’s a detailed look at the key factors to consider when evaluating ERP vendors to ensure you make the right choice for your business.

    Criteria for Choosing the Right Vendor

    To find the best ERP vendor, consider these essential criteria:

    • Reputation: A vendor’s reputation is a strong indicator of the quality of their products and services. Look for vendors who are well-known in the industry and have a solid reputation for delivering reliable ERP solutions. Check for awards, recognition, and market position.
    • Experience: How long has the vendor been in business, and how experienced are they with ERP systems in your industry? A vendor with deep experience in your sector will be more likely to understand your specific challenges and offer tailored solutions.
    • Customer Support: ERP systems are complex, and having access to strong customer support can make or break your experience. Look for vendors that provide 24/7 customer support, multiple communication channels (chat, phone, email), and quick response times. A vendor that offers continuous support after deployment will ensure your system runs smoothly without long downtimes.

    Prioritize vendors who not only sell software but also partner with your business for long-term success. This can ensure that you receive not just a product but ongoing guidance and support.

    Post-Implementation Support and Training Options

    Even the best ERP system will be ineffective if your team doesn’t know how to use it. That’s why it’s critical to choose a vendor that offers robust post-implementation support and training. The right support and training can significantly reduce the learning curve and maximize the ROI of your ERP system.

    • Support Packages: What kind of support does the vendor offer after implementation? This could include troubleshooting, software updates, or help with further customizations. Ensure that the vendor offers various levels of support to meet your needs, such as standard packages, premium support, or on-demand assistance.
    • Training: Look for vendors that provide comprehensive training programs for your employees. Training options could include on-site sessionswebinars, or online tutorials. Some vendors also offer certifications for employees to deepen their knowledge of the system, making them more effective in their roles.
    • User Manuals and Documentation: Ensure that the vendor offers user-friendly documentation and resources. Having access to detailed guides or video tutorials can empower your team to solve minor issues without constantly relying on the vendor’s support team.

    Choosing a vendor with excellent post-implementation support will ensure that your ERP system continues to deliver value long after it’s been deployed.

    ERP Consulting Services

    In addition to choosing the right ERP vendor, consider engaging with ERP consulting services. These experts can:

    • Guide System Selection: Help you choose the best ERP solution tailored to your business needs.
    • Optimize Implementation: Ensure the system is set up and customized effectively for your operations.
    • Provide Ongoing Support: Offer insights and assistance to maximize the value of your ERP system.

    Whether for initial setup or continuous improvement, reliable consultants provide valuable expertise that enhances your ERP investment.

    By carefully evaluating these factors, you’ll not only find an ERP system that works for your business today but one that can scale and evolve with you in the future.

    Common Mistakes to Avoid When Choosing an ERP System

    Selecting an ERP system is a significant decision that impacts every part of your business. The right system can drive growth and efficiency, while the wrong choice can lead to frustration, wasted resources, and setbacks.

    To ensure you make a well-informed decision, here are common mistakes to avoid when choosing an ERP system.

    Section Image

    Underestimating Implementation Complexity

    Overlooking the time and resources needed for implementation can result in delays, budget overruns, and disruptions to daily operations. Businesses should allocate sufficient time for each phase, from planning to post-launch support, and ensure they have a dedicated implementation team in place.

    How to Avoid It:

    Start by mapping out a realistic implementation timeline and ensure that you have the necessary internal and external resources. Engage with the ERP vendor early to clarify all the steps involved and seek their expertise on areas where complexity might arise, such as data migration or customization. Set milestones to track progress and address challenges as they come up.

    Choosing a System Based Solely on Price

    A lower price tag might mean sacrificing important functionalities, integration capabilities, or customer support. Cheap solutions may also require more manual processes or workarounds, which can reduce overall efficiency and increase operational costs over time.

    How to Avoid It:

    Focus on value rather than cost. When evaluating ERP options, consider not just the initial price but the Total Cost of Ownership (TCO), including implementation, maintenance, training, and ongoing support.

    Choose a system that aligns with your business needs, offers a strong ROI, and has the flexibility to adapt to future changes.

    Failing to Involve Key Team Members in the Selection Process

    If the system doesn’t align with the workflows of various departments, it can lead to:

    • Resistance from employees
    • Delays in system adoption
    • Even costly workarounds

    Without input from end users, you may also miss critical features or processes that the ERP system needs to support.

    How to Avoid It:

    Engage representatives from every department early in the selection process. Create a cross-functional team that includes IT, finance, HR, sales, and other departments impacted by the ERP system.

    Involving these stakeholders ensures that you get a full view of the business’s needs and select a system that works for everyone. This also helps build buy-in and commitment from employees, making implementation smoother.

    Ignoring Future Scalability Needs

    Many businesses focus only on the short-term capabilities of the ERP system without considering long-term growth. This can result in outgrowing the system within a few years, requiring costly system overhauls or leading to inefficiencies as the system struggles to keep up with increased data, users, or operational complexity.

    How to Avoid It:

    Look for an ERP system that can scale with your business. Consider factors such as:

    • Ability to add more users
    • Additional modules
    • Support for multiple locations

    Ask the vendor about upgrade options, system capacity, and their roadmap for future developments. By choosing a scalable solution, you ensure that the ERP system continues to meet your needs as your business grows and evolves.

    Empower Your Business with a Smart ERP System Selection

    Choosing the right ERP system is more than just a technical decision; it’s a strategic move that can transform your business. By assessing your unique needs, identifying key features, and thoroughly evaluating vendors, you’ll set your business on the path to streamlined operations and long-term growth.

    Whether you’re a small business or a large enterprise, aligning the right ERP with your goals is essential to staying competitive in an ever-evolving marketplace. Avoid common mistakes, focus on scalability, and select a vendor who is a true partner in your success. Make the smart choice today and empower your business for the future!

    Is Good UI/UX the Secret to Efficient Remote Video Editing?

    Featured Imgs 23

    Hi everyone,
    Im currently using PowerDirector Premium for my video editing projects and have run into some UI/UX issues that are affecting my remote work efficiency. The interface seems a bit cumbersome, and navigating between features isnt as smooth as Id hoped.

    Has anyone else experienced similar challenges with PowerDirector Premium? Im looking for tips or solutions that could help improve the user experience and streamline my workflow. Any advice on how to optimize the UI for better performance in a remote setup would be greatly appreciated!

    Thanks in advance for your help!

    25+ Transition Packs + Cool Transition Effects for Final Cut Pro

    Featured Imgs 23

    Today we’re bringing you a collection of some of the coolest and most creative transitions effects for Final Cut Pro.

    As a content creator and video editor, you can never have enough transition effects. Because usually, you tend to use different styles of transition effects for each video to make them look original and creative.

    We found some trendy Final Cut Pro transition effects for this collection. You’ll find transition animations suitable for all kinds of videos from YouTube vlogs to wedding videos, business slideshows, social media promos, and more.

    You can download all these transitions and templates for a single price when you subscribe to Envato Elements. Of course, we included a few free templates for your personal projects as well.

    Typo Transitions Pack for Final Cut Pro

    Typo Transitions Pack for Final Cut Pro

    Transitions effects now come in many different types and forms, allowing creators to create unique effects to transition from one scene to another. This Final Cut Pro transitions pack includes a set of typographic effects that lets you add stylish typography animations for transitions. It’s perfect for trendy lifestyle, fashion, and various other creative videos.

    UNMASK – 100 Final Cut Pro Transitions

    UNMASK - 100 Final Cut Pro Transitions

    Unmask is a big bundle of transition effects for Final Cut Pro. There are actually 100 different transitions included in this pack and each transition is available in 4K resolution. There are some amazing effects with 3D-like designs for making cool transition animations for YouTube, promos, and social media content.

    Intro Wave Transitions for Final Cut Pro X

    Intro Wave Transitions for Final Cut Pro X

    Want to make videos that make waves across social media and YouTube, then this transition pack will help you make that goal come true. With these transitions, you can add cool transitions with wave effects to make your videos look even more stylish and creative. There are multiple styles of waves effects to choose from and they all look pretty incredible.

    Cursors – Big Typography Transitions Pack

    Cursors - Big Typography Transitions Pack

    This is a vibrant set of transitions designed for Final Cut Pro. With 10 unique options and customizable color controls, this pack is perfect for enhancing your FCPX projects, lending a dynamic and engaging visual appeal to your video edits that will surely captivate your viewers.

    Glitch Transitions Final Cut Pro Templates

    Glitch Transitions Final Cut Pro Templates

    This pack provides a distinct, dynamic visual effect for your video editing needs. These templates add a unique glitch transition style to your footage. The ease of use, combined with the striking aesthetic appeal, makes this creative asset an exciting option for enhancing your Final Cut Pro projects.

    Typography Transitions for Final Cut Pro

    Typography Transitions for Final Cut Pro

    A creative collection of typography-themed transitions for FCPX. This high-quality graphical enhancement brings your videos to life with engaging typographical transitions, perfect for professional or personal projects. User-friendly and customizable, it provides a unique contemporary twist to your Final Cut Pro video editing.

    Torn Paper Transitions for Final Cut Pro

    Torn Paper Transitions for Final Cut Pro

    Torn Paper transitions pack offers a great collection of templates for Final Cut Pro users, offering a unique cinematic effect with paper tear-inspired transitions. These transitions enhance video edits, creating a visual charm that can give projects a cutting-edge appeal.

    Big Box of Transitions for Final Cut Pro

    Big Box of Transitions for Final Cut Pro

    This is a versatile transition set designed specifically for Final Cut Pro users. It features an array of innovative box animations that effortlessly add finesse to any transition. These templates breathe life into your project, making the transition element more dynamic and captivating, adding that extra flair without overwhelming the main content.

    Liquid Transitions Effects for Final Cut Pro

    Liquid Transitions Effects for Final Cut Pro

    Use this bundle of Final Cut Pro transitions to add colorful liquid effects to transition between clips in your videos. It comes with several different transitions with liquid-style designs. They are especially suitable for creative YouTube videos, educational content, and fun social media videos.

    200+ Ultimate Final Cut Pro Transitions Pack

    200+ Ultimate Final Cut Pro Transitions Pack

    With this massive Final Cut Pro transitions pack, you will never run out of options for making unique transition effects. It includes more than 200 transitions that come in 21 different categories. Each transition is available in 4K resolution and you can easily customize them to your preference.

    13 Free Final Cut Pro Transitions

    13 Free Final Cut Pro Transitions

    This is a collection of free Final Cut Pro transitions that include 13 different effects. There are multiple styles of effects included with brush style effects, water droplet transitions, and more. All are free to download.

    Free Ink Transitions for Final Cut Pro X

    Free Ink Transitions for Final Cut Pro X

    In this free transitions bundle, you get some premium-quality transitions with ink-style effects. The transitions are fully customizable and easy to use. You can even use them in your commercial projects.

    Multiscreen Transition Effects for Final Cut Pro

    Multiscreen Transition Effects for Final Cut Pro

    The multiscreen effect is one of the most popular transition effects used in business and professional videos. They allow you to showcase multiple clips on a single transition screen, which is useful for showcasing different sides of a business or product at once. This bundle includes a lot of useful multiscreen transitions for you to use in such projects.

    Usefull Transitions for Final Cut Pro

    Useful Transitions for Final Cut Pro

    The transitions in this bundle feature multipurpose effects that you can combine together to create unique transitions of your own. You can experiment with over 300 different combinations with these effects. And they are very easy to create and customize as well.

    3D Final Cut Pro Transitions Pack

    3D Final Cut Pro Transitions Pack

    This is a collection of cool transition effects featuring 3D-like designs. The effects have subtle animations that make them fit in perfectly with all kinds of professional and creative video projects, including YouTube videos, social media promos, TV commercials, and more. There are 16 different transitions effects included in this pack.

    Abstract Shapes Final Cut Pro Transitions

    Abstract Shapes Final Cut Pro Transitions

    The colorful abstract shapes and animations in these transition effects will surely give an uncommon look to your videos. They are especially suitable for social media videos as well as fashion and lifestyle videos. You can choose from 13 different transition effects in this pack.

    DSLR Camera Final Cut Pro Transition

    DSLR Camera Final Cut Pro Transition

    This Final Cut Pro transition features a unique effect that uses a DSLR camera preview to create a cool transition scene. It has two different styles of effects to choose from and the templates include the camera footage as well. You can easily edit the transition effect to your preference.

    600+ Final Cut Pro Transitions Bundle

    600+ Final Cut Pro Transitions Bundle

    Another huge bundle of transition effects for Final Cut Pro. With more than 600 effects to choose from, these transitions work with both Final Cut Pro and Apple Motion. They are available in multiple categories and feature fully customizable effects.

    Color Splash Free Final Cut Pro Transition

    Color Splash Free Final Cut Pro Transition

    This is a simple but cool transition effect you can use in your creative projects. It has a colorful splash screen effect for transitioning from one scene to another. The preset is completely free to download and use.

    Zoom Backwards Free Final Cut Pro Transition

    Zoom Backwards Free Final Cut Pro Transition

    Another subtle transition effect to use in your professional video projects. This free Final Cut Pro transition features an effect that reveals the next scene with a backward zooming effect.

    Zoom Transitions Effects for Final Cut Pro

    Zoom Transitions Effects for Final Cut Pro

    This Final Cut Pro transitions pack takes one of the most commonly used transition effects to the next level. It features zoom transition effects with added zoom animations and multiple styles of designs. There are 50 different zoom transitions to choose from and they come in various resolutions, including ones optimized for social media videos.

    Light Leaks Final Cut Pro Transitions

    Light Leaks Final Cut Pro Transitions

    If you want to add simple, clean, and subtle transition effects for your videos, this collection of Final Cut Pro transitions is made just for you. It includes 100 different styles of transitions featuring subtle light leaks effects. They are ideal for professional and business videos.

    Cartoon Transitions Pack for Final Cut Pro

    Cartoon Transitions Pack for Final Cut Pro

    These colorful and cute transitions will make your kids-themed videos and educational content look extra entertaining. The bundle includes many different styles of 2D cartoon transitions with various effects.

    Freeze Frame Final Cut Pro Transitions

    Freeze Frame Final Cut Pro Transitions

    A very cool transition effect you can use to create opening credits scenes for movies, add transitions for trailers, and much more. This bundle includes multiple styles of freeze-frame transition effects with fully editable elements.

    VFX Transitions Effects for Final Cut Pro

    VFX Transitions Effects for Final Cut Pro

    Create transitions with fiery explosions with these cool transition effects. This pack features many different styles of VFX transitions with fire explosions. They are simply the best choice for making videos with explosive transition scenes.

    8 Free Final Cut Pro Transitions

    8 Free Final Cut Pro Transitions

    A bundle of 8 different Final Cut Pro transitions you can download for free. This pack includes lots of creative transition effects with various designs. You can use them in your social media videos, YouTube vlogs, and more.

    Free Sliding Square Transition for Final Cut Pro

    Free Sliding Square Transition for Final Cut Pro

    This simple transition effect has a very basic design that creates a sliding squares animation. It’s suitable for business event videos, social media promos, and even advertisements. The template is free to download.

    How to Add Transitions in Final Cut Pro

    Adding transitions between clips in Final Cut Pro is very easy. It’s actually as easy as drag and drop.

    fcp transitions button

    Once you have your project opened in Final Cut Pro, you can open the Transitions browser by clicking on the Transitions button on the middle-right side of the screen. And then you can browse different transition categories to find one that suits your video.

    To add a transition to your project, simply drag and drop it between the clips. That’s it!

    You can watch this quick tutorial video to see how it’s done.

    If you want to learn how to install third-party transitions in Final Cut Pro, be sure to watch this video.

    Clever Polypane Debugging Features I’m Loving

    Featured Imgs 23

    I’m working on a refresh of my personal website, what I’m calling the HD remaster. Well, I wouldn’t call it a “full” redesign. I’m just cleaning things up, and Polypane is coming in clutch. I wrote about how much I enjoy developing with Polypane on my personal blog back in March 2023. In there, I say that I discover new things every time I open the browser up and I’m here to say that is still happening as of August 2024.

    Polypane, in case you’re unfamiliar with it, is a web browser specifically created to help developers in all sorts of different ways. The most obvious feature is the multiple panes displaying your project in various viewport sizes:

    Polypane browser displaying ryantrimble.com in three different viewport sizes simultaneously

    I’m not about to try to list every feature available in Polypane; I’ll leave that to friend and creator, Kilian Valkhof. Instead, I want to talk about a neat feature that I discovered recently.

    Outline tab

    Inside Polypane’s sidebar, you will find various tabs that provide different bits of information about your site. For example, if you are wondering how your social media previews will look for your latest blog post, Polypane has you covered in the Meta tab.

    Preview card displaying how open graph information will display on Mastodon.

    The tab I want to focus on though, is the Outline tab. On the surface, it seems rather straightforward, Polypane scans the page and provides you outlines for headings, landmarks, links, images, focus order, and even the full page accessibility tree.

    Polypane sidebar, outline tab, the view select options display the different views available: Headings, Landmarks, Links, Images, Focus order, and Accessibility Tree

    Seeing your page this way helps you spot some pretty obvious mistakes, but Polypane doesn’t stop there. Checking the Show issues option will point out some of the not-so-obvious problems.

    Polypane sidebar, outline tab, Landsmarks view, the "Show issues" option is enabled. In the outline, red text describes an error: Multiple banner elements at the same level found.

    In the Landmarks view, there is an option to Show potentials as well, which displays elements that could potentially be page landmarks.

    Polypane sidebar, Outline tab, Landmark view - the outline displays a red symbol indicating a potential landmark element

    In these outline views, you also can show an overlay on the page and highlight where things are located.

    Polypane laptop viewport view of ryantrimble.com, the landmark overlay feature is enabled, which outlines landmark elements in blue while also displaying their value

    Now, the reason I even stumbled upon these features within the Outline tab is due to a bug I was tracking down, one specifically related to focus order. So, I swapped over to the “Focus order” outline to inspect things further.

    Polypane sidebar, outline tab, Focus order view, displays an outline of the focusable elements on the page

    That’s when I noticed the option to see an overlay for the focus order.

    Polypane laptop view with focus order overlay enabled, displays guide lines marking the location of each focusable items

    This provides a literal map of the focus order of your page. I found this to be incredibly useful while troubleshooting the bug, as well as a great way to visualize how someone might navigate your website using a keyboard.

    These types of seemingly small, but useful features are abundant throughout Polypane.

    Amazing tool

    When I reached out to Kilian, mentioning my discovery, his response was “Everything’s there when you need it!”

    I can vouch for that.


    Clever Polypane Debugging Features I’m Loving originally published on CSS-Tricks, which is part of the DigitalOcean family. You should get the newsletter.

    How Emerging Blockchain Technologies Are Enhancing WordPress Security and Performance

    Featured Imgs 23

    In the ever-evolving space of digital technology, blockchain has started creating a ripple in most spheres when it comes to website management and security. A particular way in which blockchain is bound to kick in with great prominence is in enhancing the security and performance aspects of WordPress websites. The reason that it aligns with […]

    The post How Emerging Blockchain Technologies Are Enhancing WordPress Security and Performance first appeared on WPArena and is written by Nur ul Ain.

    100+ Best Free Keynote Templates 2024

    Featured Imgs 23

    Today we’re bringing you a collection of the best free Keynote templates for making all kinds of presentation slideshows, including business, creative, agency, and startup pitch decks.

    Keynote is a great tool for making effective presentations. But, let’s face it, when it comes to the default templates included, your options are limited. Luckily you can still download and use Keynote templates made by other designers. For this collection, we handpicked some of the best free Keynote templates just for you.

    Sure, these templates might not have the polish of premium Keynote templates you can spend a few dollars on. But, for the very low price of free, these will give you more than enough to design a stand-out slideshow.

    Just looking for a stylish free Keynote template? No problem. Let’s dive into our collection of the best free Keynote templates (with a couple of premium ones thrown in so you can compare that option too)!

    Creative Pitch Deck Free Keynote Template

    Creative Pitch Deck - Free Keynote Template

    This bright and beautiful Keynote template is a great choice for designing pitch decks for presenting products and services. It’s especially useful for presenting startup ideas as well. The template is available in both Keynote and Google Slides versions for free.

    TEXICO – Modern Business Keynote Template

    TEXICO - Creative Business Keynote Template

    If you’re looking for a creative and stylish Keynote template to design a slideshow for a startup or a creative agency presentation, this template is perfect for you.

    Free Agency Keynote Template

    Free Agency Keynote Template

    This free Keynote template is most suitable for creating presentations for agencies and small businesses. If you’re crafting a slideshow to attract clients and customers, this template has plenty of beautifully designed slides you can use to wow your audience.

    Cranford – Free Business Keynote Presentation Template

    Cranford - Free Business Keynote Presentation Template

    Cranford is a free Keynote template that’s most suitable for business-themed presentations. It comes with several modern slide layouts full of image placeholders, attractive typography, and colorful shapes. You can easily edit and customize each slide to your preference as well.

    Howard – Free Corporate Keynote Presentation Template

    Howard - Free Keynote Presentation Template

    This free Keynote template is ideal for corporate business presentations and slideshows. The template has several useful slides for showcasing various stats and data related to your company. It’s also available in PowerPoint and Google Slides formats.

    Gilano – Free Keynote Presentation Template

    Gilano - Free Corporate Keynote Presentation Template

    Gilano is another simple and modern Keynote template that you can download for free. The template features a modern and minimal slide design with easily editable colors, fonts, and shapes. It’s especially perfect for investment-related presentations.

    E-book Reader – Free Keynote Template

    E-book Reader - Free Keynote Template

    This keynote template is ideal for promoting products and services. It features a streamlined design with 6 unique slides. And you can fully customize each slide to your preference.

    Starry Sky – Free Business Keynote Template

    Starry Sky - Free Business Keynote Template

    This is an easily editable Keynote template that comes with 6 different slide layouts. You can use it to create business and professional presentations. The template has image placeholders, free fonts, and more.

    Winter Spa – Free Creative Keynote Template

    Winter Spa - Free Creative Keynote Template

    This is a simple and free Keynote template that comes with 6 slides. You can use these slides as a foundation to create additional slides for your presentation. They are fully customizable.

    Business Creative – Free Business Keynote Template

    Business Creative - Free Business Keynote Template

    Grab this Keynote template for free to create high-quality business presentations. It includes several slide layouts with clean and minimal designs. You can also change the colors, fonts, and backgrounds with ease.

    Company Introduction – Free Keynote Template

    Company Introduction - Free Keynote Template

    This free Keynote template is ideal for making business profiles and introductions. The template has 10 unique slides with easily editable designs. It also comes in 3 different color themes to choose from.

    Maurelle – Free Professional Keynote Presentation Template

    Maurelle - Free Professional Keynote Presentation Template

    Maurelle is most suitable for creating slideshows for professional and business presentations. The template features charts, shapes, and image placeholders to help you create a visually pleasing slideshow for your business meetings.

    Merville – Free Business Keynote Presentation Template

    Merville - Free Business Keynote Presentation Template

    You can craft a modern and creative business presentation using this free Keynote template. It comes loaded with multiple slide designs featuring colorful graphs, charts, and lots of icons. This template also comes in PowerPoint and Google Slides versions.

    Success – Free Infographics Keynote Templates

    Success - Free Infographics Keynote Templates

    This free Keynote template comes with a bunch of slide layouts featuring useful infographic designs. They are perfect for showcasing stats and data in your presentations. This template also comes in multiple file formats, including Keynote, PowerPoint, Canva, Google Slides, and more.

    iT Gradient – Free Keynote Template

    iT Gradient - Free Keynote Template

    This Keynote template comes packed with a lot of colorful slide layouts. It uses beautiful gradient color themes to offer a stylish canvas for you to present your content. There are 20 unique slides in this template.

    Animal – Free Modern Keynote Template

    Animal - Free Modern Keynote Template

    Animal is a free Keynote template that comes with a modern and professional slide design. It features a visual-centric content layout with more space for showing images. This template also has 20 unique slides.

    Sella – Free PowerPoint & Keynote Slides

    Sella - Free Powerpoint & Keynote Slides

    Sella is the perfect template for making presentations related to marketing and sales projects. This free template includes 5 different slide layouts with fully customizable designs. You can use it in both PowerPoint and Keynote.

    Epoch – Free Keynote Presentation Template

    Epoch Free Keynote Presentation Template

    Epoch is a premium Keynote template but you can download a sample version of this template for free. The free sample includes several slide layouts you can use to copy and create your own slides. It’s perfect for experimenting and for making business presentations.

    PARIS – Free Keynote Template

    PARIS - Free Keynote Template

    Paris is a beautiful Keynote template that features highly visual slide layouts. It features a travel-themed design with stylish layouts that are ideal for fashion and lifestyle brands. The free template includes 17 slides.

    Folio – Free Keynote Portfolio Theme

    folio Free Keynote Portfolio Theme

    Folio is a minimalist Keynote template for creating portfolio presentations. It comes with customizable slide layouts you can use to present your work. There are 18 slides in this template.

    PLANETS – Free Minimal Keynote Template

    PLANETS - Free Minimal Keynote Template

    This free Keynote template includes 10 unique slides you can use to create modern slideshows for creative brands. It’s especially suitable for design agencies and freelancers.

    Assume – Free Keynote Presentation

    Assume - Free Keynote Presentation

    With 14 different slide layouts to choose from, you can use this free Keynote template to create attractive presentations for your business. It has lots of image placeholders with stylish shapes that add a cool look to each slide.

    NEON – Free Cool Keynote Template

    NEON - Free Cool Keynote Template

    Just as the name suggests, this free Keynote template comes with a set of beautiful slides featuring neon-themed gradient colors. It’s perfect for modern technology, fashion, and design presentations. The free version of the template includes 12 slides.

    Lagoena – Free Keynote Template

    free keynote ppt

    If you’re looking for a free presentation template that can easily give virtually any premium option a run for its money, consider Lagoena. It’s a multipurpose template suitable for a range of presentation purposes.

    Yellue – Free Brand Keynote Template

    free keynote ppt

    Wanting to get your hands on a free Keynote template that helps you deliver a standout presentation? Look no further than Yellue, a stunning template that will instantly draw the attention of your clients and investors, and keep it there.

    Vova – Free Keynote Template

    free keynote ppt

    Ultra-modern, and stylish, Vova is an excellent Keynote template for anyone looking to deliver a creative, and unique presentation. It features a range of slide designs that can be fully customized to your liking.

    Free Circle Band Keynote Template

    free keynote ppt

    Here we have a fun, and playful presentation template that can be fully molded to your specific requirements in Keynote, and PowerPoint. It’s free for personal use.

    Clara – Free Fashion Keynote Template

    free keynote ppt

    Exclusively created for fashion and photography businesses, Clara is a wonderful Keynote template that you must add to your ppt collection. Do check it out.

    Free Pitch Deck Template for Keynote & PowerPoint

    Free Pitch Deck Template for Keynote & PowerPoint

    A modern and stylish Keynote template for crafting pitch decks for startup and business idea presentations. This template comes in both Keynote and PowerPoint versions featuring 19 slides.

    Pastel Pattern – Free Keynote Template

    Pastel Pattern - Free Keynote Template

    This is a beautiful Keynote template that features a set of slides inspired by pastel colors and creative shapes. The free version of the template includes several slides that you can experiment with to create your own stylish slide layouts.

    Geometric – Free Keynote Template

    Geometric - Free Keynote Template

    If you’re a fan of geometric shapes and patterns, this Keynote template is for you. You can download a portion of this template for free and use them to create slides of your own. It comes in a PowerPoint version as well.

    Kula – Free Minimal Keynote Template

    Kula - Free Minimal Keynote Template

    Kula is a beautifully minimalist Keynote template that you can download for free to make simple and elegant presentations. The free template includes more than 10 unique slides with image placeholders and easily editable layouts.

    Neon – Free Modern Keynote Template

    Neon - Free Modern Keynote Template

    You can use this free Keynote template to design modern slideshows with a dark color theme. It’s perfect for showcasing high-end products and luxury brands. The free version comes with 12 unique slides.

    Barnwell – Free Business Keynote Template

    Barnwell Free Business Keynote Template

    Grab this free multipurpose Keynote template to design all kinds of business-related presentations. It’s easily customizable and includes Google Slides and PowerPoint versions as well.

    Clifton – Free Business & Agency Keynote Template

    Clifton Free Business & Agency Keynote Template

    If you’re working on a presentation for a modern agency or business, this template will come in handy. It features a set of creative slides for crafting various business slideshows. It also comes in Google Slides and PowerPoint formats.

    Metropolis – Free Modern Keynote Template

    Metropolis - Free Modern Keynote Template

    Metropolis is a free Keynote template that features a complete set of slides for crafting business-related presentations. It includes 35 different slide layouts with transition animations.

    Portal – Free Portfolio Keynote Template

    Portal - Free Portfolio Keynote Template

    A free Keynote template for designing attractive portfolio presentations. Use this template to showcase your best work to clients. It comes with master slide layouts, animations, free icons, and much more.

    Raymond – Free Business Presentation Keynote Template

    Raymond - Free Business Presentation Keynote Template

    Raymond is a free presentation template you can use in Keynote, PowerPoint, or Google Slides. It includes lots of useful slides you can edit and customize to create company profiles, reports, and many other presentations.

    Fresy – Free Multipurpose Business Keynote Template

    Fresy - Free Multipurpose Business Keynote Template

    A minimalist Keynote template with a multipurpose design. You can use this template to make all kinds of business presentations from product showcase to portfolio presentations and more.

    Balance – Free Keynote & PowerPoint Template

    Balance - Free Keynote & PowerPoint Template

    Balance is a modern and minimal Keynote template. The free version of the presentation includes 16 unique slide layouts with easily editable designs. It also includes lots of placeholders for easily adding images as well.

    Narza – Creative Keynote Template

    Narza - Creative Keynote Template

    Narza is a creative Keynote template that features 30 unique slide designs. This template features a unique content design and color use that makes it a great choice for creative agencies and freelancers. The template is fully customizable and includes master slides as well.

    London – Free Minimal Keynote Template

    London - Free Minimal Keynote Template

    London is a beautifully minimalist Keynote template you can download and use for free to create various presentations. It’s ideal for making slideshows related to fashion and lifestyle. It includes 21 unique slides with image placeholders and lots of vector shapes.

    Bazz – Free Animated Keynote Template

    bazz free animated keynote

    Bazz is a premium Keynote template that features creatively animated slides. The free version of the template includes several slides you can use to create your own animated presentations.

    Free Business Profile Keynote Template

    Free Business Profile Keynote Template

    This free Keynote template is perfect for making business and company profile presentations. It comes with various slides you can use to effectively showcase your business to your audience. The slides are available in multiple color schemes as well.

    Selfone – Free Multipurpose Presentation Template

    Selfone - Free Multipurpose Presentation Template

    Selfone is a unique presentation template that comes in both Keynote and Google Slides versions. This template is designed for presenting apps, products, and ideas. It includes 32 editable slides. You can use it for free with all kinds of projects.

    Colorado – Business Keynote Template

    Colorado - Business Keynote Template

    Colorado is a stylish Keynote template designed for modern and casual businesses. The template comes with 30 unique slide layouts that are easily customizable to change colors, fonts, and shapes. It also includes image placeholders as well.

    Dolor – Free Modern Keynote Template

    Dolor - Modern Keynote Presentation Template

    Dolor is a modern Keynote template you can use to design stylish presentations for showcasing portfolios and businesses. The large image placeholders and the clean layouts of the slides will certainly help you get more attention from your audience. This template comes in both Keynote and PowerPoint versions.

    Armio – Modern Business Keynote Template

    Armio - Modern Business Keynote Template

    A minimal and creative business Keynote template. This template features a minimal and clean design. And it comes with image placeholders, gallery and portfolio slides, 5 different color schemes, and 30 custom slide layouts.

    XAVIER – Free Keynote Presentation Template

    XAVIER - Free Keynote Presentation Template

    Xavier is another free Keynote template that comes with a set of slides that feature colorful and trendy design. This template is perfect for making different types of presentations for creative agencies and designers. It features an easily editable design as well.

    Born-Ink – Free Creative Keynote Template

    Born-Ink - Free Creative Keynote Template

    Born Ink features a stylish design that makes it a great choice for designing slideshows for fashion and design-related presentations. It comes with 10 unique slide designs. And it’s available in PowerPoint format as well.

    The Business – Free Keynote Template

    The Business - Free Keynote Template

    Made with modern businesses in mind, this free template allows you to design different types of business-themed presentations. The template comes with 12 slides. You’ll have to signup for a free account to download this template.

    Radiance – Free Agency Keynote Template

    Radiance - Free Agency Keynote Template

    Radiance is also free to download after a quick signup. This template is made with agencies in mind. It includes 32 unique slides featuring elegant and modern designs. It’s available in PowerPoint and Google Slides versions as well.

    Free Real Estate Keynote Template

    Free Real Estate Keynote Template

    This free Keynote template is perfect for designing a simple slideshow to present real-estate property and solutions. The template comes with 20 unique slide designs. You can easily customize them to add your own images.

    Free Minimal & Clean Keynote Template

    Free Minimal Keynote Template

    If you’re looking for a minimal template to craft a subtle and clean presentation, this Keynote template is for you. It features more than 20 customizable slide layouts featuring icons, shapes, animations, and image placeholders.

    Timeline & History Free Keynote Template

    Timeline & History Free Keynote Template

    Timelines offer a great way to present product schedules, company history, and much more. This is a great free Keynote template you can use to easily design timelines for presentations. The template includes 20 slide layouts.

    Minimal – Free Clean & Simple Keynote Template

    Minimal - Free Clean & Simple Keynote Template

    A clean and minimal Keynote template you can use for free to create presentations for various types of purposes. This template is easily customizable and comes with master slide layouts and 20 pre-made slide designs.

    Business Proposal – Free Keynote Template

    Business Proposal - Free Keynote Template

    You can use this free Keynote template to create stylish business proposals that win over your clients and customers. It includes 20 unique slides with professional designs and transition animations.

    Duotone – Free Creative Keynote Template

    Duotone - Free Creatiave Keynote Template

    This creative Keynote template comes with a unique design featuring a duotone color theme. It includes 18 unique slide layouts with easy drag and drop editing features, image placeholders, resizable graphics, and free fonts. The template is free to download and use with your personal projects.

    Yellow – Free Keynote Presentation Template

    Yellow - Free Keynote Presentation Template

    Yellow is a modern Keynote template featuring a creative design. It comes with 60 unique slide designs that can be easily customized to your preference. The template is also available in PowerPoint version as well.

    Voodoo – Free Keynote Presentation Template

    Voodoo Keynote Presentation Template

    Featuring 10 unique slide designs, this free Keynote template is perfect for making a presentation for a modern agency or a freelancer. The template is available in both dark and light color themes as well as a PowerPoint version.

    BlockChain – Free Keynote Presentation

    BlockChain - Free Keynote Presentation

    Even though this Keynote template is designed for making blockchain-related presentations, it can be easily customized to make other types of presentations as well. The template features 10 unique slides with easily customizable designs.

    Color – Stylish Free Keynote Template

    Color - Stylish Free Keynote Template

    This colorful Keynote template comes with a set of beautiful slide layouts that will allow you to create more attractive presentations that capture your audience’s attention. The template includes 10 slide designs with image placeholders and vector graphics.

    Zane – Free Keynote & PowerPoint Template

    Zane - Free Keynote & PowerPoint Template

    Zane is a professional Keynote template you can use to make different kinds of business and agency related presentations. It comes with 11 slide designs and the template is available in PowerPoint and Google Slides versions as well.

    PASTEL – Keynote Presentation Template

    PASTEL - Keynote Presentation Template

    Pastel is a modern Keynote template that comes with a set of slides that feature a design inspired by pastel colors. The free version of the template includes a limited set of slides that are also available in Google Slides and PowerPoint.

    Macademia – Keynote Presentation Template

    Macademia - Keynote Presentation Template

    This beautiful Keynote presentation is perfect for making a lookbook-style slideshow for a fashion or apparel brand. The template is easily customizable as well. You can use the free version with your personal projects.

    Brookly – Minimal Keynote Template

    Brookly - Minimal Keynote Presentation Template

    Brookly is an elegant Keynote template featuring a creative set of slides that can be used to make modern business and professional presentations. The slides can be easily customized to your preference as well.

    Retro – Keynote & PowerPoint Template

    Retro - Keynote & PowerPoint Template

    This is a high-quality Keynote template that comes with 25 unique slide layouts. You can use to create attractive presentations for branding and marketing projects. The template is also available in PowerPoint and Google Slides versions as well.

    Lookbook – Colorful Free Keynote Template

    Lookbook - Colorful Free Keynote Template

    Lookbook is a free Keynote template that features a set of colorful and attractive slides. The template comes with a design filled with vibrant colors that makes it perfect for designing entertaining presentations for fashion, design, and creative brands. The template is available in PowerPoint format as well.

    Space – Free Powerpoint & Keynote Template

    Space - Free Powerpoint & Keynote Template

    Space is a clean and professional Keynote template that also comes with a PowerPoint version to let you design presentations using both apps. In addition to its beautiful slide designs, the template also features lots of icons, device mockups, and maps for making more attractive slideshows.

    Ravi – Free Powerpoint & Keynote Template

    Ravi - Free Powerpoint & Keynote Template

    Ravi is a stylishly modern Keynote template you can use to design a colorful slideshow for fashion, marketing, and branding presentations. The template features an easily customizable slide layout featuring lots of vector elements, shapes, and device mockups.

    Air – Free Minimal Keynote Template

    Air - Free Minimal Keynote Template

    Air Keynote template comes with more than 60 unique slides featuring a minimalist design that can be easily customized to your preference. It’s ideal for making presentations for creative professionals, agencies, and startups.

    Business Plan – Free Keynote Template

    Business Plan - Free Keynote Template

    This free Keynote template is perfect for making different kinds of business presentations, especially including business plans and project proposals. The template features 20 unique slide designs with drag and drop image placements.

    Simple Portfolio – Free Creative Keynote Template

    Simple Portfolio - Free Keynote Template

    If you’re a creative professional looking to showcase your portfolio in a presentation, this template will come in handy. The Keynote template comes with more than 20 creative slide layouts in HD resolution.

    Montana – Minimal Free Presentation Template

    Montana Minimal Free Presentation Template

    Montana is a minimalist Keynote presentation template you can use to design all kinds of creative and professional presentations. The template is also available in PowerPoint and Google Slides layouts as well. All of which can be downloaded for free!

    Comersa – Free Pitch Deck Keynote Template

    Comersa Free Pitch Deck Keynote Template

    Comersa features a set of very modern slide designs featuring various shapes, icons, and graphs. It’s ideal for making business presentations and startup pitch decks. The Keynote template is free to use with your personal projects.

    Annual Report – Free Keynote Template

    Annual Report - Free Keynote Template

    Are you looking for a simple Keynote template to present your annual business report? Then use this template to craft your presentation for free. It comes with 20 unique slides filled with transition animations.

    Company Profile – Free Keynote Presentation

    Company Profile - Free Keynote Presentation

    This free Keynote template will help you design a professional slideshow to present your company or agency to your audience at conferences, events, and meetings. The template includes 20 slide designs with image placeholders and more.

    Business Proposal – Free Keynote Template

    Free Business Proposal - Keynote Presentation Template

    Create stylish project and business proposals using this free Keynote template that your clients can never say NO to. The free template comes in PowerPoint and Google Slides versions as well.

    Case Study – Free Minimal Keynote Template

    Case Study - Free Minimal Keynote Template

    Looking for a cheap Keynote template to present your case study to your team? Then use this free Keynote template to save your money and design a slideshow that makes you look like a true professional.

    Clean Business – Free Keynote Template

    Clean Business - Free Keynote Template

    Another free Keynote template for presenting your business plans and projects to your audience. This template includes 20 unique slide designs featuring image placeholders and transition animations.

    Services – Free Dark Keynote Template

    Services - Free Dark Keynote Template

    If you prefer slide designs with darker color themes, this free Keynote template is perfect for you. It features a modern color theme with attractive layouts most suitable for making business and agency presentations.

    Hope – Powerpoint & Keynote Template

    Hope - Powerpoint & Keynote Template

    This free Keynote template is perfect for making presentations for showcasing your products, company, and brand. It comes with lots of unique slide designs featuring image placeholders and easily editable layouts you can edit and customize however you want.

    Simple – Minimal Free Keynote Template

    Simple - Minimal Free Keynote Template

    Another modern Keynote template featuring a minimalist design. This template features minimal colors with a clean layout allowing you to design presentations for startups, creative agencies, and professionals.

    Business Plan – Free Keynote Template

    Business Plan - Free Keynote Template

    Just as the name suggests, this Keynote template is designed specifically for creating presentations related to business and companies. The template comes with a set of modern slides you can use to make slideshows for showcasing business plans, marketing plans, and more.

    Corporate – Business Free Keynote Template

    Corporate - Business Free Keynote Template

    This free Keynote template comes with 8 unique slide layouts with stylish clean designs. The slides feature stylish graphics and charts that can be easily customized. You can use the template to make corporate business and brand-related presentations.

    Minimal – Clean Free Keynote Template

    Minimal - Clean Free Keynote Template

    A highly minimalist Keynote template featuring a modern and clean design. This template comes with 10 unique slides featuring a text content-focused design. It’s most suitable for making presentations for creative professionals and agencies.

    Basics – Modern Keynote Template

    Basics - Modern Keynote Template

    This free Keynote template includes 31 unique slides filled with lots of attractive colors, vector elements, and image placeholders. You can easily edit the template however you like to create slideshows for all kinds of presentations.

    Bizpro – Business Keynote Template

    Bizpro - Business Keynote Template

    Bizpro is a simple free Keynote template that comes with 8 modern slides. It includes a set of high-quality vector icons, image placeholders, and editable layouts. The template also comes in PowerPoint and Google Slides versions.

    Taya – Free Keynote Presentation Template

    Taya - Free Keynote Presentation Template

    Taya is a creative and minimal Keynote template you can use to design slideshows for modern businesses, agencies, and brands. The template is fully customizable and features a clean layout with image placeholders. It’s available in PowerPoint version as well.

    Softly – Modern Free Keynote Template

    Softly - Modern Free Keynote Template

    Softly is a modern Keynote template featuring an image-focused design. The template includes 60 unique slides with image placeholders, icons, vector shapes and more. It’s most suitable for fashion and portfolio presentations.

    Write – Creative Free Keynote Template

    Write - Free Keynote Template

    Write is a creative Keynote template that comes with a set of minimal slides. The template allows you to grab your audience’s attention with its clean and simple design. It’s available in PowerPoint format as well.

    Enable – Elegant Free Keynote Template

    Enable - Elegant Free Keynote Template

    Enable is an elegant free presentation template that you can edit and use with both Keynote and PowerPoint. The template is easily customizable and features image placeholders and lots of editable vectors.

    Omelia – Minimal Free Keynote Template

    Omelia - Minimal Free Keynote Template

    Omelia is a great fee Keynote template you can use to design presentations for fashion and design brands. The template features a content-focused design that puts more attention to images. It’s free to use with your personal projects.

    Altezza – Free Creative Keynote Template

    Altezza - Free Creative Keynote Template

    Altezza is a free Keynote presentation template featuring 11 unique slides. The template also includes Google Fonts, XML settings, along with Google Slides and PowerPoint versions of the template to let you customize it using your favorite app.

    Every – Stylish Free Keynote Template

    Every - Stylish Free Keynote Template

    Every is the ideal Keynote template you can use to make a creative portfolio or a design related presentation. It comes with 16 unique slide layouts featuring easily editable design, image placeholders, and editable vector elements.

    Burbank – Free Business Presentation Template

    Burbank - Free Business Presentation Template

    Burbank Keynote template comes with 8 fully customizable slides featuring modern and colorful designs. It’s ideal for making slideshows for a business meeting and event presentations. The template is also available in PowerPoint and Google Slides versions.

    Brook – Free Keynote Presentation Template

    Brook - Free Keynote Presentation Template

    Brook is a modern Keynote template that includes 8 slides you can easily customize to your preference. It also includes creative vector icons, editable graphics, shapes, and much more.

    Business Strategy – Free Keynote Template

    Business Strategy - Free Keynote Template

    Business Strategy Keynote template is most suitable for making business-related presentations. It comes with 8 different slide designs featuring minimal layouts.

    Petang – Free Keynote Presentation Template

    Petang - Free Keynote Presentation Template

    Petang is a free Keynote template designed for creative professionals and designers. It features a dark color theme that effectively highlights its content to attract the audience. The template also includes editable graphics, charts, and image placeholders.

    Free Corporate Keynote Template

    free keynote template

    Fancy a modern yet professional Keynote template for free? Look no further than this meticulously crafted presentation template that’s sure to create a lasting impression on your audience.

    AnApple – Keynote Templates Free Download

    free keynote template

    AnApple is a free Keynote presentation template with a minimal yet eye-catching design. The template is super easy to use and comes with an array of customizable features to play around with. one of the best free Keynote templates out there!

    Curvle Urban – Free Keynote Templates For Mac

    free keynote template

    Next up we have one of the best free Keynote templates for designers, photographers, and other experts working in the creative industry. It comes with a stylish layout and offers a range of amazing features for you to take advantage of.

    Aqilla – Free Keynote Templates For Designers

    free keynote template

    Aquilla is a clean, modern, multipurpose Keynote template that can be virtually used for any presentation. It offers professionally designed slides, drag and drop picture placeholder, free fonts, one-click color change feature, and a lot more.

    The Power of Partnerships and Innovation, according to New Balance’s Calvin Goncalves

    Featured Imgs 23

    You don‘t need to be a sneakerhead to know about New Balance—I know I’m not.

    The 118-year-old footwear company is everywhere, from TV to film to neighborhood cookouts, despite changes in fashion, consumers, and how people find and purchase new products.

    So, what‘s the brand’s secret sauce to staying relevant longer than we've been alive?

    Click Here to Subscribe to Masters in Marketing

    New Balance Marketing Associate Calvin Goncalves says thoughtful partnerships and innovative strategies play a huge role. Goncalves is an expert with a lot on his plate.

    He‘s part of a team at New Balance that plans out the brand’s strategy years in advance while considering past campaigns and what worked or didn't work in previous years.

    He knows a lot about brand partnerships, having been involved in New Balance‘s creative collaborations with DLTR and Joe Freshgoods.

    Fortunately, Goncalves told us what it’s like to walk in his shoes (pun intended), and we chatted about innovation, collaborations, and the best way to partner with others in a campaign.

    The Do‘s (and Don’ts!) of Brand Partnerships, According to a New Balance Marketer

    Goncalves says partnerships are great for go-to-market strategies because they expose products and services to new audiences.

    But working with influencers is a doozy, so here are some of his tried-and-true tips for getting it right.

    1. Act natural. Don't force it.

    Goncalves says brands should avoid forcing a partnership if the chemistry isn‘t there. He mentions New Balance’s partnership with Joe Freshgoods as an example.

    “When we bring outside people in, like a Joe Freshgoods, from a brand level—we don't force it,” he says. “We allow them to be themselves but also ensure it's good for the brand. Instead of trying to force these concepts on people, we say, 'This is the product that we have. What do you envision?'”

    In other words, partner with a brand that is already aligned with your values, show them what your brand brings to the partnership (e.g., a new product or service), and collab, collab, collab.

    “We do this instead of just trying to pick the most popular person, shoe, or moment,” he says. “When we just stick all these things together, the collaboration comes across as watered down and tacky.”

    Which brings me to our next point.

    2. Don't just stick your best shoe onto the trendiest TikToker.

    Picture this all-too-likely scenario: You're in a pitch meeting with your team to brainstorm some hip, trendy influencers who might want to partner with your brand. (Side note: Am I hip and trendy if I say the words hip and trendy?)

    And then your coworker has a great idea. “Ooh, ooh!” he says, shooting out of his seat. "How about Addison Rae? She has 88 million followers… How perfect?"

    Goncalves says this is a mistake.

    “Okay, cool, someone might have 15 million followers on TikTok, but do they fit your brand?” Goncalves asks. “People are very savvy, and you don't want anyone to think of something as a money grab.”

    Instead, Goncalves suggests considering the ideas and vision you already have for your brand and seeking partnerships with people who align with those goals.

    “Do a lot of research and listen to what people are saying,” he says. “If you're getting talent, you must vet them because it could blow up in your face. You need to know the right partner; that's the most important thing.”

    3. Be innovative.

    New Balance is just shy of 120 years old, and Goncalves credits the company's longevity to its obsession with innovation.

    “We have to be innovative to compete with the bigger brands that are on the rise right now.”

    An example of innovation came from an event New Balance hosted with collaborator DLTR in Atlanta, Georgia.

    For the event, the New Balance team decided to go all-out with an ice cream truck wrapped in images of the sneaker, plus CGI and 3-D modelling of the shoe.

    The brainstorming session resulted in the perfect summertime event to promote the launch of New Balance x DLTR's sneaker line, Gelato.

    Local children and families were served free ice cream from a Gelato-themed truck as kid influencers like King Moore, Heiress Harris, Semaj, and Royal Rose World put on a performance.

    Other highlights included games and a face-painting station.

    “I was in Atlanta for that activation,” he says. “I got to see it come to life. Honestly, it's the coolest thing I've probably ever done.”

    Remember what we said about scoring the right partnership? Well, there's a reason DLTR was chosen to work with New Balance.

    “DLTR knows their community and they know their audience, so that's why we partnered with them,” he says. “They actually brought live kid models and kid influencers who are huge in their market. And then we made it a perfect balance.”

    4. Use a blast from the past.

    Let‘s return to our earlier mention of New Balance’s latest collaboration with Joe Freshgood. The partnership consists of two pairs of sneakers called the “When Things Were Pure” pack that are an homage to the early 2000s and Y2K fashion.

    Goncalves says nostalgia is a great tool for marketing that can make for creative and authentic partnerships.

    “I always suggest tapping into some nostalgia whenever you do something,” he says.

    Goncalves suggests thinking about a nostalgic moment and finding ways to connect it with your new audience.

    For example, watching videos from the DLTR collaboration event reminded me of the summer block parties of my childhood and begging my parents for a few dollars to get ice cream or standing in line with my friends eagerly waiting to get our faces painted.

    5. Remember, teamwork makes the dream work.

    Partnerships and collaborations are opportunities to share new ideas, reach different audiences, and create innovative, strategic campaigns. However, a partnership is only as good as the teamwork behind it.

    “The most important thing that I would like to stress is teamwork and working cross-functionally,” Goncalves explains. “You see the finished product, but a lot of teams work on it to make it happen.”

    Like my middle school soccer coach, Goncalves says team work is the key to the success of any partnership, be it with a creator or another brand.

    “The biggest thing for me is being a team player, whether I need to lead or step back,” he says. “I just really want to drive home the point that teamwork is the essential recipe for making things happen.”

    Click Here to Subscribe to Masters in Marketing

    7 Top AI Market Research Tools in 2024

    Featured Imgs 23

    Market research is the backbone of all marketing, and we can’t skip it.

    Download Now: 100 ChatGPT Prompts for Marketers [Free Guide]

    After all, how can you promote any products and services if you haven’t dug deep into your market, audience, and competition?

    Nevertheless, market research eats up a ton of time. So many marketers take it for granted and settle for superficial research.

    To avoid this, make use of AI market research tools. Which?

    I tested seven AI market analysis tools and broke down which ones are worth trying.

    Let’s jump in.

    Table of Contents

    What are AI market research tools?

    AI market research tools use artificial intelligence to gather and analyze market data. They pull in data from different sources, spot trends, predict future shifts, and break down complex info into simple insights.

    These tools also help with audience segmentation, tracking competitors, and creating detailed reports, making it easier for marketers to make smart, data-driven decisions.

    Machine learning and natural language processing (NLP) enable these tools to mimic human behavior.

    My interest in AI and its impact on markets led me to explore notable success stories from big names who’ve harnessed AI in marketing. One such example is Spotify.

    It implemented AI for research last year through its AI DJ feature.

    The tool constantly collects feedback and analyzes your listening patterns, essentially conducting ongoing “market research” to fine-tune music choices and feed Spotify’s analysts with data on which songs to add to increase listening time, bring more subscriptions, etc.

    ai market research tools: AI DJ by Spotify

    Image Source

    The AI DJ goes beyond basic recommendations and provides commentary on the songs and artists it plays, making the experience more engaging.

    Why use AI tools for market research?

    Many people still think that AI can’t understand human nuances like a real researcher can, but that’s just one of the misconceptions, says Ashley S., Ph.D. in Anthropology and Co-Founder of EmpathixAI.

    Lie – AI can’t understand human nuance like a real researcher.

    Image Source

    The truth is that AI has made huge strides in grasping these subtleties and can provide insights that are just as valuable, if not more so, than traditional methods.

    Can I research the market without AI? Sure. How hard is it on a scale of 1 to 10? 11.

    That’s why giving these tools a chance is more than a good idea. Here are the top three reasons why you should think about it:

    Predictive Analysis

    AI algorithms can track customer behavior and predict trends, giving marketers a chance to fine-tune their strategies.

    For example, a broadcast company was losing market share to digital media, which was expected to dominate 50% of the market in five years.

    The CFO wanted to improve content to win back viewers and boost ad revenue. Scios Market, an AI market research tool, helped analyze which show attributes, like content quality and cast, drove viewership and ad dollars.

    Predictive analysis and what-if forecasting identified a show concept likely to achieve the highest ratings. This approach led to a new show with 42% higher ratings and allowed the company to double its ad rates.

    benefits of ai market research tools: Scios case study results

    Image Source

    Personalization and Targeting

    AI can segment audiences and personalize marketing strategies based on detailed customer data. This leads to more accurate targeting, better engagement, and higher ROI.

    The best example is a Middle Eastern bank that saw a $3.4 million increase in cardholder spending within three months by using Personalization Breeze from Dynamic Yield and Mastercard.

    AI-driven personalized offers led to a 60% boost in travel transactions, a 30% increase in premium card sign-ups, and a 15% rise in everyday spending.

    This example shows how smart AI personalization can quickly drive significant growth and improve customer engagement.

    benefits of ai market research tools: Dynamic Yield case study

    Image Source

    And, according to an Acxiom report, 47% of customers prefer personalized emails or ads because it helps them easily find relevant products and solutions.

    Use HubSpot AI Email Writer to quickly generate and customize sales outreach emails and marketing campaigns. No more staring at a blank screen — let AI handle the heavy lifting and watch your email engagement increase.

    Improved Efficiency

    AI market research tools, like generative AI models, have significantly impacted productivity and efficiency in almost all kinds of tasks.

    For instance, last year’s study by Shakked Noy and Whitney Zhang from MIT examined the effects of ChatGPT on professionals' document writing efficiency.

    The study involved 444 business professionals across different fields who were tasked with writing two business documents. One group used ChatGPT to assist in research writing, while the other wrote without AI support.

    Key Findings:

    1. Increased Productivity. Professionals who used the AI finished their documents in about 17 minutes, while those who didn't use AI took 27 minutes. This means a 59% increase in productivity. Essentially, professionals with ChatGPT could produce 59% more documents in an 8-hour workday compared to those working without it.

    Time spent on writing subtasks with and without AI

    Image Source

    2. Better Quality. Despite taking less time, AI-assisted documents were rated higher in quality. Documents created with ChatGPT had an average quality score of 4.5 out of 7, while those written without AI scored 3.8. This shows that AI not only saved time but also improved the quality of the work.

    “AI is a tool to help you work faster, not a replacement for critical thinking and problem-solving,” says Alex Cattoni from How To Use A.I. For FAST Market Research. “AI tools like ChatGPT are not always connected to the internet by default, which means they can produce inaccurate or even harmful results.

    This is known as an AI hallucination. Even tech researchers worry that people rely too heavily on these systems for important advice. Use it as a brainstorming tool instead.”

    P.S. If you’re wondering which AI tool writes the best marketing copy, Erica Santiago has tested several different tools and shared her detailed opinions. I wholeheartedly recommend reading this article.

    7 Best AI Market Research Tools

    After studying lots of case studies and reviews and talking to specialists who use AI tools for market research, I pulled together a list of the seven best tools to try.

    I'll walk you through their prominent features, pricing, and what I find exciting about them.

    1. Gong for call insights and sales research.

    Gong.io specializes in revenue intelligence and conversation analytics. It analyzes sales calls, meetings (both audio and video format), and customer interactions to provide insights into sales processes, customer behaviors, and market trends.

    Features

    • Analyzes sales conversations to identify trends, successful tactics, and areas for improvement.
    • Provides visibility into the sales pipeline by tracking deal progress and identifying potential issues.
    • Offers insights and recommendations for sales coaching based on real conversation data.
    • Helps understand how competitors are being discussed in sales conversations and what strategies work.

    ai market research tool: Gong, homepage

    Pricing: Gong prices each license per user. Reach out to them to settle on a customized quote.

    Best for: Gong is equally great for researchers and marketers who frequently hold customer calls or audience interviews.

    What I like: Gong provides both contextual and referential insights. Contextual insights analyze real-time conversation details like tone and sentiment, while referential insights compare these interactions to past data, identifying patterns and best practices to improve sales outcomes.

    Try HubSpot’s Free AI Chatbot Builder to book meetings and provide round-the-clock customer support. Let it handle common queries, trigger email campaigns, and scale your interactions, freeing up your team’s time.

    Testing It Out

    I used Gong to analyze one of our company’s sales calls, and the insights were incredibly good.

    For instance, its talk-to-listen ratio literally showed that the sales rep spent too much time talking and not enough listening, which Gong flagged as a potential issue based on successful past conversations.

    ai market research tool: Talk ratio on Gong

    Parts of the call were color-coded, indicating different topics, emotions, or levels of engagement. It was super easy to track key moments and see when important issues were discussed or when the customer’s interest dropped.

    ai market analysis tool: Meeting breakdown by Gong

    I haven’t run into many issues with Gong, but the speech-to-text feature can be a bit hit-or-miss sometimes. It usually gets the job done, but some parts require refinement. Even so, it’s still one of the top tools out there for this purpose.

    2. YouScan for social media analysis.

    YouScan uses AI to monitor social media and images, helping you track brand mentions, understand customer feelings, and spot trends. It provides real-time insights into how people view your brand.

    For instance, YouScan shows whether people are generally positive, negative, or neutral about your brand based on their comments or post reactions.

    YouScan AI market analysis tool for social media

    Features

    • Tracks mentions of your brand, products, or relevant topics across different SM platforms.
    • Analyzes sentiment and trends to gauge public opinion.
    • Identifies and analyzes visual content related to your brand or industry.
    • Helps track logo usage, brand mentions in images, and user-generated content.
    • Uses AI to assess the emotional tone of posts and conversations.
    • Detects emerging trends and patterns in consumer behavior.
    • Monitors competitors' social media presence and performance.
    • Generates detailed reports and visualizations.

    Pricing

    • Starter 3 ($299 per month): 3 topics, unlimited users, and 30,000 monthly mentions.
    • Unlimited Plans: Configured to your requirements.

    ai market research tool: YouScan pricing

    Best for: Companies active on social media that want to track their brand's presence and impact across platforms.

    What I like: It doesn’t rely on hashtags and captions only, but it identifies subjects and text in images as well.

    Here’s a simple breakdown of how it works:

    1. The AI identifies and tags visual elements in images, such as logos, objects, and scenes.

    ai market analysis tool: Image recognition in YouScan

    2. It extracts relevant information from these images, like how your brand’s logo is used or what products are featured.

    3. The tool then analyzes this data to provide insights, such as how your brand is perceived or which products are the most popular.

    ai market research tool: YouScan groups environments in which your brand was mentioned.

    4. You can use filters to narrow down the results and view detailed reports.

    Testing It Out

    I think every marketer, especially social media managers, will fall in love with this tool.

    The analytics are in-depth and give a clear picture of mention volumes, engagement, and sentiment trends.

    For example, if your posts receive a lot of happy or positive comments, YouScan will generally reflect a positive sentiment. On the flip side, if the posts show negative reactions or dissatisfaction, the sentiment will be negative as well.

    ai market research tool: YouScan analytics

    The Insights Copilot, powered by ChatGPT, is my favorite part. It makes data analysis much easier by generating quick summaries and actionable insights.

    For example, you can ask what customers like about your product, and it will give you a quick summary based on social media mentions.

    ai market research tool: Insights Copilot by ChatGPT

    Image Source

    I also enjoyed the ability to make custom dashboards in 1,000 different ways.

    3. Consensus for quick and reliable scientific insights.

    Consensus is an AI market analysis tool that digs into scientific studies to give you clear, actionable insights.

    But instead of just giving you a list of academic papers like traditional search engines, Consensus scans these papers and summarizes the key findings.

    It uses advanced NLP and machine learning to understand the content and present the most relevant information in a simple, easy-to-read format.

    ai market research tool: Consensus AI market analysis tool

    Features

    • Provides direct answers to specific questions by analyzing scientific papers.
    • Highlights the scientific consensus and evidence supporting the findings.
    • Summarizes key points from multiple papers, saving users time in reviewing literature.
    • Offers links to original papers, allowing users to verify information and explore further.

    Pricing

    • Free: Unlimited AI filters, searches, and research indicators. Limited Copilot, GPT-4 summaries, and Consensus Meter.
    • Premium ($11.99/month): Full access to Consensus Meter, bookmarks, GPT-4 summaries, and Copilot.
    • Teams ($12.99 per seat/month): Central billing, discounts for 200+ seats, account management.
    • Enterprise (custom quote): Library integration, dedicated support, large-scale user management.

    ai market analysis tool: Consensus pricing

    Best for: Academics, marketers, and anyone seeking reliable scientific information. It can help marketers reveal what factors influence purchasing decisions, how different demographics respond to various marketing strategies, and what trends are emerging in the market.

    What I like: The Collaboration Hub feature is great for working in real-time with your team members.

    Testing It Out

    I typed in something about mindfulness and sleep, and within seconds, I had a concise summary of the relevant research.

    ai market research tool: Asking a question in Consensus

    It pulled together key points from multiple papers into one clear overview.

    Then there's the Copilot feature, which adds even deeper insights using GPT-style summaries, complete with clickable citations for easy access to the sources.

    ai market research tool: Search results for the question I asked.

    The Consensus Meter is a great feature, too. I asked a yes/no question, and it broke down the research findings with percentages — giving me a quick snapshot of where the science stands.

    ai market research tool: Consensus meter

    The ability to save searches, export citations, and integrate with tools like Zotero makes it a must-have for serious research.

    And who can benefit from such research?

    Concretely, all these findings can boost market research for sleep-related products.

    For example, research shows that mindfulness improves sleep, which can lead to the development of supplements or apps that help with relaxation. Data on sleep patterns can also help create better sleep trackers or more comfortable mattresses.

    Moreover, marketers can use this information to create targeted ads and content. Understanding sleep patterns can help in designing promotional campaigns for sleep-related products.

    You see? Everything is connected. 🙂

    4. Lexalytics for advanced text analytics and sentiment analysis.

    Lexalytics is a text analysis tool that helps businesses understand large amounts of written data. It can determine if people are feeling positive or negative, identify key names and places, and determine what main topics are being discussed.

    Let's say a company is preparing to launch a new smartwatch.

    Lexalytics scans social media and reviews to see if people are excited about smartwatches. Then, the tool tracks real-time discussions to identify what people are talking about most.

    Is it battery life or design? The answer helps the company highlight these trends in their product launch.

    ai market research tool: Lexalytics homepage

    By identifying key names (e.g., industry influencers, competitors) and places (e.g., tech hubs, major cities) mentioned in the data, the company can tailor their marketing campaigns to target specific audiences or regions.

    For example, if some popular tech influencer is buzzing around in conversations, the company could reach out to them and offer an exclusive review or endorsement, turning that buzz into brand hype.

    Features

    • Identifies and categorizes emotions in text, such as positive, negative, or neutral.
    • Detects important names, places, organizations, and products mentioned in the text.
    • Allows users to tailor text analysis models and solutions to fit specific industries or needs.
    • Provides immediate insights by analyzing text data as it is received.
    • Sorts and categorizes text into predefined categories for easier analysis.
    • Handles text in multiple languages, making it suitable for global applications.
    • Offers detailed visualizations and reports.

    Pricing: Request a demo to get more info about pricing.

    Best for: Marketing teams, product managers, customer support, data analysts, and researchers who need to analyze and understand sentiment trends in feedback and data.

    What I like: The tool effectively handles nuances like negations and intensifiers, which makes results more accurate.

    Testing It Out

    I decided to focus on sentiment analysis to see how the tool handles this aspect.

    First, I created a chart widget in the dashboard and selected the sentiment polarity option.

    ai market research tool: Sentiment polarity

    For my test, I zeroed in on the top 10 topics, which gave me a good range of data to analyze. I started by viewing the total number of documents to understand how sentiment was distributed — positive, negative, and neutral — across these topics.

    ai market analysis tool: Test dash from Lexalytics

    Next, I adjusted the widget to show the percentages of documents rather than raw counts.

    This change provided a clearer picture of what fraction of the documents were positive, negative, or neutral for each topic. It was interesting to compare these percentages and see how sentiment varied by topic.

    ai market research tool: Sentiment  polarity of “topics”

    5. Crayon for tracking and analyzing competitor activity.

    Crayon allows you to track what your competitors are cooking. It provides competitive intelligence and market research insights through AI-driven analytics.

    Crayon continuously tracks competitor activities across various channels — websites, social media, and news sources.

    With this inside scoop, you can see all their moves and make savvy, well-informed decisions.

    ai market research tool: Crayon AI market analysis tool

    Features

    • Tracks competitors’ activities in real time to keep you informed about their latest moves and strategies.
    • Analyzes competitors’ marketing tactics and business decisions.
    • Benchmarks your performance against competitors to highlight areas for improvement.
    • Detects emerging market trends and informs you about them.
    • Provides detailed industry reports to give you a clear picture of market conditions and opportunities.
    • Processes large volumes of data efficiently.
    • Forecasts future market trends based on current and historical data.
    • Sends custom alerts to keep you updated on important events.
    • Visualizes complex data with clear charts and graphs.

    Pricing: Pricing depends on your needs and team size. Reach out for a demo to get your quote.

    Best for: Individuals and teams who want to track multiple competitors, manage detailed battle cards, and organize insights across various topics.

    What I like: Compete Hub, which acts as a newsfeed for my latest announcements and helps me stay on top of industry developments.

    Testing It Out

    Previously, I struggled with the tedious task of sifting through Google Alerts, which took time away from more important tasks.

    Crayon AI changed that by providing really good insights with just a click. The platform’s machine learning algorithm prioritizes critical updates, such as significant changes to competitors' homepages over minor social media posts.

    ai market analysis tool: Crayon insights dashboard

    I particularly love the daily email summaries, which deliver a curated list of the most important insights right to my inbox, saving me from endless alert checking.

    ai market research tool: Email summary by Crayon

    Try HubSpot AI Summarization to easily generate business reports, summarize customer interactions, and boost productivity with AI-driven insights.

    6. Poll The People for crowdsourced decision-making powered by AI.

    Poll The People helps you have a global conversation with your target audience. The platform offers more than just polls — it also incorporates public opinions and deeper surveys.

    With Poll The People, businesses can find the collective thoughts of a large group and make informed decisions based on widespread feedback — curated and analyzed with Open AI to prevent biases and human-prone errors.

    Poll The People – AI market analysis tool

    Image Source

    Features

    • Creates quick and easy polls to gather feedback fast.
    • Generates real-time results to help you make swift decisions.
    • Targets specific demographics to get relevant feedback.
    • Offers both public and private poll options for various needs.
    • Provides diverse question formats, including multiple-choice and text input.
    • Customizes polls with branding and specific questions.
    • Delivers instant analysis for immediate insights.
    • Exports poll results in various formats for detailed analysis.
    • Ensures anonymous responses for honest feedback.

    Pricing

    • Lite (Free): 20+ templates, 250 responses per study, 3 tests per month, and more.
    • Plus ($50/month): Everything in Lite, 500 responses per study, 7-day free trial, and 10 tests per month.
    • Premium ($100/month): Everything in Plus, support, 2,000 responses per study, and unlimited tests.
    • Enterprise (from $10,000/month): Everything in Premium, plus expert consultation, unlimited responses, and additional support.

    ai market research tool: Poll The People pricing

    Best for: Marketers, product developers, UX/UI designers, business owners, and researchers who need quick, targeted feedback to make informed decisions.

    What I like: It’s not just a text-based tool. Upload images and get feedback on specific designs or logos.

    Testing It Out

    I used it to get feedback on potential titles for my book. I set up a quick poll asking for opinions on which title resonated best with readers.

    Within a short period, I received 100 responses that provided valuable insights into what my audience likes.

    ai market analysis tool:Preparing the poll

    The process was incredibly straightforward.

    I created the poll with two-choice options and targeted the responses to make sure they came from my intended audience.

    Note: I don’t recommend the free version because you pay per response; for example, one response costs $1, so 100 responses would cost $100. It’s more cost-effective to opt for a monthly plan if you need a larger number of responses.

    ai market research tool: Audience targeting in Poll the People

    7. ChatSpot for smarter research and data analysis.

    ChatSpot by HubSpot is an AI-powered assistant that simplifies market research. It combines the capabilities of ChatGPT to give you powerful insights and personalized responses.

    You can quickly spot trends, track customer needs, and get valuable data using pre-made templates and real-time information. It integrates with your HubSpot CRM, letting you connect with your data.

    Scouting sales leads or digging into company details like funding rounds and tech stacks? ChatSpot makes research easy and gets the most out of it.

    Features

    • Leverages data to track and interpret market trends.
    • Uses prompt templates and unique data sources for smarter insights.
    • Drafts blog posts, writes X posts, and creates AI-generated images.
    • Identifies key opportunities quickly with prospecting templates.
    • Integrates with HubSpot CRM to interact with your data in real time.
    • Provides deep insights into company details like funding rounds and technologies.
    • Offers intuitive answers designed to help you take action.
    • Allows you to manage contacts, tasks, and notes using natural language commands.

    Pricing: ChatSpot is free to use and automatically connects to your HubSpot account.

    Best for: Marketers, sales teams, customer service reps, business analysts, content creators, small business owners, and project managers who want actionable insights and improved efficiency.

    What I like: The accuracy of the data it provides. I also love ChatSpot’s Image Generator, which creates a variety of stunning visuals.

    Pro tip: Interview AI as if it were your ideal client. Provide it with demographic details and ask it to respond with motivations and struggles using the language of your target audience.

    With just a few clicks, you can generate blogs, social posts, and emails. HubSpot Content Writer is perfect for saving time, overcoming writer's block, and scaling your content without extra costs.

    Testing It Out

    First, I tested ChatSpot’s primary chat feature by asking it a question about current ecommerce trends:

    ai market research tool: Asking ChatSpot a simple question

    As you can see, it provided a brief but clear response, with bolded words that highlight key ecommerce trends.

    Then, I asked about what influences clients when choosing between Google Drive and Dropbox for cloud storage:

    ai market research tool: ChatSpot

    ChatSpot delivered a crisp answer in a brief paragraph, highlighting the key points with bold text again.

    But ChatSpot offers more than just a question-answer feature, and that’s what I love most about it — quickly prospecting for sales with handy templates, drafting blog posts and social media updates, and generating AI images. It also lets you dig into company data like funding and tech used.

    Plus, you can manage your HubSpot CRM tasks — like adding contacts and creating notes — using natural language commands, making everything more intuitive and efficient.

    From Spending Days on Analysis to Getting Results in Seconds

    If someone had told us a few years ago that everything we used to spend hours on — creating detailed analyses, charts, and struggling with Excel — could be done in just a few clicks, with results sorted in seconds, we wouldn’t have believed it.

    But, that‘s our reality today, and it’s only getting better.

    That’s why I hate when people say, “AI takes jobs.” No, it makes them easier.

    We’re still the ones setting tasks and making final decisions. But AI market research tools help us track trends, analyze competitors, and compare data more quickly and efficiently.

    Just as we no longer use carriages to travel from point A to point B, there’s no need to manually do tasks when a faster, smarter solution is right at our fingertips.

    The most important thing is to find high-quality solutions that meet our needs and budget. That’s it. Don’t be afraid of AI. Let’s keep up with the times.

    Embracing Imperfections in Marketing: How to Embrace Flaws Using the Pratfall Effect

    Featured Imgs 23

    Welcome to Creator Columns, where we bring expert HubSpot Creator voices to the Blogs that inspire and help you grow better.

    Here’s something difficult for a marketer to admit.

    Sometimes, marketing is incredibly glib.

    → Click here to download our free guide to digital marketing fundamentals  [Download Now].

    It’s so intensely focused on highlighting positives that marketing often comes across as superficial. Advertising campaigns, slogans, and product launches all use the same rhetoric.

    They talk about how great the thing is.

    Gillette is the best a man can get. Coca-Cola Opens Happiness. And KFC is Finger Lickin’ Good.

    Embracing imperfections in marketing example: KFC advertisement

    Image Source

    I’m not surprised.

    If you want to persuade someone to buy something, you’ll probably talk about how great it is.

    If you wanted to hook your roommate up with a work colleague, you wouldn’t tell them that they put tuna in the office microwave. No, you’d focus on the positives.

    It’s conventional wisdom.

    But is it right?

    See, I think all of us, deep down, know that we’re not solely drawn to positive things.

    No. Sometimes, we prefer imperfections.

    Embracing imperfections in marketing is about buyer psychology.

    If you told McDonald’s to change their slogan from I’m lovin’ it, to, I’ve only got $4 so this will have to do — you’d get kicked out of the boardroom.

    Embracing imperfections in marketing example: McDonald’s example vs. idea

    But this is a problem. It’s marketing that’s based on gut instinct, not evidence.

    It's marketing based on opinion, not fact.

    It's marketing based on experience, not science.

    See if we focused on understanding the psychology behind our buyers, we might not laugh at this suggestion for a new McDonald's slogan. We might embrace it.

    Perfection isn’t perfect.

    Adam Grant shared a study of world-class sculptors in his book Hidden Potential.

    It turns out that world-class sculptors weren’t world-class students. They showed little talent as they studied and definitely weren’t perfect. Their pieces contained lots of faults.

    66% of the world’s best sculptors graduated high school with Bs and Cs.

    Embracing imperfections in marketing example: Pratfall effect graphic

    A similar pattern emerged when comparing America's most influential architects.

    The great architects had rarely been great students: they typically finished college with a B or C average.

    Adam Grant writes how, in their quest for flawless results, research suggests that perfectionists tend to get three things wrong.

    1. They obsess about details that don't matter.
    2. They avoid unfamiliar situations that might lead to failure.
    3. They berate themselves for making mistakes.

    There’s something powerful in embracing flaws. Acknowledging that perfection is impossible and instead showcasing the imperfections that make you, you.

    And the same is true for marketers. Those who embrace their flaws tend to create better ads.

    The Pratfall Effect

    Embracing imperfections in marketing example: Nudge brand graphic

    This is known in psychology as the pratfall effect.

    The pratfall effect was documented back in 1966 by the Havard psychologist Elliot Aronson. His studies revealed that people saw intelligent quiz contestants as more likable when they spilled coffee down themselves. In other words, competent people are preferred if they’re a little clumsy.

    In Aronson’s words, “the pratfall effect made the quiz contestant appear more appealing, increasing his approachability and making him seem more human”.

    Jo Sylvester conducted a followup study at Swansea University. Her team found that when job candidates revealed a weakness they were considered more likable, and thus were far more likely to be offered the job.

    The Pratfall Effect in Practice

    Consumer psychologist Adam Ferrier, a previous guest on Nudge, proved this by asking a representative sample of 626 people a question about cookies.

    The participants were shown two cookies that were identical apart from one small difference. One cookie had a rough edge, while the other was perfectly smooth.

    Embracing imperfections in marketing example: Nudge Pratfall effect graphic

    But, I’m never convinced until I’ve tested these principles myself. So, I created two Reddit ads to promote my podcast, Nudge.

    A Pratfall Effect Marketing Experiment

    The first ad was traditional textbook marketing stuff, highlighting all the positives about listening to my show. It was titled “5 reasons why you should listen to Nudge.”

    The second highlighted my flaws. Titled “5 reasons why you SHOULDN’T listen to Nudge.”

    I’ll be honest. I didn’t expect the pratfall effect ad to work. It was too literal. I was literally telling people not to listen to my show AND giving them reasons why.

    Sure, the reasons I gave weren’t too damning and it was all written in a jokey manner, but I still didn’t think it would beat the control.

    I spent around $110 in total. Over 300,000 people saw the ad. And I couldn't believe the results.

    Embracing imperfections in marketing example: Nudge Pratfall effect experiment graphic

    It was 4x more effective.

    The click-through rate on the control was 0.09%, but the click rate for the pratfall ad was 0.47%. I got a 391% uplift telling people not to listen to my show. Over 500 new listeners tuned in to the show from that one ad. And to date, it’s my most successful test on Reddit.

    And yet, this is something that I doubt I’d ever use in a business setting. Your boss wouldn’t dare let you try something that says not to buy the product. It’s so rare to see companies embracing imperfections in marketing, or showcasing weaknesses, because it seems too risky.

    But it pays to be different.

    It pays to apply science to marketing.

    And it pays to embrace your flaws.

    The Best Social Media Platforms for Video Content in 2024 [Consumer Data]

    Featured Imgs 23

    Whenever I think about social video platforms, the first ones that come to mind are YouTube and TikTok, but those are only the tip of the iceberg regarding video sharing. There are several more video platforms out there.

    Download Now: The 2024 State of Social Media Trends [Free Report]

    However, before we explore the vast options marketers have at their disposal, let's dive into the importance of social media videos, where consumers are watching them, and other important findings.

    Where are consumers watching social media videos?

    YouTube, Instagram, and TikTok are among the social media platforms with the highest ROI, according to our 2024 State of Marketing Report. So, it‘s safe to say that’s where consumers watch social media videos.

    In fact, our most recent Video Marketing Report shows Instagram is the top social media platform for ROI, engagement, and lead generation for sharing marketing videos.

    Behind Instagram is YouTube regarding ROI and lead generation.

    Of course, I can‘t leave out TikTok, considering it’s the app I find myself scrolling through for hours on end. The short-form video platform has the 3rd highest ROI and comes in 2nd for engagement behind Instagram.

    Finally, there's Facebook. While 60% of marketers sharing marketing videos use the longstanding Meta-owned platform, it comes in fourth place for ROI, lead generation, and engagement.

    13 Best Social Media Video Platforms

    1. YouTube

    YouTube is the largest video-sharing platform and the second-largest social media platform in the world, with over 2.7 billion users. According to Neilsen, YouTube topped the list for streaming time for 17 consecutive months in July.

    So, if you‘re wondering if the platform can be a great addition to your video marketing or social media strategy—the numbers suggest that’s the right move!

    What I love most about YouTube is how the platform can host diverse formats of videos, such as live streaming, short-form videos, and long-form videos.

    You can also utilize YouTube's Community tab to speak to engage with your audience in between video uploads.

    Other key features and benefits include:

    • AI-generated transcriptions and captions
    • Straightforward privacy settings
    • Option to pay to promote your videos on YouTube and Google
    • The ability to curate your videos into playlists
    • Data analytics and management tools via YouTube Studio
    • Monetization options via the YouTube Partner Program
    • Robust audio library
    @erikeepswriting To learn more, read "The Best Social Media Platforms for Video Content in 2024" on the HubSpot Marketing blog! #fyp #marketing #socialmediamarketing #videomarketing ♬ Neva Play (feat. RM of BTS) - Megan Thee Stallion

    2. TikTok

    TikTok is an excellent platform for attracting a Gen Z audience.

    Our 2024 Consumer Trends Report shows that 48% of Gen Z consumers prefer to learn about new products via short-form videos on TikTok, and 72% say they've used the app in the last three months.

    Some of my favorite features of TikTok are:

    • Live stream shopping capabilities
    • Several monetization opportunities, including the ability for viewers to send gifts
    • Hashtags for boosts in engagement and community building
    • Advertising options for business accounts
    • Constantly growing library of trending songs and sounds

    3. Instagram

    Instagram is also popular among Gen Z, with 72% reporting to have used the app in the last three months. It's a great platform for promoting products and selling them in-app.

    Here are some of the best features:

    • E-commerce capabilities via Instagram storefronts
    • Live stream capabilities
    • Shoppable stories

    4. Facebook

    Facebook is known to be more popular among millennials and Gen X, but our Consumer Trends Report shows it still has loyal users. Our report shows that 42% of consumers consider the app their favorite.

    Features include:

    • Facebook Live
    • Facebook Stories
    • Paid Video Ads
    • Community pages to connect with your audience

    5. Snapchat

    I was a junior in high school when Snapchat launched, and I remember it being extremely popular among college students a few years later.

    The app is still going strong among younger consumers today, with 57% of Gen Z consumers saying they've used the app in the last three months.

    It also remains quite popular among Millennials, with more than a third (37%) also reporting using it within the last few months.

    Marketing on Snapchat can be tricky since the app‘s main draw is that users can send each other videos and photos that disappear after 24 hours. It’s more popular for interpersonal communication.

    However, marketers can still leverage the app thanks to various features like Snap Ads, Story Ads, and Collections Ads.

    6. Twitch

    Twitch is a live streaming platform especially popular among gamers; however, you don‘t need to be in the gaming industry to leverage it.

    Brands like Wendy’s and Old Spice leverage influencer marketing by tapping into well-known streamers who can introduce their products to a wider audience.

    My favorite Twitch features and benefits are:

    • Monetization options via its affiliate and partnership programs
    • Stream scheduling
    • Live comments
    • Channel analytics

    7. X (formerly Twitter)

    X is mostly regarded as a micro-blogging platform, but it has video posting and sharing abilities. Users without an X subscription can upload videos up to 140 seconds long.

    Subscribers can upload videos up to 4 hours long, depending on whether they use iOS, the desktop version of X, or Android.

    8. LinkedIn

    I only recently discovered the different possibilities regarding video on Linkedin, and I was pleasantly surprised. Users can upload up to 10 minutes of native video on the platform, stream for up to four hours, and post video ads that are up to 30 minutes long. 

    Furthermore, I've found that drumming up engagement for videos on LinkedIn is pretty easy because you're relying on your own network plus the networks of others to share your content. 

    One of my most recent videos is a TikTok I embedded in a LinkedIn post. In just a week, that post garnered more than 1,700 views and reached more 1,200 people.

    It's worth noting that I only have about 600 people in my LinkedIn network.

    9. Pinterest

    Pinterest's video capabilities are especially helpful for retail brands looking to reach consumers seeking inspiration. Pinterest is a social media platform that allows users to create digital vision boards for inspiration regarding style, art, recipes, and more. 

    For example, Fenty Beauty uses its Pinterest board to post videos showing its products in use while giving makeup inspiration. Brands can also make curated Pinterest boards consisting of multiple videos, all within the same niche. 

    Other useful features are: 

    • Shoppable video ads featuring a video clip promoting relevant products to users with similar interests
    • Personalized collection ads allow multiple images that can include one video and three supporting images promoting relevant products.

    10. Reddit

    Reddit is an app that focuses on community and discussions. Brands can leverage Reddit video ads to build discussions around their products and services while building community in the form of subreddits. 

    Though videos can be up to 15 minutes long, I suggest keeping them no longer than 30 seconds to a minute. 

    11. Discord 

    Brands leveraging Discord typically use the platform for community marketing. This is achieved by creating a designated space (server) that serves as a central hub for interactions between the brand and its consumers and segmenting consumers into different channels that appeal to their interests. 

    So, where does video come in? Well, I put Discord on this list because the platform allows for video calls, which allows server members to tune in and converse. Brands can host webinars, tutorials, Q&As, and more via live video calls and streams. 

    12. Telegram

    Telegram is a cloud-based messaging app that lets viewers send messages, videos, images, and files to each other. Users can also make voice and video calls. 

    Telegram can be a great platform for providing customer service, and its video capabilities can allow brands to better troubleshoot issues, answer questions, or provide visual tutorials.  

    13. Vimeo

    Vimeo is often compared to YouTube, but I personally believe the former has some technical capabilities that give it an edge over the more well-known platform.

    Vimeo allows users to post videos that can only be seen by followers or selected accounts, which can be helpful if you want to build community via exclusive content. 


    Tips for Sharing Social Media Videos

    1. For most platforms, zone in on short-form videos.

    The world is becoming more fast-paced every day. While many people are watching social media videos in their spare time, some are watching them on the go.

    For example, I often watch TikTok videos and Instagram Reels on the subway or bus while running errands.

    My friends often watch videos in between meetings or while waiting for an appointment.

    These short periods of time don't leave much room for consumers to watch long-form videos, so many marketers suggest focusing on creating short-form, or “snackable,” video content.

    “Using snackable videos on social can actually drive more engagement than static images,” says Meisha Bochicchio, Content Marketing Manager at Wistia.

    When it comes to creating effective snackable content, Bochicchio says, “First things first, keep in mind that most social media platforms will automatically start playing video content as viewers scroll.

    So, make sure your videos are autoplay-friendly. Keep them short and put your key messaging in the first few seconds.”

    “Remember that most people won’t hear your audio, so make sure your videos are also silent-friendly, ”Bochicchio advises. “Consider text overlays, or upload captions directly on platforms like LinkedIn, Twitter, and Facebook.”

    To learn more about this strategy, check out this post on snackable content, or this post that highlights the latest short-form video trends.

    And if you want to make snackable content on your own, our AI-powered Clip Creator tool can convert text into professional videos for your business with just a few clicks.

    2. Test different video formats, too.

    While short-form video content is a great tactic to harness, you can still publish longer videos as long as they're engaging and valuable to your audience.

    For example, while people might not want to watch a two-hour commercial, they could watch a longer live video Q&A, an interview with a thought leader, or a video that tells a longer but entertaining story.

    While you can certainly test longer-form videos, you can also test out other formats, such as live streams, interactive videos, and shopping videos, on platforms like TikTok, Instagram, and Facebook.

    It's worth noting that 46% of Gen Z consumers in the U.S. have participated in live shopping events, and 47% have purchased from a live stream.

    As new video formats emerge, it can be helpful to determine if they might work for your brand and design a test around them.

    Be sure you identify and track the right success metrics. For example, if you‘re testing a longer video, look at its views and dropoff rate to see how long viewers stay tuned.

    Meanwhile, if you try a more interactive approach like a live stream or Q&A you can also take note of comments, engagements, and shares on the content while you’re live.

    3. Meet your video audiences where they are.

    As with any social media strategy, some content will perform better on some social media platforms rather than others.

    While snackable, consumer-facing content might perform well with YouTube, Facebook, and TikTok's large consumer audiences, a B2B marketing video or a Q&A with a corporate thought leader might perform better on a professional-facing network like LinkedIn.

    Luckily, to create a great marketing strategy, you don‘t (and shouldn’t have to) place your videos on every single social media platform.

    However, you should research the demographics of each major network, identify which audiences might engage most with your content, and start publishing videos where it makes the most sense for your brand and goals.

    Then, continue to keep an eye on platforms you've ruled out in case they continue to evolve and provide your brand more audience opportunities in the future.

    4. Don't always lean on repurposed content.

    During my early days as a content creator, I would often repurpose content across multiple platforms. That strategy was sufficient for a while, but things have changed since then.

    Today, it can still be beneficial for brands to repurpose some video content for different platforms when they have similar audiences and features. This can also be a great way to test whether your content strategy for one platform will work with one audience.

    However, because knowing your social media audience is more important than ever, you might want to consider having a slightly different video strategy for your most important video platforms.

    While there will be times where you can easily repurpose content to save time or bandwidth, some platforms like TikTok and Instagram are evolving with algorithms that could deprioritize your content if it has a watermark from another network.

    5. Embrace influencers and customers.

    Even if you've done all of your research and churn out videos daily, it can still be incredibly hard to post a viral piece of content that grows your audience.

    Luckily, there are experts on every social media platform who know how to create videos. And, some of them will even create videos for you -- and then share them with their audiences.

    That's why one great growth strategy can involve reaching out to influencers or thought leaders with expertise in your industry and either featuring them in your videos or getting them to endorse your brand in their content.

    If you can't afford to have an influencer help boost your video strategy, you can also look towards happy consumers.

    With this strategy, you can encourage customers to share a video about their experience with your brand on social media, or you can create a video filled with multiple pieces of user-generated content from happy customers.

    Because today's consumers crave authenticity from brands, user-generated content not only can provide you with free video content but can also spread brand awareness to prospects or people researching you on social media.

    Navigating Social Media Content

    More than ever, social media and content marketing are always evolving. As a marketer, it‘s important to stay up to date with the latest trends and data to better inform your strategies -- whether you’re investing in video or other tactics.

    Editor's note: This post was originally published in June 2021 and has been updated for comprehensiveness.

    41 Instagram Features, Hacks, & Tips Everyone Should Know About

    Featured Imgs 23
     

    I’ve been in content marketing for about eight years, and I’ll tell you this golden nugget of truth for free: You can’t cheat your way to success in this game.

    New Data: Instagram Engagement Report [Free Download]

    And that’s especially true when it comes to marketing on a visual platform like Instagram.

    In my experience, it takes dedication, consistency, and hard work to build a reputable Insta account. That said, I’m not a total glutton for punishment. I’m all for Instagram hacks that make the process of account building easier.

    As a social media manager operating accounts in multiple time zones, a simple hack like scheduling Instagram posts in advance was a lifesaver for me. Then, getting Instagram and Pinterest to work together like a well-oiled machine helped me grow my personal blog’s traffic.

    Whether you’re posting for business or pleasure, there are countless lesser-known features, settings, hacks, and search options to help take your Instagram game to the next level. And I've compiled them all here. Let’s go!

    Note: Before getting started, make sure you're operating on the latest version of Instagram. At the time of publishing this guide, the latest version is 346 on iOS and on Android.

    Please also note that although this article might demonstrate each tip below using an iPhone or Android device, all items on this list are available for both operating systems and can be enjoyed using the same step-by-step instructions.

    Table of Contents

    41 Hidden Instagram Hacks, Tips, and Features

    Instagram Account Features

    1. Add and manage multiple accounts from the same device.

    As a freelance social media manager working on multiple client accounts, I found this hack an absolute blessing.

    Managing multiple accounts from the same device made me way more effective and efficient at my job.

    For example, if a scheduled post hit a technical glitch and didn't go live, I could toggle between accounts and manually post the content without an arduous log-on process.

    I could also complete engagement tasks (i.e., commenting on X amount of relevant posts) for multiple client accounts in one session.

    I don‘t know about you, but I find it much easier to do the same task repeatedly if I’m already in the ‘zone.’

    But even for personal use, it‘s a game changer.

    Separate account for your dog? Don’t be embarrassed; stand by your puppy profile. Whether it's a pet or a business account, you can add and manage this one alongside your personal account.

    Here's how:

    1. From your profile, tap the gear icon. To find this icon on an Android device, you'll first need to tap the three horizontal lines to the top right of your screen.
    2. Scroll to the very bottom and tap “Add Account.”
    3. Add your other account by username and password, and you're all set.

    To toggle between both profiles, hold down your profile picture in the navigation bar to view all connected accounts.

    2. See all the posts you've liked.

    Ever wanted to see the post you’ve liked all in one place? All you have to do is go to your profile, click the three lines on the top right (on Android and iOS), tap “Your Activity,” tap “Interactions,” and then click “Likes.”

    Instagram hacks; how to see posts you’ve liked on Instagram

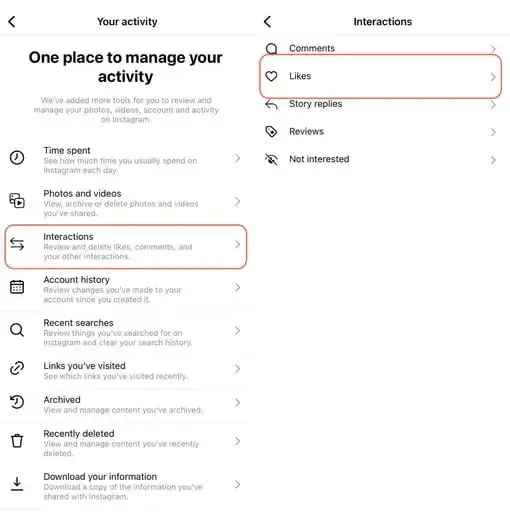
    With this, you can see 300 of the last posts you’ve liked.

    To un-like any posts you‘ve Liked, simply go to the post and deselect the "heart" icon below it.

    Don’t worry — the user won‘t be notified that you’ve un-liked the post.

    3. Hide, delete, or disable comments and likes on your posts.

    X may carry a more “anything goes” culture of commentary, but your Instagram profile is your domain — and it's much easier to control who says what on your content. This is especially important if you manage a business account.

    To Filter Comments by Keyword:
    • Navigate to Settings and tap “Privacy,” then “Hidden Words.”
    • You can toggle “Hide comments” to filter general offensive words or click “Manage custom words and phrases for messages, comments, and posts” to add custom filters.
    To Delete Comments:
    • Tap the speech bubble icon below the comment you'd like to delete, and swipe lightly to the left over this text.
    • Select the garbage can icon that appears to delete this post. You can also do this to your own comments.
    To Disable Comments Entirely:

    To clarify, you can't turn off comments across your entire profile; you can only disable them for individual posts.

    • To do so, start posting an image on which you'd like nobody to comment.
    • When you reach the page to add a caption, tags, and location, tap “Advanced Settings” at the very bottom.
    • This will open a screen where you can easily switch on an option labeled “Turn Off Commenting.”

    Instagram hacks; how to turn off commenting

    4. Clear your Instagram search history.

    To clear your Instagram search history (on Android and iOS), go to your profile, tap Settings, then “Your activity.” Tap “Recent searches” and click “Clear all.”

    Instagram hacks; recent searches

    5. Add another Instagram account to your bio.

    Perhaps your company has more than one Instagram account for different aspects of your brand.

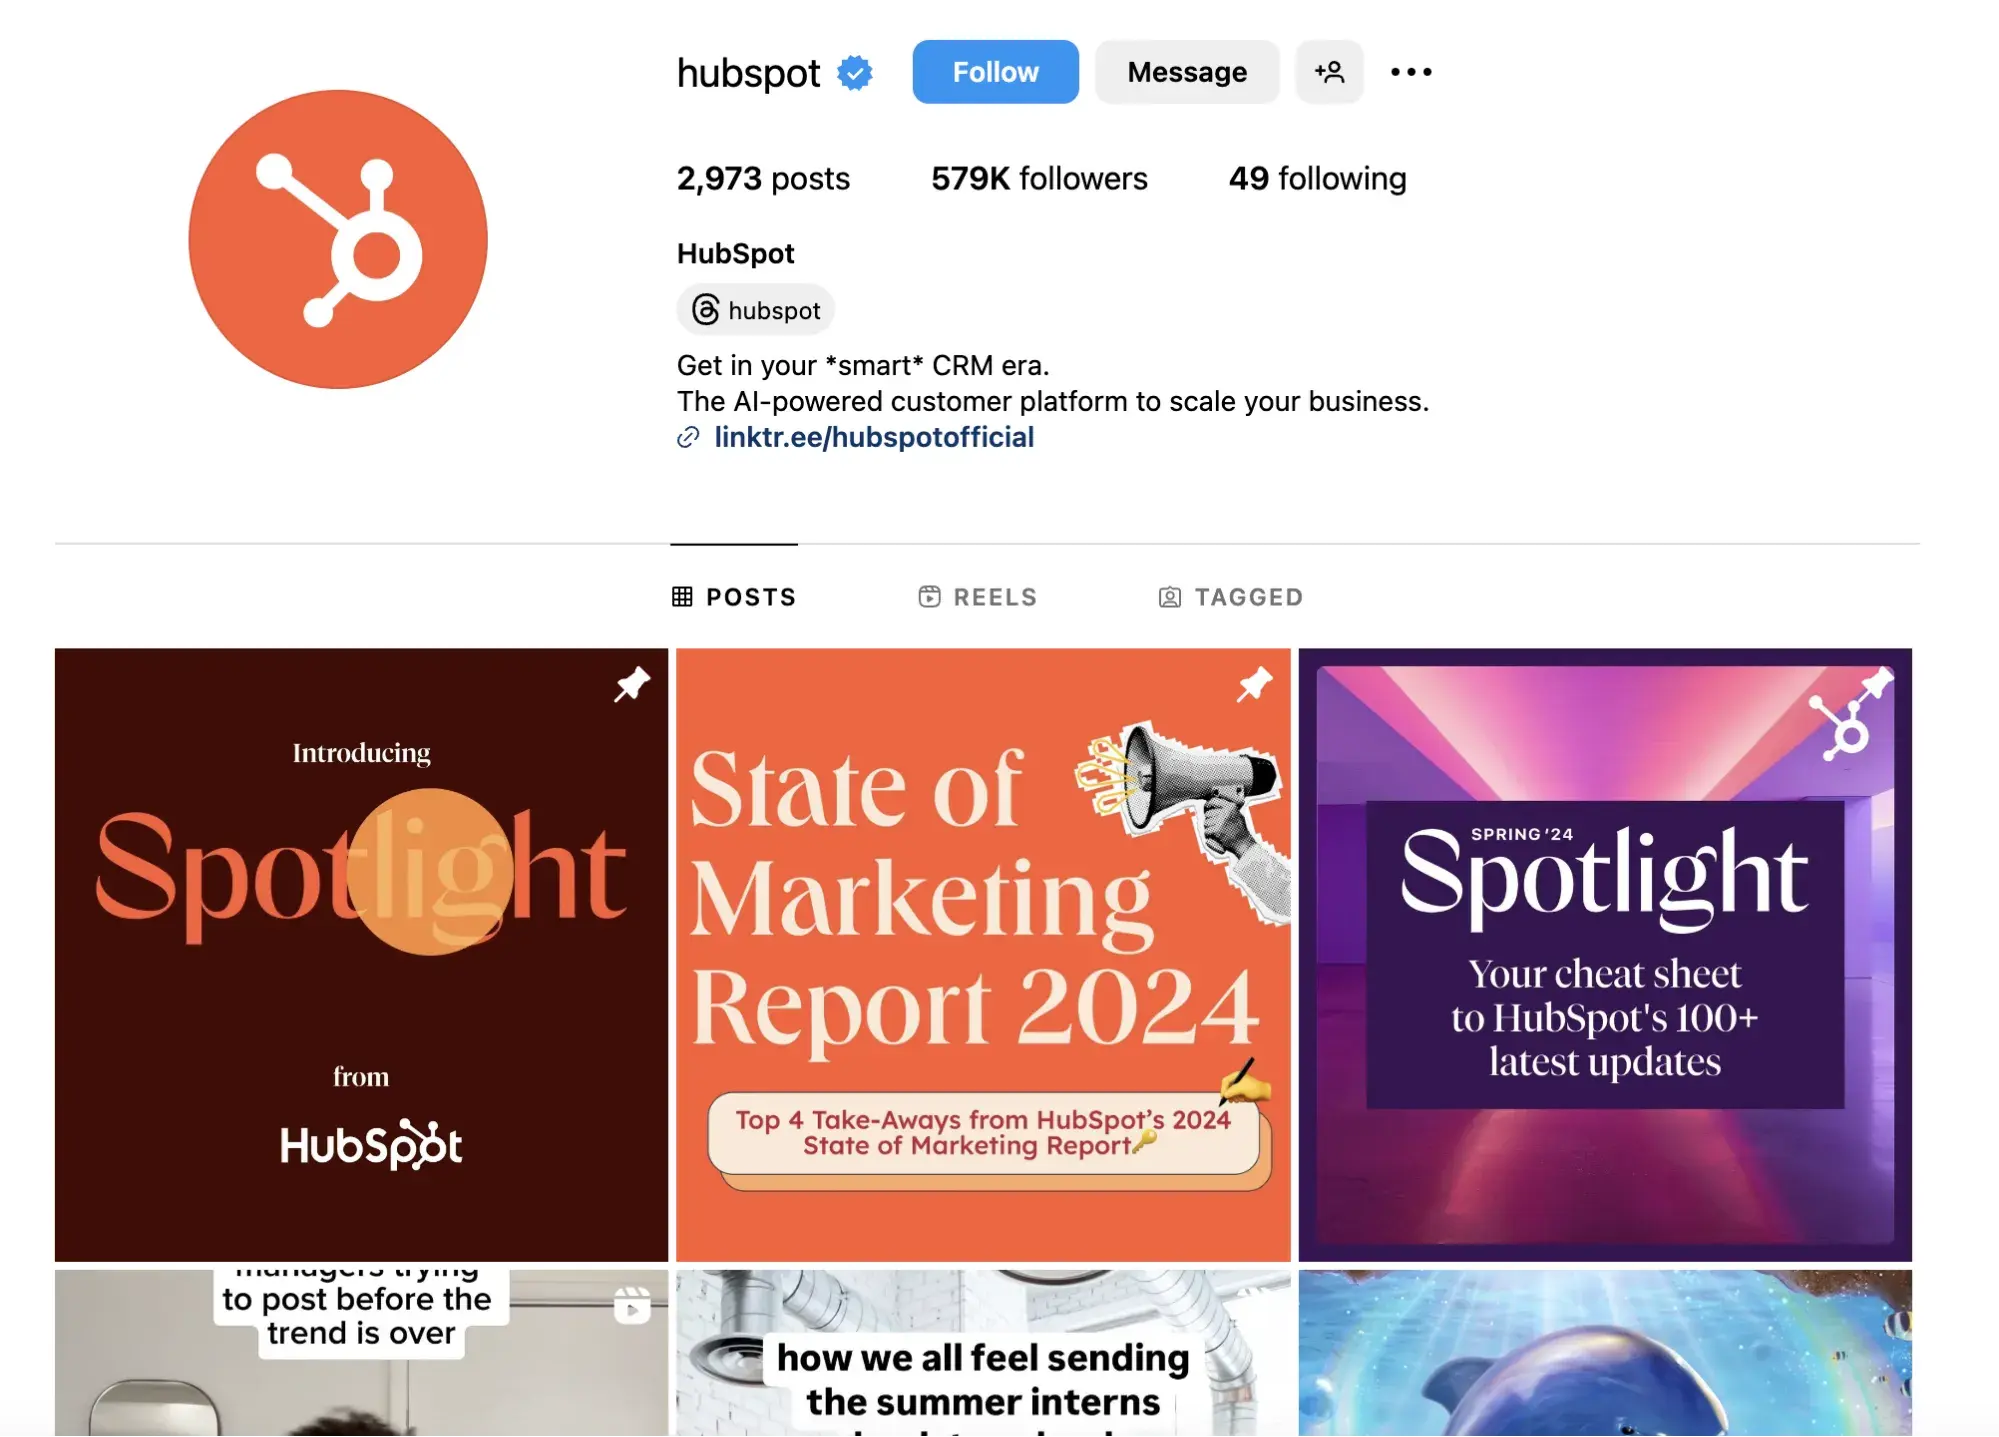
    For instance, HubSpot has a verified HubSpot account, a HubSpot Life account, a HubSpot Academy account, and a HubSpot Partners account.

    To draw awareness back to its main company page HubSpot links to the @HubSpot account in its other account bios, like in @HubSpotLife's account:

    Instagram hacks; hubspot life instagram

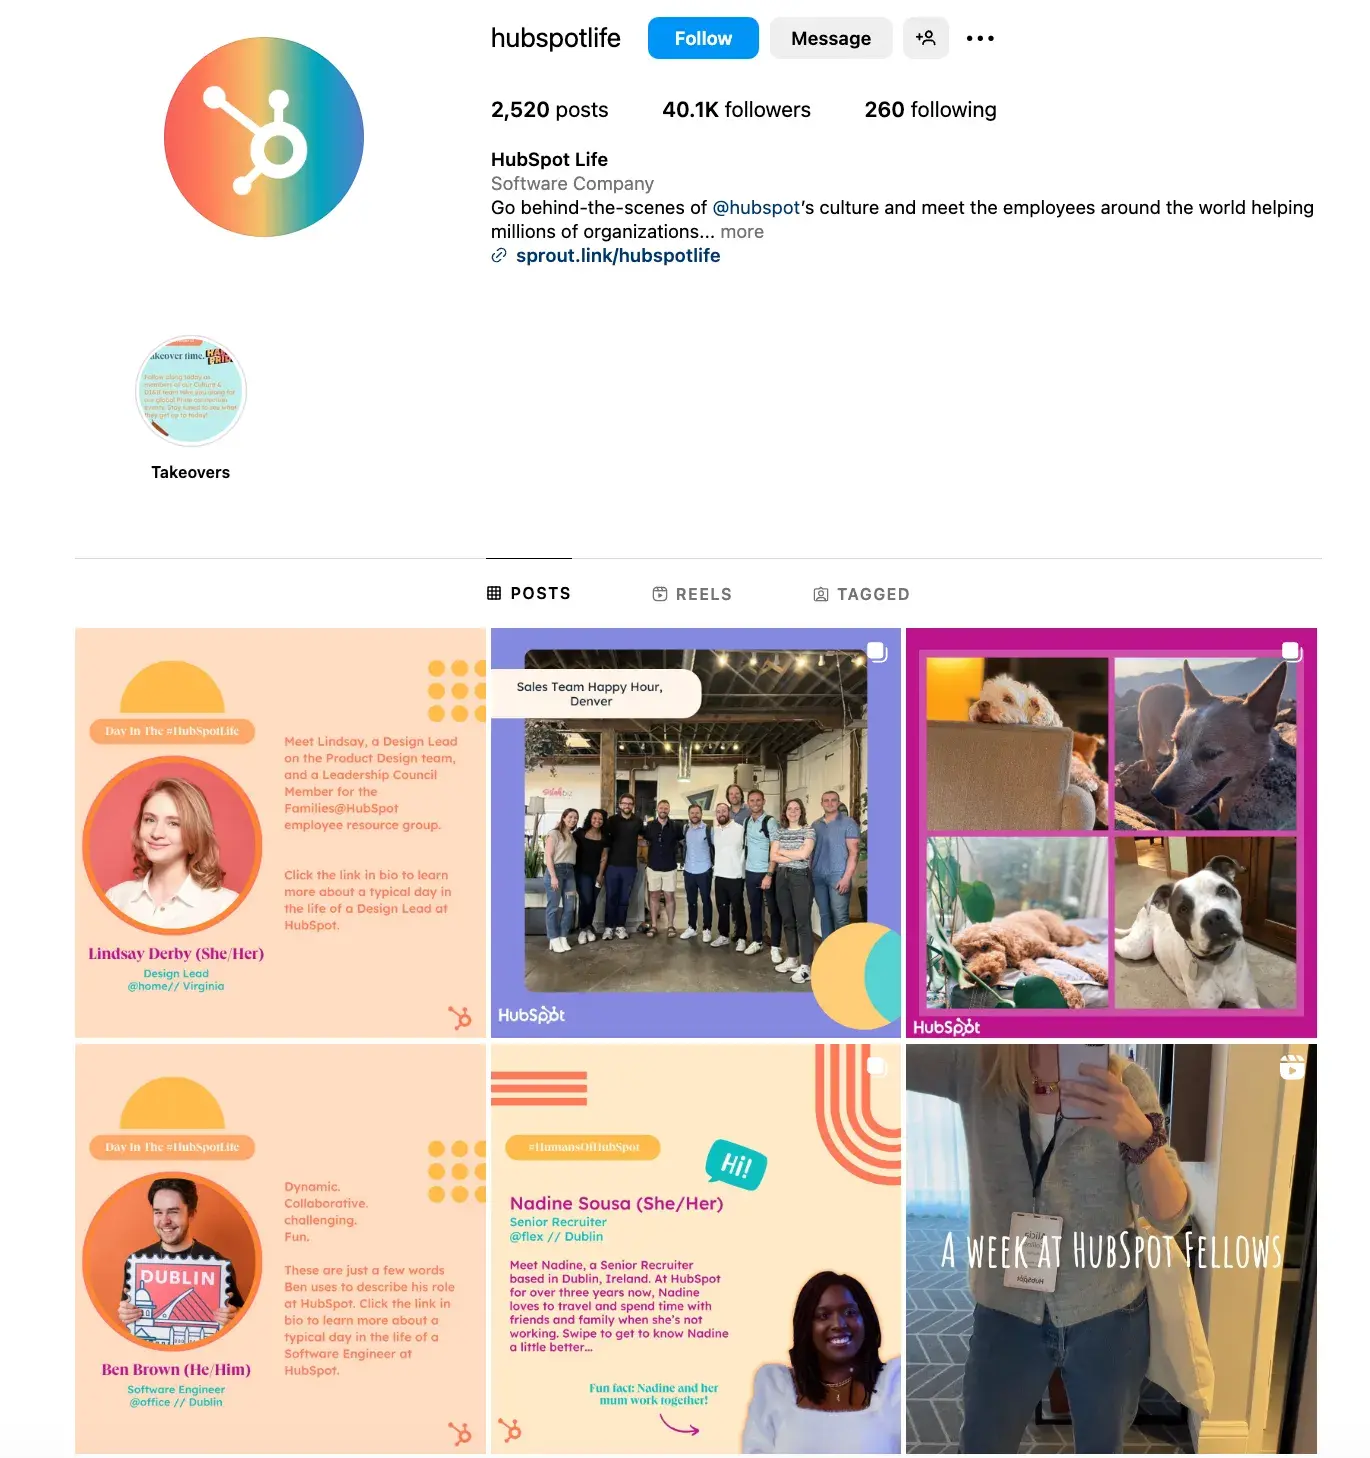
    Fortunately, you have the option to include another Instagram account in your Instagram bio. To do so, simply type the “@” sign into your bio and then select the account you'd like to tag. Then, click “Done.”

    6. Communicate with your audience using Instagram Broadcast channels.

    According to our Instagram Engagement Report, content showcasing a brand’s products/services (demos, teasers, etc.) is the best-performing type of content. Followed closely is funny content and relatable or authentic content.

    Now, if only there was a fun way to share this type of content … Enter Broadcast Channels, a messaging tool for creators to engage directly with a large group of followers.

    Creators can share updates and behind-the-scenes content as text, video, voice notes, and images. Followers can't send messages but can enjoy the content, react to content, and vote in polls.

    Instagram Design Features

    7. Add special fonts to your bio.

    Here's an Instagram bio hack that can truly make your profile stand out. You can already add emojis to the bio beneath your profile photo, but your keyboard limits your creativity right there.

    Using a couple of basic third-party websites, you can copy over some more special fonts not often found in the Instagram community. Here's how.

    To Add a Special Font to Your Bio via Mobile:
    • Add a new font to your Instagram bio via your mobile device using a website like LingoJam.
    • Open the site on your phone, type your desired bio text in the left-hand text box, and you'll see the same bio text in different typefaces appear on the right.

    Instagram hacks; how to add special fonts to your bio

    • Carry your chosen font over to your Instagram bio by tapping it and selecting “Copy.”
    • Then, open your Instagram app, navigate to your profile, select “Edit Profile,” tap the “Bio” section, and paste your chosen font into the empty field.
    To Add a Special Font to Your Bio on Desktop:

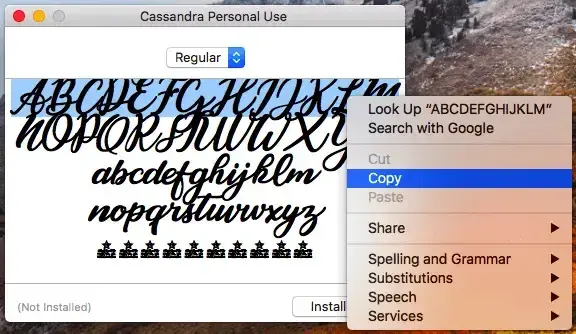
    If you're editing your Instagram profile on your laptop or desktop, Font Space has a library of fonts you can download and copy into your bio in seconds.

    • To do so, Find a font you like and select “Download” beneath the font's sample image, as shown below.

    Instagram hacks; how to add special fonts to your bio

    • Downloading this font will open a folder on your desktop where you can pull a “.ttf” file that carries the various versions of this font. The file will look something like the screenshot below.

    Instagram hacks; how to add special fonts to your bio

    • Once you have this font copied to your computer's clipboard, open your internet browser and log onto Instagram.com.
    • Select “Edit Profile” and paste your downloaded font into your bio field.
    • You can then edit the sample text that came with your font to write your new bio as you see fit.

    8. Add special characters to your bio.

    Not only can you customize your bio with a special font, but you can also add atypical characters that distinguish you or your brand.

    These include§,†, or even™ — symbols you wouldn‘t find on your smartphone’s normal keyboard — which is helpful if your Instagram name features a trademarked product name.

    To Add Special Characters From Mobile
    • Using your mobile device, install a free mobile app like Character Pad, which catalogs nearly every character and symbol you might need but won't find in the 26-letter English alphabet.
    • Open the app and find the character you want to add to your Instagram bio.
    • In Character Pad, you'll simply double-tap the picture of your chosen symbol to paste it into a text box, as shown below.
    • Then, copy this character to your phone's clipboard. (For our purposes, I double-tapped the half-moon icon.)

    Instagram hacks; how to add special characters to your bio

    • Once you have your symbol copied to your clipboard, open Instagram, navigate to your bio, and tap “Edit Profile.”

    Instagram hacks; how to add special fonts to your bio

    • Hold down your finger on the field of your bio you want to insert your special character until “Paste” appears as an option, as shown below.
    • Tap “Paste” and then “Done.” Then, you'll be all set.

    Instagram hacks; how to add special fonts to your bio

    To Add Special Characters From a PC

    You can also insert special characters and symbols through Instagram‘s web client on a desktop or laptop computer. The easiest way is to use Microsoft Word’s “Symbol” insertion icon, as shown below.

    Instagram hacks; how to add special fonts to your bio

    • Select your desired symbol or character and copy it to your computer's clipboard.
    • Then, navigate to Instagram.com and follow the steps above to paste your character into a particular part of your bio.

    Note: You might be tempted to simply Google search for the special character you want. At times, it might work just as well as the steps above. But keep in mind not all special characters you copy from the internet are “clean” when you paste them into Instagram — some of them might become corrupted or not show up correctly.

    9. Reorder filters to set your favorite filters at the front.

    If you use Instagram a lot, chances are you have a few favorite go-to filters and others you never touch. To make editing photos easier, you can reorder the filters in your editing window.

    • To reorder filters, add a new post and begin editing it.
    • When you get to the filters page, hold down on a filter you'd like to move and then drag it to your preferred location.

    Instagram hacks; how to add special filters

    10. Use Instagram as a photo editor (without having to post anything).

    This is lowkey one of my favorite Insta hacks. The reason is that I don't always want to share content on Instagram. Still, I might want to share visual content on a different social platform like LinkedIn.

    In my humble opinion, no other social platform matches the photo editing capabilities of Instagram, and I‘m a real sucker for the filters. So, I’ll use this hack to add a filter and/or crop an image before sharing it to LinkedIn.

    I haven't done a formal A/B test, but my photos on LinkedIn with an Instagram filter tend to perform better than those without. Of course, that could be down to the specific type of content I share and my audience. Your results may differ.

    In your case, you might love Instagram‘s filters and editing capabilities but aren’t quite ready to post the photo to your account — right now or ever.

    To use Instagram as a photo editor without posting anything, all you need to do is publish a picture while your phone is on airplane mode.

    • First, be sure you have “Save Original Photo” turned on in your Instagram settings.

    Instagram hacks; how to save original photo

    • Next, follow the normal steps to post a photo to Instagram: Upload the photo, edit it, and press “Share.”
    • An error message will appear saying the upload failed, but you‘ll be able to find the edited image in your phone’s photo gallery.

    Instagram hacks

    11. Insert line breaks into your bio and captions.

    When you write a caption on Instagram, you‘ll see the keyboard doesn’t give you the option to press “Enter” or “Return.” The same is true for your bio. So how do all those people put line breaks in there?

    Instagram hacks; how to add return line on Instagram caption

    It turns out that all you have to do is press the “123” key in the bottom left corner of the keyboard, and the “Return” key will appear on the bottom right.

    Instagram hacks; how to add return line on Instagram caption

    I know this tip sounds simple, but a lot of people miss it — myself included, until a colleague clued me in. I‘ve seen some elaborate solutions out there for hacking through this problem, like writing the caption copy in another app and then copying and pasting it into Instagram. Thankfully, it’s much simpler than that.

    Instagram Optimization Features

    12. Pin important content to the top of your Instagram Grid.

    If you have an Instagram post that you want to call attention to, you can pin it to the top of your profile grid.

    • To do this, pick the Reel or image post you want to pin.
    • In the top right corner of the post, tap the three dots and click “Pin to your profile.”
    • The post will now show up at the top of your grid.

    This is a valuable tool to share ongoing partnerships with your followers, draw attention to popular content, and make sure new followers or browsers can immediately see the most important content you want to share with them.

    13. Optimize your Instagram bio to appear in the Explore tab.

    Your friends, family, and coworkers might be your first group of Instagram followers, but growing your audience takes more than the people who already know you. One key way to do this is to get your profile to appear on Instagram's Explore page.

    Instagram explore page

    Image Source

    The Explore page, accessible using the magnifying glass icon shown above, is a browsing page that sorts the entire Instagram community by topic and keyword. These include “Fitness,” “Style,” “Science,” and more.

    Hashtagging your posts with these words can expose your content to the people browsing these topics, but you can also use them in your Instagram name and bio to promote your profile.

    If Jane Doe is a marketing consultant, for example, she might want to make her Instagram name “Jane Doe Marketing” rather than simply “Jane Doe.” Then, in her bio, she can include all of her specialties, such as “SEO,” “blogging,” “email marketing,” etc.

    Pro tip: When you’re looking for suitable hashtags for your content or bio, aside from relevance, you want to factor in competition.

    To do this, I don’t recommend using the first hashtags that Instagram auto-suggests when you start typing. They’re usually the most competitive (i.e., densely populated with existing content), making it harder for you to stand out.

    The good news? All it takes is a little research.

    In my case below, I’m looking for hashtags for my abstract artwork. I’m using ‘#abstract’ as a jumping-off point. But at over 13 million existing posts, that’s waaay too competitive, in my opinion.

    Experimenting with hashtag Instagram hacks

    Scrolling down, I can see ‘#abstractionism’ and ‘#abstract_post’ at 42, 442, and 14,380, respectively. I like the look of those odds compared to hashtags with millions of existing profiles and content. So, those two would be on my list out of that small selection.

    14. Drive traffic to an external website.

    Nearly 40% of marketers cite driving traffic to a brand's external site as the biggest challenge with Instagram.

    And it‘s no wonder, given that clickable URLs aren’t allowed anywhere except the single “website” box in your bio.

    If you put a URL in a photo caption, it'll appear as plain text, meaning users would have to painstakingly copy the URL, open a web browser, and paste or type it there.

    One sneaky way to get people to visit your Instagram profile, which is where that one clickable URL is allowed, is to use your photo captions to encourage people to visit your profile for a link.

    Then, update that URL frequently to point to your latest blog content, YouTube video, product, or offer.

    Check out the example below from the food magazine Bon Appétit, which includes a link in its bio that draws people to external Bon Appétit content.
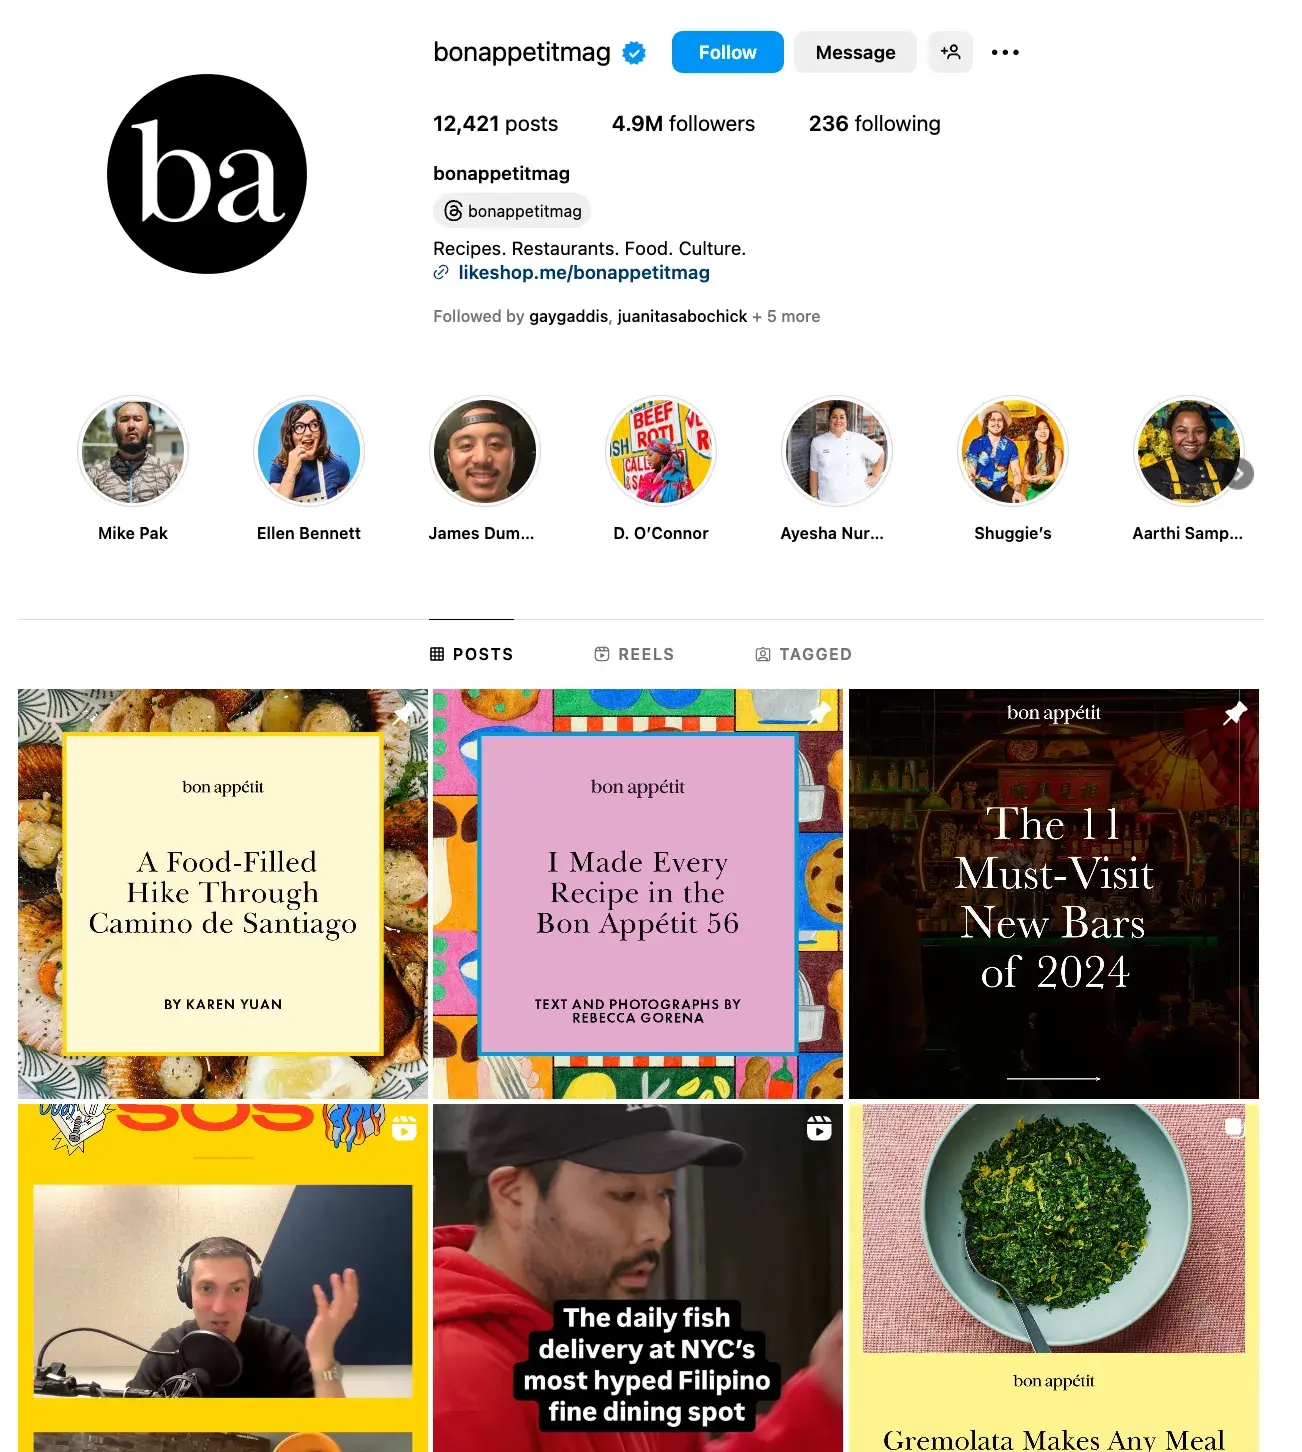
    Instagram hacks; Bon Appetit Mag

    Image Source

    If you have a verified Instagram account, you can also add links to your Story. Read more about this feature here.

    15. Sell products from Instagram using Shoppable Posts.

    You might already know you can tag people in your Instagram posts as (or after) you post new content. Now, you can tag products — and direct your viewers to a product page to buy what they saw.

    Welcome news for the 49% of marketers who use revenue/sales of products within the Instagram app to determine ROI.

    Pro tip: Speaking of ROI … Why not try our Free Paid Media Template to analyze performance and revenue for each media type and source?

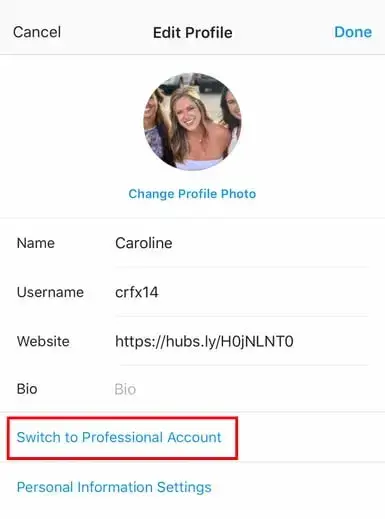
    To Add an Instagram Business Account

    You'll need an Instagram Business account to publish shoppable posts. You can get one by selecting “Edit Profile” on your Instagram profile and tapping “Try Instagram Business Tools,” as shown below.

    Instagram hacks; how to switch to a professional account

    To Tag a Post With Products

    Once you‘ve launched an Instagram Business account, you’ll need to enable product tags to use them on a post that depicts a product.

    • Navigate to your settings using the gear icon from your profile page, and select “Products.”
    • Tap “Continue” and follow the prompts to connect a "product catalog" to your business profile.

    With product tags enabled on your Instagram Business account, you can now upload new posts and tag your photo with products you find from your product catalog. Here's what a shoppable post can look like:

    Instagram hacks; how to create a shoppable post

    Image Source

    16. Create an auto-complete quick reply for standard responses.

    Responding to user comments and questions is incredibly time-consuming, but fortunately, there's a hack to streamline the process and make it more efficient. (Note: This only works on Instagram Business accounts.)

    You can simply create a one-to-two word phrase that can act as your shortcut to a longer standard response you might send often.

    • To do this, click “Business” in your Settings, and then “Quick Replies.”
    • Or, click the three-dot chat bubble icon on the bottom of the screen, and then click “New Quick Reply.”
    • Add a shortcut you can enter for the response.
    • For instance, you might type “returnpolicy” as the shortcut for a longer response. (i.e., “Hey there. We're sorry you don't love your purchase. Fortunately, we permit 30-day returns, no questions asked. Please send us your order confirmation number to get the process started.”)
    • Once you‘ve added a shortcut, you can either type the shortcut "returnpolicy" into the comment box when you want it to auto-generate, or you can tap the three-dot chat Quick Replies bubble icon at the bottom of your screen to choose from a response you’ve created. (Read more about Quick Replies here.)

    Instagram hacks; how to create a quick reply

    Image Source

    17. Pin your Instagram post to Pinterest.

    I'm an SEO girl at heart. But before I knew what SEO was, I began experimenting with Pinterest to grow my blog traffic.

    To get the most from Pinterest, you need to post consistently, and as most content creators know, sometimes you hit a brick wall on the inspiration front.

    When I have a creative block with Pinterest content, I like to repurpose old Instagram posts. (And it‘s easier than you think!) I’ve used the following technique to build group boards and direct traffic to my blog.

    But here's the thing: You might not know this hack exists. Why? Well, Instagram doesn't have a natural integration with many social networks (except Facebook — considering they are both owned by Meta) for publishing Instagram posts to other social accounts.

    However, with respect to Pinterest, image-loving platforms stick together. Here's a backdoor way to Pin your latest Instagram Story to Pinterest:

    • On the Instagram mobile app, tap a post to view it in full, then tap the three dots to the top-right of the image.
    • Select “Copy Share URL” to attach the picture's link to your clipboard.

    Instagram hacks; how to pin a post on Pinterest

    • Open the Pinterest mobile app — or download it; you'll need it for this step — and navigate to your profile page.
    • If you have the latest version of Pinterest downloaded, it might ask you as soon as you open the app if you'd like to produce the image from your clipboard.
    • If not, select the “+” icon to the top right to add a new pin, and you'll see a menu of options where you can add your “Copied Link” to a new Pin or board on your profile.

    Instagram Reels Features

    18. Upload and browse video content on Instagram Reels.

    Instagram Reels is one of the most popular features of Instagram to date.

    In fact, 25% of marketers share this post format at least once a day, according to HubSpot’s most recent Instagram Engagement Report data.

    This makes it the most shared content type on Instagram for marketers, with image posts and stories coming in joint second at 23%.

    You can find Instagram Reels by opening the app and tapping the TV icon in the bottom navigation bar.

    You'll land on a gallery of Reels to watch, including those from people you follow, trending videos, and the most popular creators on the app.

    As you view more videos, the algorithm will adapt to your interests and show you Reels relevant to your likes. And naturally, the same goes for your target audience.

    The Reels you create are visible on your Profile under the Reels icon. When you want to upload a new Reel, follow the steps to upload an image, but click Reels instead.

    19. Easily create Reels using the template feature.

    Instagram’s native Reels template helps anyone quickly and easily make a Reel. To create a Reel using a template, you can either:

    • Find a Reel you like that someone has created, tap on the three dots on the bottom right corner of the real, tap “Use as template,” and follow the steps. (Note: the only Reels you can use as a template have the ‘Use as a template’ button.)

    Or,

    • Click on the Reels tab, swipe left to access the “Templates” option, and select the template you want to use. Then, follow the steps on screen.

    Instagram hacks; how to create a Reel from a template

    20. Automatically add captions to your Reels and Stories.

    The auto-caption feature automatically converts speech into captions for your Reels and Stories.

    This feature is incredibly important for increasing accessibility for your content and also for allowing people to consume your content without sound.

    21. Remix Reels to engage with other users.

    Remixing a Reel means creating one that includes content from someone else’s Reel. It’s a great way to engage with other users and create side-by-side interaction.

    • To Remix a real (on Android and iOS), tap the three dots on the Reel you want to remix.
    • Tap “Remix” and choose whether to play your video beside the original video or after it ends.
    • Next, record your Reel and share it to your profile.

    If you remix a Reel using side-by-side video, you can mix the audio and add voiceovers, text, and stickers to your Reel and the original Reel.

    If you remix a Reel and add your video after the original, you can’t change the audio from the original post, but you can adjust the volume level of the original Reel and add a voiceover.

    22. Reply to a comment on your Reel with a Reel.

    Instagram now allows people to create Reels to reply to comments on Reels. It’s an engaging way to interact with followers and build connections.

    • To do this (on Android and iOS), tap “Reply” underneath a comment and click the camera icon.
    • Record your Reel or upload a pre-recorded video from your camera roll.
    • Click on the comment sticker to update the background color or change its position in the frame.
    • Edit your Reel, then click “Share.”

    Instagram Stories Features

    23. Use Notes to share status updates.

    Notes are 60-character max posts next to profile images in the messages inbox.

    Notes will appear in your followers' inboxes, and you can choose to share them with all of your followers or your selected Close Friends list. They last 24 hours, and Notes replies appear as DMs.

    The new feature is a great way to share your timely thoughts, engage with people, and see what others are saying.

    Instagram hacks; how to create an Instagram note

    Image Source

    24. Create a collection of saved posts.

    In addition to being able to view all of the posts you've liked, Instagram also has an option to save or bookmark certain posts in collections that you create.

    • Start by going to your profile, and tapping the “Settings” icon at the top-right of your screen, and then select “Saved”:

    Instagram hacks; how to create a collection on Instagram

    • Next, press the “+” button and name your new Collection.

    Instagram hacks; how to create a collection on Instagram

    • Click “Next,” and select images from your “Saved” section.

    Instagram hacks; how to create a collection on Instagram

    • To save photos for future collections, tap the bookmark icon below the post you want to add, as shown below:

    Instagram hacks; how to create a collection on Instagram

    • Then, go back to your saved photos by following the previous steps.
    • You‘ll see the photos you’ve saved — to add them to your Collection, select the Collection you want to add to, and tap “Add to Collection.” From there, you can add any of your saved photos.

    Instagram hacks; how to create a collection on Instagram

    25. Create Stories Highlights to show Stories for longer than a day.

    Like in Snapchat, posts to your Story only stick around for your followers to see for 24 hours. But sometimes, you have a Story that deserves more daylight to be told.

    That's where Stories Highlights comes in, a feature by Instagram that allows you to save stories together in the same space on your profile page.

    If you ever wondered what that “New” button with the “+” icon was below your profile image, this explains it.

    To make a Stories Highlight, tap this New option and select any number of past stories in your album:

    Instagram hacks; how to create a Stories Highlight on Instagram

    Image Source

    Then, give it a cover photo and a name to display as its own Instagram Story on your profile page. You can remove Stories Highlights at any time by tapping and holding down this Story.

    26. Reorder Instagram Stories Highlights.

    The Highlights on your Instagram feed act as your brand‘s portfolio — you can use Highlights to demonstrate your company’s values, showcase new products or services, or categorize various topics you post about frequently.

    For instance, The North Face uses its Highlights section to highlight various initiatives that are important to the brand, including a section labeled “Summit Series,” “Explore Fund,” “XPLR Pass,” “Pride,” and “Athletes.”

    The North Face Instagram

    Image Source

    Since a user can only see the first five Highlights when they come across your profile, you‘ll want to ensure your first Highlights are the ones you’re most proud of. To do this, simply follow this trick:

    • Hold down the Highlight you'd like moved to the front of this list and click “Edit Highlight” when the slide-up appears.

    Instagram hacks; how to edit Highlight

    • Next, find an image or video you‘d like to add to the Highlight. (Don’t worry — you‘ll be able to delete this within 30 seconds, so you don’t need to choose one that will stay on the Highlight.)

    Instagram hacks; how to edit Highlight

    • Click “Done” in the top right corner.
    • Now, your Highlight will be first in the list. To remove the image or video you just added, follow the above instructions and simply un-check the image you added. Your Highlight will remain at the beginning of the Highlight reel.

    27. Change your Instagram Highlights Icon without publishing it to your feed.

    The image you choose for each Highlight should accurately depict what type of content users can expect to see if they tap the Highlight, so you'll want to choose a compelling, engaging image.

    However, if you have a design, logo, or image you‘d like to use that isn’t in your Instagram feed, it's still possible to make it the Highlight Icon.

    • To do this, click “Edit Highlight” (same as the step above):

    Instagram hacks; how to edit Highlight

    • Next, click “Edit Cover,” and scroll through your camera roll to find an image you like.

    Instagram hacks; how to edit Highlight

    Instagram hacks; how to edit Highlight

    • Once you choose an image from your camera roll, click “Done.” Your Highlight cover image is now an image you've never posted on your Instagram account:

    Instagram hacks; how to edit Highlight

    28. Schedule posts in advance.

    Given that Instagram is a mobile app, you're probably in a routine of taking photos and posting them to your Instagram Story on the fly. But, you can also pre-post them from your computer for a set day and time in the future.

    This feature is available with a social media scheduling tool, as well as HubSpot, if you have an Instagram business account.

    If you have this business profile, switch to it via the Instagram mobile app and follow the prompts to connect it to Facebook.

    Depending on the social scheduling tool you use, you might not include this step.

    Once you‘ve toggled to the right account, however, you’ll launch your scheduling tool, navigate to your current connected profiles, and see Instagram as an available integration.

    A word of warning when it comes to scheduling posts on Instagram — and I tell you this from experience managing Insta accounts for international clients… make sure you set your scheduling tool to your client’s time zone rather than yours.

    I once created and scheduled some beautiful content, and it was met with crickets. Why? It went out at an appropriate time on my end, but it was an unsociable time for the client and their audience. Doh!

    Pro tip: Looking for the best days and times to schedule content on Instagram for peak engagement and performance? According to 50% of global marketers surveyed by HubSpot, Friday is the best day to post. Saturday comes in second at 44%, followed closely by Sunday.

    When it comes to times, scheduling content at 6 PM-8:59 PM on Friday, Saturday, and Sunday yields the best results for marketers.

    29. Use ‘Type Mode’ to enhance your Instagram Stories.

    Since its launch, Stories have become quite creative, and it takes more than a pretty filter to stand out to your audience.

    Enter “Type Mode,” an option similar to Snapchat that gives you the power to caption Stories that need extra context to resonate with someone. Here's how to use it:

    • Open Instagram Stories by swiping right from your Instagram feed. This will launch your smartphone camera.
    • Then, take a photo or video and press the “Aa” icon to the top-right of your screen, as shown below:

    Instagram hacks; how to add text to Stories

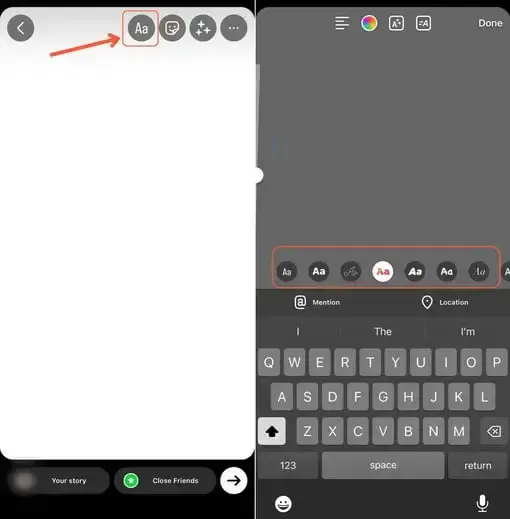
    • The “Aa” icon will open Type Mode, where you have eight fonts to choose from. Here's what a sample Story looks like with Modern font:

    Instagram hacks; how to add text to Stories

    30. Post content from other users to your Instagram Story.

    Although Instagram Stories are a great way to give your content exposure on your followers‘ homepages, you might not always have something Story-worthy.

    In those times, you can share an inspiring post from someone else through your Instagram Stories. Here’s how:

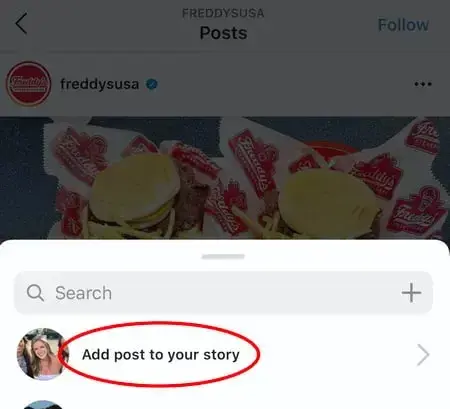
    • Find a post you want to share in your Instagram Stories and tap the paper airplane icon, as shown below.

    Instagram hacks; how to post others’ content to Stories

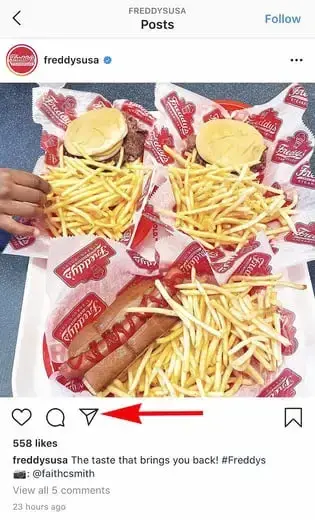
    • This icon will open a screen allowing you to send this post to specific followers or add it to your Story.
    • Tap the latter option, as shown below.

    Instagram hacks; how to post others’ content to Stories

    Tapping this option will automatically turn the post into an Instagram Story, which you can edit and design to your liking the same way you would any other Instagram Story.

    31. Share Candid Stories with your followers.

    Instagram Candid Stories lets you share in-the-moment updates with friends to let them know what you’re up to. A unique feature is that each Story is only visible to others who have posted their own Candid Stories.

    To share a Candid Story, use the stories camera and select Candid Story, or wait for the daily Candid Story notification.
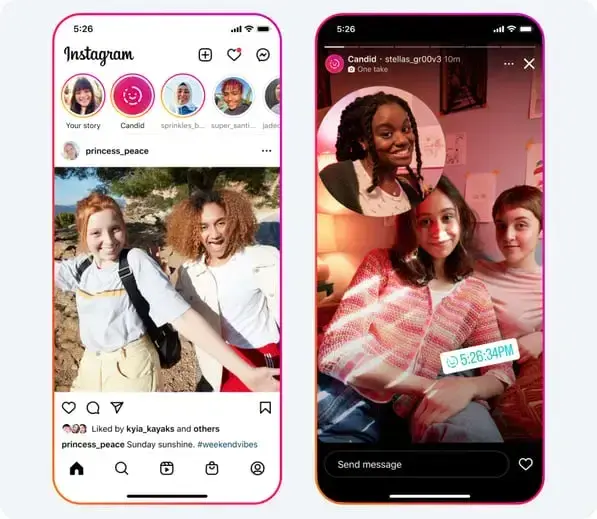
    Instagram hacks; how to post Candid Stories

    Image Source

    Note that the Candid Story feature is not yet available to all users.

    Instagram User Preferences Features

    32. Mute Instagram notifications using Quiet Mode.

    Quiet Mode turns off all app notifications and adds a badge to your profile, so people know you’re taking a break. When you turn Quiet Mode off, you’ll get a roundup of notifications of things you’ve missed.

    • To use Quiet Mode on Instagram, Navigate to your profile page. Click “Settings,“ then ”Notifications,“ and then ”Quiet mode."
    • Toggle the “Quiet mode” button to enable it and turn it off when you’re ready to receive notifications again.

    You can also set a designated time to trigger Quiet Mode every day, so you don’t have to remember to turn it off and on.

    how to turn on quiet mode on Instagram

    Quiet Mode is currently available in the U.S., U.K., Ireland, Canada, Australia, and New Zealand.

    33. Create a Favorites list to see your favorite accounts first.

    If you have favorite accounts on Instagram or friends whose content you want to see more often, you can select up to 50 accounts to add to your Favorites list.

    You’ll see their posts higher up and more often in your feed, and you can even swipe to a separate favorites-only feed to see what people are up to.

    Every Favorites feed is free of ads and suggested posts, and nobody else knows who you’ve added to the list.

    To choose your favorites, tap the Instagram logo on the top left corner, and select your favorite accounts to add.

    Instagram hacks; how to create a favorites list

    34. Get notifications when your favorite people post.

    Never want to miss an Instagram post from your favorite influencers again? You can choose to get a notification every time a specific user posts a new photo. All you have to do is turn on notifications for each user individually.

    To turn on these notifications, visit a user's profile, click the bell icon in the upper right corner, and choose what type of post you want a notification for: Posts, Stories, Reels, Videos, or Live Videos.

    how to get notifications when user posts on Instagram

    Image Source

    Want to turn post notifications off? Just follow the same steps. It‘s important to note that you must enable notifications from the Instagram app in your phone’s settings — here's how.

    • To allow notifications on iPhone/iPad: Go to “Settings,” then “Notifications.” Choose “Instagram” and then turn on the setting to “Allow Notifications.”
    • To allow notifications on Android: Go to “Settings,” then choose “Apps,” then “Instagram.” Select the option to show notifications.

    35. Hide photos you've been tagged in.

    When someone tags you in a photo or video on Instagram, it's automatically added to your profile under “Photos of You,” unless you opt to add tagged photos manually (see the next tip).

    • To see the posts you've been tagged in, go to your own profile and click the person icon below your bio.
    • Next, click on an individual post (in your tagged photos) and click the three dots in the top right.
    • Tap “Post options,” then tap “Remove me from post” or “Hide from my profile.” The first removes your tag, and the second removes it from your tagged photos.

    36. Adjust your settings to approve tagged photos before they show up in your profile.

    As I mentioned in the previous step, when someone tags a photo or video of you on Instagram, it‘s automatically added to your profile.

    But you can change your Instagram settings to enable manually selecting which photos you’re tagged in that show up on your profile.

    To manually approve tagged posts, navigate to “Settings,” tap “Privacy,” “Posts,” then “Manually approve tags,” and toggle the on button.

    Now, you‘ll be notified when you’ve been tagged in a post, and you can approve it to show up on your profile.

    37. Hide ads you don't find relevant.

    Instagram tries to show you ads that are interesting and relevant to you. You might see ads based on people you follow and things you Like on Instagram, or the third-party websites and apps you visit.

    If you see sponsored posts you don‘t find relevant, though, you can let Instagram know and slowly teach its algorithm what you like and don’t like to see.

    To hide ads on Instagram, tap on the three dots to the right of a post labeled “Sponsored,” and choose “Hide ad.”

    how to hide ads on Instagram

    From there, it‘ll ask you to share why you don’t want to see the ad anymore.

    You can also opt out of seeing ads based on sites and apps off of Instagram and Facebook from your device‘s settings.

    Note that even if you choose to opt out of seeing these types of ads, you’ll still see ads based on your Instagram and Facebook activity.

    • To limit ad tracking on an iPhone/iPad: Go to “Settings” and choose “Privacy & Security,” then “Apple Advertising.” From there, choose the option to turn off personalized ads.
    • To turn off interest-based ads on Android: Go to “Google Settings,” then “Ads.” From there, choose the option to “Turn off interest-based ads.”

    38. Send photos privately to your friends.

    Posting photos with all of your followers or with the public isn't the only way to share content on Instagram. You can also share them with individual or multiple users, kind of like a Facebook message or group text message.

    You can either send a new photo to friends, or send a photo that you or someone else has already posted.

    • To send a new photo privately, upload a photo and begin editing it, as you would when editing a new post.
    • When you get to the “Share” page, tap the top where it automatically says “New Post,” but when prompted, select “Direct Message.”
    • From there, you can pick and choose whom you'd like to send the photo to.

    You can access your direct messages at any time by clicking the mailbox icon at the top right of your homepage.

    • To send an existing photo privately, start by opening the post you want to share — it can be your own or someone else's, as long as the latter has a public account.
    • Next, click the paper-airplane-like icon below the post, then select who you want to receive it when the “Send to” box appears.

    User Search Features

    39. Search Instagram users without an account.

    As much as Instagram would like to see you ultimately create an account for yourself or your business, you can peruse the beautiful brands, people, and dogs that are waiting for you without an account to see if it's worth signing up.

    There are two ways to search for people on Instagram without logging in:

    Entering a Username at the End of the Instagram URL

    The first way to search users without an account is by using an Instagram username you already know, and adding it to the end of “www.instagram.com/.”

    For example, if you were to start with our Instagram username — which is simply “HubSpot” — you can enter the following into your browser's address bar: www.instagram.com/hubspot.

    This will bring you to our Instagram profile as well as the elusive search bar at the top of the page:

    HubSpot Instagram page

    Once you've reached this page, you can use the search bar to the left of the “Sign Up” button to browse users who are already active on the platform.

    Googling Them in an Instagram Site Search

    A slightly “hackier” way of looking up users without an Instagram account of your own is to simply search their name in a Google site search.

    This means telling Google to only look up search terms on a website of your choice (in this case, Instagram).

    To site search a user, open a Google search and type the following: "site:instagram.com [name of user]."

    By keeping all the text prior to the brackets in your search bar, you can shuffle through the names of people and businesses, and Google will produce results that are live only on Instagram. Here's what a site search looks like for HubSpot.

    As you can see, Google produces our main profile, our culture-focused HubSpot Life profile, Instagram posts that include the #hubspot hashtag, and our HubSpot Academy Page.

    site search for Hubspot Instagram example

    40. Look through pictures without accidentally liking them.

    It‘s pretty easy to learn how to like something on Instagram — so easy, in fact, that people do it accidentally: It’s just a quick double tap of the photo once you've entered its full view.

    The thing is, it's so easy to do quickly by mistake.

    So, here‘s a quick Instagram cheat for you: To look through someone’s photos without “double-tap paranoia,” scroll through Instagram feeds with your phone set to airplane mode. Without internet access, you won't be able to Like a photo, even if you accidentally double-tap it.

    The pictures won‘t load in the first place if you start on airplane mode, though. You’ll have to go to the feed first to load the posts, then turn on airplane mode, then start scrolling.

    When you reach the end of the first rows of posts and want to load more, simply turn airplane mode off, let more load, and then turn it on again. Cumbersome? Maybe a little, but it could be worth the paranoia mitigation.

    • To turn on airplane mode on an iPhone/iPad: Swipe up from the bottom of the screen and click the airplane icon. Or, go to “Settings” and then “Wi-Fi,” and switch “Airplane Mode” on.
    • To turn on airplane mode on an Android device: Swipe down from the top of the screen. Then, swipe from right to left until you see “Settings,” and then touch it. Touch “Airplane Mode” to turn it on.

    41. Browse posts from certain locations.

    One fun thing you can do on Instagram is browse photos and videos from a specific location or taken near your current location.

    I like to do that when I'm planning a trip somewhere or want to check out a new restaurant and scroll through the pictures taken there.

    Here's how to do both of these things.

    To Browse Posts From a Specific Location:

    You can either search for a specific place, or you can click into a geotag on an existing photo.

    To search for a specific place:

    • Tap the magnifying glass icon at the bottom of your home screen, which will bring you to the general search page.
    • Type in a place you’d like to search for, and you’ll see content most relevant to the place you searched, including the most popular Reels, accounts, audios, tagged photos, and locations.

    how to search for a specific place on Instagram

    how to search for a specific place on Instagram

    How to Get Verified on Instagram

    A verified badge (the blue check beside a celebrity or brand account name) tells users that you‘re, in Instagram’s words, “the authentic presence of a notable public figure, celebrity, global brand or entity it represents.”

    For instance, there are plenty of “Reese Witherspoon” fan pages on Instagram, but there's only one real Reese Witherspoon account, as verified by the blue badge:

    how to get verified on Instagram

    To request a verified badge, you must be a public figure, celebrity, or brand and meet certain requirements. If you‘ve determined you fit Instagram’s criteria for verification, follow these steps to request a badge:

      1. Go to your profile (the person icon in the bottom left corner).
      2. Tap the three lines in the top right corner.
      3. Click “Settings,” “Account,” “Request Verification.”
      4. Fill out the form, including username, Full Name, Document type (like government issued photo ID), Category, Country/Region, and Audience.
      5. When you've filled out all form fields, click “Send.”

    It‘s important to note, you won’t necessarily receive a verified badge if you request one. Learn more about what happens after you request a verified badge.

    Instagram Features & Hacks

    I might be biased, but Instagram is one of the most fun (and visually appealing) social apps around. Aside from personal use, you can use Instagram to enhance your brand’s presence.

    It’s no surprise, then, that 31% of marketers surveyed for HubSpot’s 2024 Instagram Engagement Report post on their brand’s account multiple times a week.

    On the other end of the spectrum, 23% of marketers post multiple times a day.

    At first, I found that latter statistic surprising, but with features like Reels and Stories, it makes more sense.

    Overall, my favorite Instagram marketing hacks are post-scheduling and using the platform with Pinterest. From a personal and business perspective, I love that you can benefit from Instagram’s filters without posting on your account.

    That said, all of the tricks in this post can help you use Instagram to an even fuller extent. I sincerely hope you’ve found all of them helpful!

    Editor's note: This post was originally published in May 2017 and has been updated for comprehensiveness.

    Creating Custom Lottie Animations With SVGator

    Featured Imgs 23

    This article is a sponsored by SVGator

    SVGator has gone through a series of updates since our last article, which was published in 2021, when it was already considered to be the most advanced web-based tool for vector animation. The first step toward more versatile software came with the mobile export feature that made it possible to implement the animations in iOS and Android applications.

    The animation tool continued its upgrade with a series of new export options: video formats including MP4, AVI, MKV, MOV, and WebM, as well as image formats such as GIF, Animated PNG, WebP, and image sequence. By covering a larger area of users’ needs, the app now enables anyone to create animated stickers, social media, and newsletter animations, video assets, and many more types of visual content on demand.

    The goal of becoming a “one tool for all” still lacked the last piece of the puzzle, namely full support for Lottie files. Lottie, just like SVG, is a vector-based format, but it has even better comprehensive multi-platform support, a fact that makes it super popular among developers and design professionals. It is built for use across various platforms, enabling smooth integration into both web and mobile applications. Its file size is minimal, it is infinitely scalable, and developers find it straightforward to implement once they get familiar with the format. Lottie can incorporate raster graphics and also supports interactivity.

    SVGator’s latest version has everything you need for your various applications without the need for any third-party apps or plug-ins.

    Note: You can test all of SVGator’s functionalities free of charge before committing to the Pro plan. However, you can export up to three watermarked files, with videos and GIFs limited to basic quality.

    In this article, we will follow a creation process made of these steps:

    • Importing an existent Lottie JSON and making some minor adjustments;
    • Importing new animated assets created with SVGator (using the library);
    • Creating and animating new elements from scratch;
    • Exporting the Lottie animation.
    Getting Started With SVGator

    The sign-up process is simple, fast, and straightforward, and no credit card is required. Sign up either with Google or Facebook or, alternatively, by providing your name, email address, and password. Start a project either with a Lottie animation or a static SVG. If you don’t have an existing file, you can design and animate everything starting from a blank canvas.

    Now that you’ve created your account, let’s dive right into the fun part. Here’s a preview of how your animation is going to look by the time you’re done following this guide. Neat, right?

    (Large preview) Create A New Project

    After logging in and clicking on the New Project option, you will be taken to the New Project Panel, where you can choose between starting from a blank project or uploading a file. Let’s start this project with an existing Lottie JSON.

    1. Click on the Upload file button and navigate to the directory where you have saved your Lottie file.

    2. Select the “Fast response.json” file and click Open.

      Hit play in the editor, and the animation should look like this:

      (Large preview)

    Note: Make sure to hit Save after each step to make sure you don’t lose any of your progress while working on this project alongside our guide.

    Import An Animated Asset

    In this step, you will learn how to use the Library to import new assets to your project. You can easily choose from a variety of ready-made SVGs stored in different categories, load new files from your computer (Lottie, static SVG, and images), or save animations from other SVGator projects and reuse them.

    In this case, let’s use an animated message bubble previously created and saved to the Uploads section of the Library.

    Learn how to create and save animated assets with this short video tutorial.

    1. Navigate to the left sidebar of the app and switch to the Library tab, then click the “+” icon to upload the message bubble asset that you downloaded earlier.
    2. After it is loaded in the uploads section, simply click on it to add it to your project.

      All the animated properties of the asset are now present in the timeline, and you can edit them if you want.

      Note: Make sure the playhead is at the second “0” before adding the animated asset. When adding an animated asset, it will always start animating from the point where the playhead is placed.
    3. Freely adjust its position and size as you wish.
    4. With the playhead at the second 0, click on the Animate button, then choose Position.

    At this point, you should have the first Position keyframe automatically added at the second 0, and you are ready to start animating.

    Animate The Message Bubble
    1. Start by dragging the playhead on the timeline at 0.2 seconds:

    2. Then, drag the message bubble up a few pixels. The second keyframe will appear in the timeline, marking the element’s new position, thus creating the 2 milliseconds animation.

      Note: You can hit Play at any moment to check how everything looks!

      Next, you can use the Scale animator to make the bubble disappear after the dots representing the typing are done animating by scaling it down to 0 for both the X and Y axes:

    3. With the message bubble still selected, drag the playhead at 2.2 seconds, click on Animate, and select Scale (or just press Shift + S on the keyboard) to set the first Scale keyframe, then drag the playhead at 2.5 seconds.
    4. Set the scale properties to 0 for both the X and Y axes (in the right side panel). The bubble won’t be visible anymore at this point.

      Note: To maintain the ratio while changing the scale values, make sure you have the Maintain proportions on (the link icon next to the scale inputs).

      To add an extra touch of interest to this scaling motion, add an easing function preset:

    5. First, jump back to the first Scale keyframe (you can also double-click the keyframe to jump the playhead right at it).
    6. Open the Easing Panel next to the time indicator and scroll down through the presets list, then select Ease in Back. Due to its bezier going out of the graph, this easing function will create a bounce-back effect for the scale animation.

      Note: You can adjust the bezier of a selected easing preset and create a new custom function, which will appear at the top of the list.

      Keep in mind that you need at least one keyframe selected if you intend to apply an easing. The easing function will apply from the selected keyframe toward the next keyframe at its right. Of course, you can apply a certain easing for multiple keyframes at once.

      To get a smoother transition when the message bubble disappears, add an Opacity animation of one millisecond at the end of the scaling:

    7. Choose Opacity from the animators’ list and set the first keyframe at 2.4 seconds, then drag the playhead at 2.5 seconds to match the ending keyframe from the scale animation above.
    8. From the Appearance panel, drag the Opacity slider all the way to the left, at 0%.
    Create An Email Icon

    For the concept behind this animation to be complete, let’s create (and later animate) a “new email” notification as a response to the character sending that message.

    Once again, SVGator’s asset library comes in handy for this step:

    1. Go to the search bar from the Library and type in “mail,” then click on the mail asset from the results.
    2. Place it somewhere above the laptop. Edit the mail icon to better fit the style of the animation:

    3. Open the email group and select the rectangle from the back.
    4. Change its fill color to a dark purple.
    5. Round up the corners using the Radius slider.

    6. Make the element’s design minimal by deleting these two lines from the lower part of the envelope.

    7. Select the envelope seal flap, which is the Polyline element in the group, above the rectangle.
    8. Add a lighter purple for the fill, set the stroke to 2 px width, and also make it white.

      To make the animation even more interesting, create a notification alert in the top-right corner of the envelope:

    9. Use the Ellipse tool (O) from the toolbar on top and draw a circle in the top-right corner of the envelope.
    10. Choose a nice red color for the fill, and set the stroke to white with a 2 px width.

    11. Click on the “T” icon to select the Text tool.
    12. Click on the circle and type “1”.
    13. Set the color to white and click on the “B” icon to make it bold.

    14. Select both the red circle and the number, and group them: right-click, and hit Group.

      You can also hit Command or Ctrl + G on your keyboard. Double-click on the newly created group to rename it to “Notification.”

    15. Select both the notification group and email group below and create a new group, which you can name “new email.”
    Animate The New Email Group

    Let’s animate the new email popping out of the laptop right after the character has finished texting his message:

    1. With the “New email” group selected, click twice on the Move down icon from the header to place the group last.
      You can also press Command or Ctrl + arrow down on your keyboard.
    2. Drag the group behind the laptop (on the canvas) to hide it entirely, and also scale it down a little.
    3. With the playhead at 3 seconds, add the animators Scale and Position.
      You can also do that by pressing Shift + S and Shift + P on your keyboard.

    4. Drag the playhead at the second 3.3 on the timeline.
    5. Move the New Email group above the laptop and scale it up a bit.
    6. You can also bend the motion path line to create a curved trajectory for the position animation.

    7. Select the first keyframes at the second 3.
    8. Open the easing panel.
    9. And click on the Ease Out Cubic preset to add it to both keyframes.
    Animate The Notification

    Let’s animate the notification dot separately. We’ll make it pop in while the email group shows up.

    1. Select the Notification group.
    2. Create a scale-up animation for it with 0 for both the X and Y axes at 3.2 and 1 at 3.5 seconds.
    3. Select the first keyframe and, from the easing panel, choose Ease Out Back. This easing function will ensure the popping effect.
    Add Expressiveness To The Character

    Make the character smile while looking at the email that just popped out. For this, you need to animate the stroke offset of the mouth:

    1. Select the mouth path. You can use the Node tool to select it directly with one click.
    2. Drag the playhead at 3.5 seconds, which is the moment from where the smile will start.
    3. Select the last keyframe of the Stroke offset animator from the timeline and duplicate it at second 3.5, or you can also use Ctrl or Cmd + D for duplication.

    4. Drag the playhead at second 3.9.
    5. Go to the properties panel and set the Offset to 0. The stroke will now fill the path all the way, creating a stroke offset animation of 4 milliseconds.
    Final Edits

    You can still make all kinds of adjustments to your animation before exporting it. In this case, let’s change the color of the initial Lottie animation we used to start this project:

    1. Use the Node tool to select all the green paths that form the character’s arms and torso.
    2. Change the color as you desire.
    Export Lottie

    Once you’re done editing, you can export the animation by clicking on the top right Export button and selecting the Lottie format. Alternatively, you can press Command or Ctrl + E on your keyboard to jump directly to the export panel, from where you can still select the animation you want to export.

    1. Make sure the Lottie format is selected from the dropdown. In the export panel, you can set a name for the file you are about to export, choose the frame rate and animation speed, or set a background color.
    2. You can preview the Lottie animation with a Lottie player.
      Note: This step is recommended to make sure all animations are supported in the Lottie format by previewing it on a webpage using the Lottie player. The preview in the export panel isn’t an actual Lottie animation.
    3. Get back to the export panel and simply click Export to download the Lottie JSON.
    Final Thoughts

    Now that you’re done with your animation don’t forget that you have plenty of export options available besides Lottie. You can post the same project on social media in video format, export it as an SVG animation for the web, or turn it into a GIF sticker or any other type of visual you can think of. GIF animations can also be used in Figma presentations and prototypes as a high-fidelity preview of the production-ready Lottie file.

    We hope you enjoyed this article and that it will inspire you to create amazing Lottie animations in your next project.

    Below, you can find a few useful resources to continue your journey with SVG and SVGator:

    • SVGator tutorials
      Check out a series of short video tutorials to help you get started with SVGator.
    • SVGator Help Center
      It answers the most common questions about SVGator, its features, and membership plans.