

On August 20, 2024, OpenAI enabled GPT-4o fine-tuning in the OpenAI playground and the OpenAI API. The much-awaited feature is free for fine-tuning 1 million daily tokens until September 23, 2024.
In this article, I will show you how to fine-tune the OpenAI GPT-4o model for text classification and summarization tasks.
It is important to note that in my previous articles I have already demonstrated results obtained for zero-shot text classification and zero-shot text summarization using default GPT-4o model. In this article, you will see that fine-tuning a GPT-4o model improves text classification and text summarization performance significantly.
So, let's begin without an ado.
The following script installs the Python libraries you need to run codes in this article.
!pip install openai
!pip install rouge-score
!pip install --upgrade openpyxl
!pip install pandas openpyxl
The script below imports the required libraries into your Python application.
import os
import json
import time
import pandas as pd
from rouge_score import rouge_scorer
from sklearn.metrics import accuracy_score
from openai import OpenAI
In a previous article, I explained the process of fine-tuning GPT-4o mini and GPT-3.5 turbo models for zero-shot text classification.
The process remains the same for fine-tuning GPT-4o.
We will first import the text classification dataset, which in this article is the Twitter US Airline Sentiment Dataset.
The following script imports the dataset.
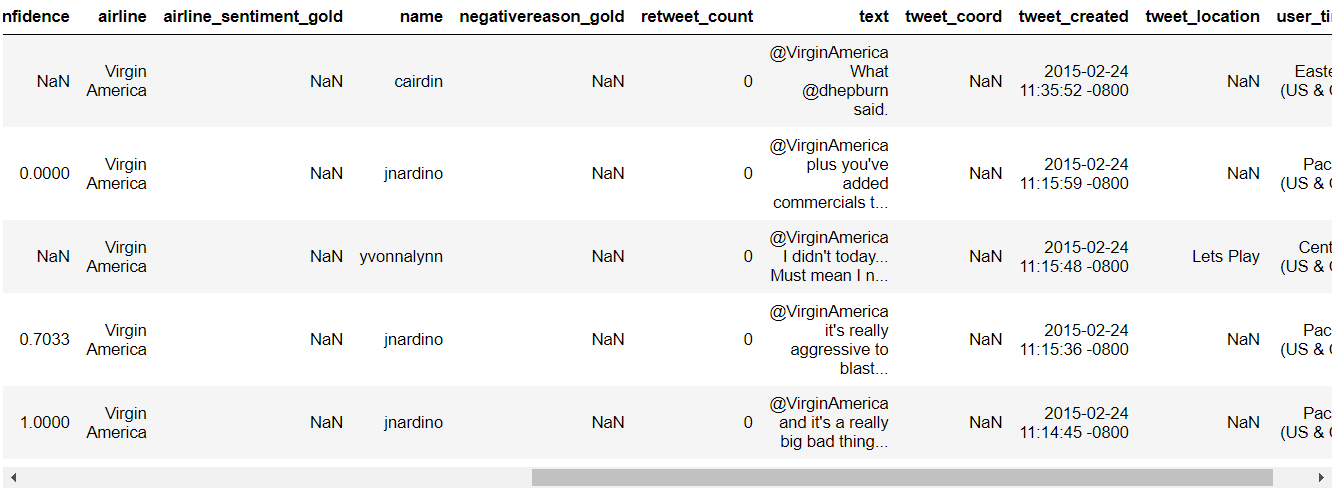
dataset = pd.read_csv(r"D:\Datasets\Tweets.csv")
dataset.head()
Output:
Next, we will write the preprocess_data() function, which takes in a dataset, the start index n, and the number of records as parameters. It then divides the dataset by sentiment category and returns the number of records beginning at the specified index. This approach ensures we have an equal number of records for each sentiment category.
We will fetch 600 records (200 positive, negative, and neutral) for training and 99 records (33 for each category) for testing. You can use more number of records for fine-tuning if you want.
def preprocess_data(dataset, n, records):

    # Remove rows where 'airline_sentiment' or 'text' are NaN
    dataset = dataset.dropna(subset=['airline_sentiment', 'text'])

    # Remove rows where 'airline_sentiment' or 'text' are empty strings
    dataset = dataset[(dataset['airline_sentiment'].str.strip() != '') & (dataset['text'].str.strip() != '')]

    # Filter the DataFrame for each sentiment
    neutral_df = dataset[dataset['airline_sentiment'] == 'neutral']
    positive_df = dataset[dataset['airline_sentiment'] == 'positive']
    negative_df = dataset[dataset['airline_sentiment'] == 'negative']

    # Select records from Nth index
    neutral_sample = neutral_df[n: n +records]
    positive_sample = positive_df[n: n +records]
    negative_sample = negative_df[n: n +records]

    # Concatenate the samples into one DataFrame
    dataset = pd.concat([neutral_sample, positive_sample, negative_sample])

    # Reset index if needed
    dataset.reset_index(drop=True, inplace=True)

    dataset = dataset[["text", "airline_sentiment"]]

    return dataset
The following script creates training and test sets.
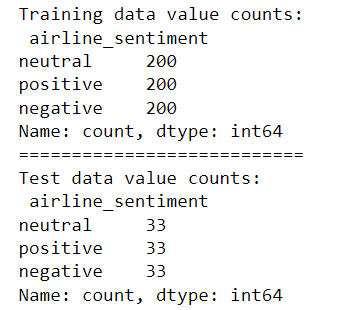
training_data = preprocess_data(dataset, 0, 200)
print("Training data value counts:\n", training_data["airline_sentiment"].value_counts())
print("===========================")
test_data = preprocess_data(dataset, 600, 33)
print("Test data value counts:\n", test_data["airline_sentiment"].value_counts())
Output:
Next, we convert our dataset into the JSON format required to fine-tune OpenAI models.
# JSON file path
json_file_path = r"D:\Datasets\airline_sentiments.json"

# Function to create the JSON structure for each row
def create_json_structure(row):
    return {
        "messages": [
            {"role": "system", "content": "You are a Twitter sentiment analysis expert who can predict sentiment expressed in the tweets about an airline. You select sentiment value from positive, negative, or neutral."},
            {"role": "user", "content": row['text']},
            {"role": "assistant", "content": row['airline_sentiment']}
        ]
    }

# Convert DataFrame to JSON structures
json_structures = training_data.apply(create_json_structure, axis=1).tolist()

# Write JSON structures to file, each on a new line
with open(json_file_path, 'w') as f:
    for json_structure in json_structures:
        f.write(json.dumps(json_structure) + '\n')

print(f"Data has been written to {json_file_path}")
To fine-tune the OpenAI model, you need to upload training files to the OpenAI server. To do so, create a client object of the OpenAI class and pass the JSON file to the files.create() method of the client object.
client = OpenAI(
    # This is the default and can be omitted
    api_key = os.environ.get('OPENAI_API_KEY'),
)


training_file = client.files.create(
  file=open(json_file_path, "rb"),
  purpose="fine-tune"
)
Finally, as shown in the script below, you can start fine-tuning using the client.fine_tuning.jobs.create() method. Here, you must pass GPT-4o model id gpt-4o-2024-08-06 to the model attribute.
fine_tuning_job_gpt4o = client.fine_tuning.jobs.create(
  training_file=training_file.id,
  model="gpt-4o-2024-08-06"
)
You can see fine-tuning events for your fine-tuning job using the following script:
# List up to 10 events from a fine-tuning job
print(client.fine_tuning.jobs.list_events(fine_tuning_job_id = fine_tuning_job_gpt4o.id,
                                    limit=10))
Once fine-tuning is completed, you will receive an email with the fine-tuned model ID. Alternatively, you can retrieve the fine-tuned model ID using the following script.
ft_model_id = client.fine_tuning.jobs.retrieve(fine_tuning_job_gpt4o.id).fine_tuned_model
Once you have the fine-tuned model ID, you can use it like any default OpenAI model. The following script defines the find_sentiment() function, which uses the fine-tuned model ID to predict the sentiments of the tweets in the test set and finally prints the overall fine-tuned model accuracy.
def find_sentiment(client, model, dataset):
    tweets_list = dataset["text"].tolist()

    all_sentiments = []


    i = 0


    while i < len(tweets_list):

        try:
            tweet = tweets_list[i]
            content = """What is the sentiment expressed in the following tweet about an airline?
            Select sentiment value from positive, negative, or neutral. Return only the sentiment value in small letters.
            tweet: {}""".format(tweet)

            response = client.chat.completions.create(
                model=model,
                temperature=0,
                max_tokens=10,
                messages=[
                    {"role": "user", "content": content}
                ]
            )

            sentiment_value = response.choices[0].message.content

            all_sentiments.append(sentiment_value)
            i += 1
            print(i, sentiment_value)

        except Exception as e:
            print("===================")
            print("Exception occurred:", e)

    accuracy = accuracy_score(all_sentiments, dataset["airline_sentiment"])
    print(f"Accuracy: {accuracy}")

find_sentiment(client,ft_model_id, test_data)
Output:
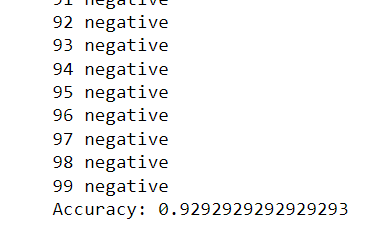
The above output shows that the fine-tuned model achieved an accuracy of 92.92%, significantly better than the accuracy achieved via the default GPT-4o model in a previous article.
In the next section, you will see how to fine-tune GPT-4o for text summarization.
We will use the News Articles with Summary dataset to fine-tune the GPT-4o model.
The following script imports the dataset.
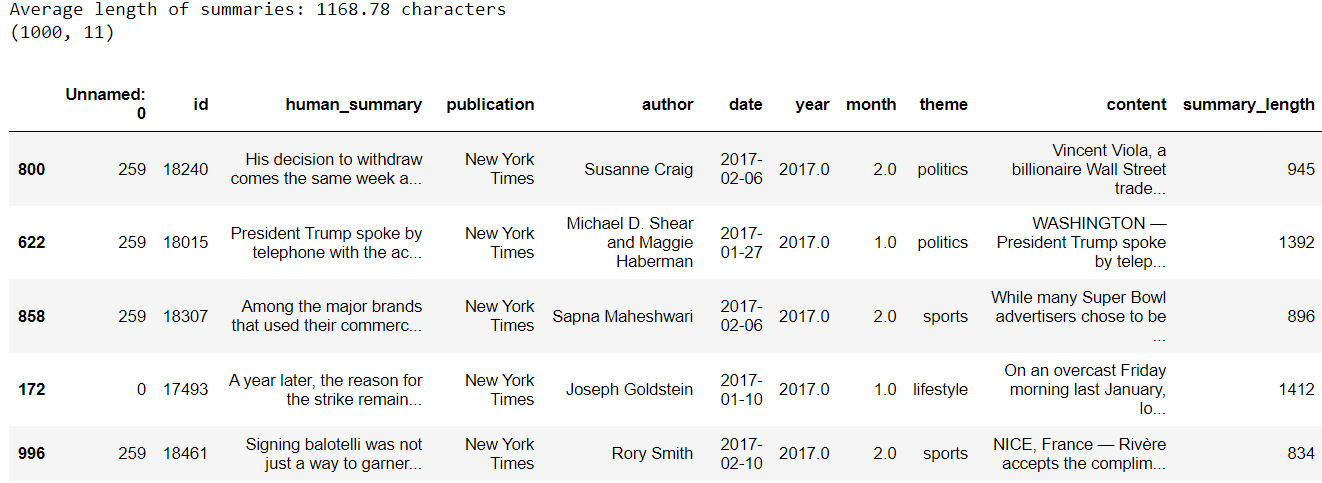
dataset = pd.read_excel(r"D:\Datasets\dataset.xlsx")
dataset = dataset.sample(frac=1)
dataset['summary_length'] = dataset['human_summary'].apply(len)
average_length = dataset['summary_length'].mean()
print(f"Average length of summaries: {average_length:.2f} characters")
print(dataset.shape)
dataset.head()
Output:
The rest of the process remains the same as text classification. We will filter a subset of data for fine-tuning (in this case, records 101 to 200) and convert the dataset into OpenAI-compliant JSON format.
selected_data = dataset.iloc[101:201]

# Function to create the JSON structure for each row
def create_json_structure(row):
    return {
        "messages": [
            {"role": "system", "content": "You are analyzing news articles. Use the provided content to generate a concise summary."},
            {"role": "user", "content": row['content']},
            {"role": "assistant", "content": row['human_summary']}
        ]
    }

# Convert selected DataFrame rows to JSON structures
json_structures = selected_data.apply(create_json_structure, axis=1).tolist()

# JSON file path
json_file_path = r"D:\Datasets\news_summaries.json"

# Write JSON structures to file, each on a new line
with open(json_file_path, 'w') as f:
    for json_structure in json_structures:
        f.write(json.dumps(json_structure) + '\n')

print(f"Data has been written to {json_file_path}")
Next, upload the training file to OpenAI servers.
training_file = client.files.create(
  file=open(json_file_path, "rb"),
  purpose="fine-tune"
)
Finally, you can start fine-tuning using the following script.
fine_tuning_job_gpt4o_ts = client.fine_tuning.jobs.create(
  training_file=training_file.id,
  model="gpt-4o-2024-08-06"
)
Once the model is fine-tuned, retrieve the model ID using the following script.
ft_model_id = client.fine_tuning.jobs.retrieve(fine_tuning_job_gpt4o_ts.id).fine_tuned_model
We will use the ROUGE scores to evaluate the text summarization performance of the fine-tuned model. The following script defines the calculate_rouge() function that allows you to calculate ROUGE1, ROUGE2, and ROUGEL scores.
# Function to calculate ROUGE scores
def calculate_rouge(reference, candidate):
    scorer = rouge_scorer.RougeScorer(['rouge1', 'rouge2', 'rougeL'], use_stemmer=True)
    scores = scorer.score(reference, candidate)
    return {key: value.fmeasure for key, value in scores.items()}
Finally, the following script demonstrates how we generate the summaries of the first 20 articles in our dataset using the fine-tuned model.
%%time

results = []

i = 0

for _, row in dataset[:20].iterrows():
    article = row['content']
    human_summary = row['human_summary']

    i = i + 1
    print(f"Summarizing article {i}.")

    prompt = f"Summarize the following article in 1150 characters. The summary should look like human created:\n\n{article}\n\nSummary:"

    response = client.chat.completions.create(
        model= ft_model_id,
        messages=[{"role": "user", "content": prompt}],
        max_tokens=1150,
        temperature=0.7
    )
    generated_summary = response.choices[0].message.content
    rouge_scores = calculate_rouge(human_summary, generated_summary)

    results.append({
    'article_id': row.id,
    'generated_summary': generated_summary,
    'rouge1': rouge_scores['rouge1'],
    'rouge2': rouge_scores['rouge2'],
    'rougeL': rouge_scores['rougeL']
    })
The following script prints average ROUGE scores.
results_df = pd.DataFrame(results)
mean_values = results_df[["rouge1", "rouge2", "rougeL"]].mean()
print(mean_values)
Output:
rouge1    0.579758
rouge2    0.417515
rougeL    0.431266
dtype: float64
The above script shows that the fine-tuned GPT-4o model achieves significantly higher ROUGE scores than the default GPT-4o model.
Fine-tuning can significantly improve a model's performance on a specific task. This article explains how to fine-tune the OpenAI GPT-4o model for text classification and text summarization. The results show that the fine-tuned GPT-4o model significantly outperforms the default GPT-4o model on both tasks.