WP Engine Makes Local Pro Free for All Users

WP Engine announced today that Local Pro, the commercial upgrade for its local WordPress development product, is now free for all users. Beginning with version 6.0, all features that formerly required a paid subscription are now available with a free Local account. These include Live Links Pro, Instant Reload, Link Checker, and MagicSync.

“We believe Local Pro features benefit a broader WordPress developer community and we want to deliver the full value of Local to more developers than ever,” WP Engine Senior Vice President Seth Halpern said. “We want to empower the freedom to create on WordPress by making all Local features available for free.”

WP Engine’s recently published research estimates the WordPress economy at $596.7B. The company may be in a better position to gain customers for its hosting products if they make Local completely free, as the tool was designed to seamlessly connect with WP Engine and Flywheel’s hosting. It is currently used by more than 300,000 developers. Over the years Local has gained popularity due to how easy it makes setting up WordPress development and testing environments.

Version 6.0 also introduces Local’s new Cloud Backups add-on, which will allow users to backup to Google Drive or Dropbox. Cloud backups can be restored from the Tools tab. The 6.0 release post details a few features that have been moved to new locations in the interface:

  • MagicSync is now a global preference, and the default push/pull experience can be toggled in the Preferences menu. 
  • Live Links Pro, now Live Links, will be accessible for all users by connecting your Local account.
  • Link Checker and Instant Reload have been moved to the Local Add-ons Library. 
  • Xdebug Add-ons have moved from the Utilities tab into the Tools tab within Local.

Existing Local Pro subscribers will have access to priority support until September 1, 2021. After that time, dedicated ticket support will be discontinued in favor of directing users to the community forums and help docs. WP Engine is offering customers full or prorated refunds, which will be sent out before July 31, 2021.

“non numeric” error

Hi, the scenario is:
I run an apartment complex, someone comes in to pay their rent. I fill in an html form
to record payment(update "payments" database table) and print a receipt.
I hope u will look at it and offer advice. I hope to combine both
the payment and receipt. I don't understand the "non numeric" error and I'm obviously doing
my echoes wrong as the receipt# is not displayed on the receipt(instead of the value in the
"numberstbl" it displays "receiptno".

the code:

<!DOCTYPE html><html>
<head>
<title>rent payment and receipt</title>
</head>
<body><center>
<?php
echo "<center>";echo date('m/d/y');echo "</center>";
// Include config file
require_once "getpayments.php";

//MySqli Select Query$results = $conn->query("SELECT rentdue FROM payments");

$unit=$_POST['unit']; $rentpaid=$_POST['rentpaid'];
$hudpay=$_POST['hudpay']; $datepaid=$_POST['datepaid'];

$unit='unit'; $rentpaid='rentpaid'; $rentdue='rentdue'; $hudpay='hudpay';
$prevbal='prevbal'; $latechg='latechg'; $datepaid='datepaid'; $prev="0.00"; $late="0.00";

// if no pay or part pay add $10 to latechg and amount not paid to prevbal
if ($rentpaid < $rentdue)
{ $latechg = $latechg + "10.00"; $prevbal = $rentdue - $rentpaid; }
// if payment = rentdue
elseif ($rentpaid == $rentdue)
 { $prevbal = $prev; $latechg = $late; }

// if over-payment subtract over-payment from prevbal
elseif ($rentpaid > $rentdue )
{ 
$prevbal = $rentpaid  - $rentdue; $latechg = $late; } // ***  29 non numeric both *** 

//MySqli Select Query
$results = $conn->query("SELECT receiptno FROM numberstbl");
$receiptno='receiptno';
?>
<b><?php echo $_POST["receiptno"]; ?>
<!--<img src="apt-pic.jpg" alt="apartment" height=250 width=800><br> -->
For:<SELECT name="options">
<option value="#990033" style="background-color: Violet;">Rent payment</option>
<option value="#003300" style="background-color: Aquamarine;">Background Check</option>
<option value="#6600cc" style="background-color: Pink;">Security Deposit Payment</option>
<option value="#003300" style="background-color: Aquamarine;">Damages Payment</option>
<option value="#990033" style="background-color: Violet;">Late Charges Payment</option>
<option value="#003300" style="background-color: Aquamarine;">Court Costs Payment</option>
<option value="#6600cc" style="background-color: Pink;">NSF Payment</option>
<option value="#990033" style="background-color: Violet;"> </option>
</SELECT><br>

<input type="text" size = 25 STYLE="color: #000000; background-color: #D4AAFF;" name="Name" value="Business Name -">
<input type="text" size = 25 STYLE="color: #000000; background-color: #D4D4FF;" name="Addy1" value="Business address -">
<input type="text" size = 25 STYLE="color: #000000; background-color: #D4AAFF;" name="Addy2" value="City, State, Zip"><br>

<b> unit paying is: <?php echo $_POST["unit"]; ?> -
Amount paid is: <?php echo $_POST["rentpaid"]; ?> -
Amount due is: <?php echo $rentdue; ?></b><br> // *** line 54 ****

<b>Sign here</b><input type="text" size=75 name="sign"><br>
<input type="text" size=25 name="thanks" readonly value="We Thank You:" STYLE="color:
#000000; font-weight: bold; background-color: #ffccff;" onFocus="this.value=''"><br>

<?php
/* Perform a query, check for error */
if(!empty($_POST["update"]))
   {
$sql = "UPDATE payments SET
rentpaid='$rentpaid', hudpay='$hudpay', prevbal='$prevbal', latechg='$latechg', datepaid='$datepaid' 
where unit = '$unit'";
if ($conn->query($sql) === TRUE) { echo "ng"; } 
else { echo "Error updating record: " . $conn->error; }
    }
/* Perform a query, check for error */
if(!empty($_POST["update"]))
   {
$sql = "UPDATE numberstbl SET 
receiptno = $receiptno + 1 where id=1";
if ($conn->query($sql) === TRUE) { echo "ng"; } 
else { echo "Error updating record: " . $conn->error; }
$conn->close();
 }
?>

</center></body></html>

errors:
06/30/21

Warning: A non-numeric value encountered in C:\xampp\htdocs\property\payment.php on line 29

Warning: A non-numeric value encountered in C:\xampp\htdocs\property\payment.php on line 29

Notice: Undefined index: receiptno in C:\xampp\htdocs\property\payment.php on line 37

unit paying is: apt1 - Amount paid is: 530.00 - Amount due is: rentdue
// * line 54 **

Add Editor-Only Notes via the Markdown Comment Block WordPress Plugin

Rich Tabor, the Senior Product Manager of WordPress Experience at GoDaddy, tweeted that he had an idea for a new block at the end of last week. Shortly after, the Markdown Comment Block plugin appeared on WordPress.org.

The plugin is a one-off block. It allows users to enter notes directly into the post editor that will not appear on the front end of the site. Tabor said he came up with the idea when working on an article for building single-block plugins.

There are few things I love more than simple plugins with a tight focus, performing a single function. Markdown Comment Block lands in this category.

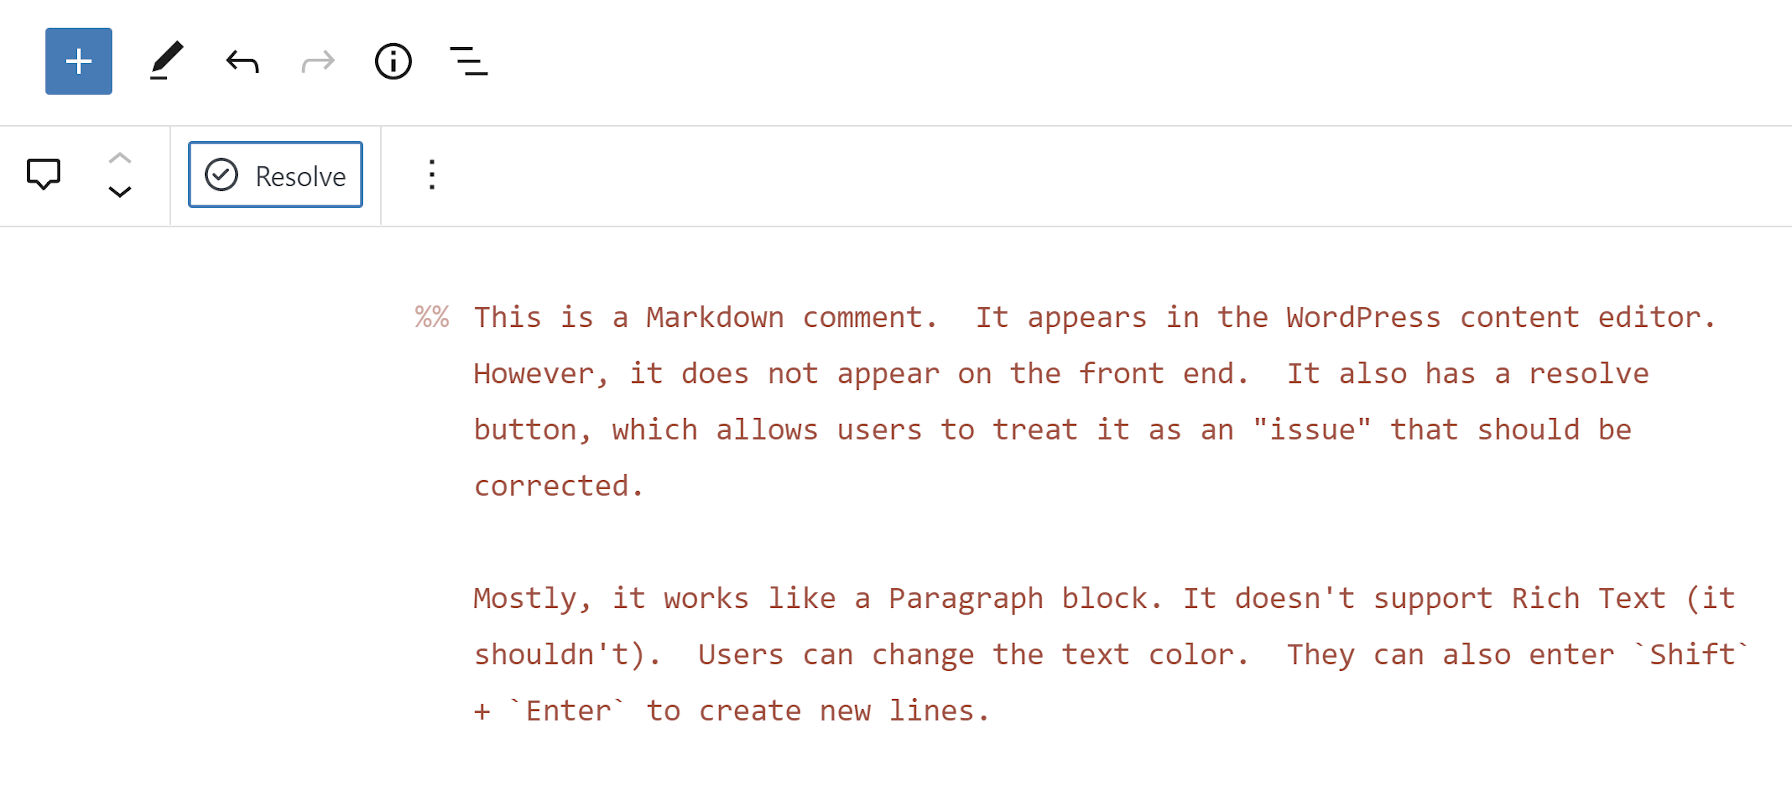
The plugin creates a new block that works nearly the same as a typical Paragraph block:

Adding inline comments to the WordPress post editor via the Markdown Comments Block plugin.
Adding inline comments to a post.

Users can change the text color, but they will not have access to the typical Rich Text controls. Those should be unnecessary anyway.

As someone who does long-form writing almost exclusively in Markdown, the block’s use of the double percent-sign syntax for comments intrigued me. Technically, the Markdown spec does not support any sort of special characters for them. It handles HTML comments. However, those appear in the source code on the front end when the document is rendered. I have only seen the %% mark to denote comments in the Inspire Writer app for Windows. Tabor said he had seen the same in Ulysses. The feature also exists in the Iceberg editor for WordPress, which Tabor created alongside Jeffrey Carandang.

The plugin also introduces the %% keyboard shortcut. Typing it directly in the editor will create a new Markdown Comment block.

My primary use case for the plugin would be leaving notes for my later self. However, it could also be handy in users’ publishing flows. The block adds a “Resolve” button to the toolbar. Clicking it deletes the comment.

Clicking the Resolve button for the Markdown Comment block to delete a comment.
Clicking the “Resolve” button will delete the block.

The block itself will not likely offer a robust enough feature set for complex workflows. However, pairing it with a plugin like Post Descriptions could round out the experience for larger teams of writers and copyeditors.

The Post Descriptions plugin allows users to add notes on the post level. These notes appear on the post-management screen, letting other team members know when to check an article. However, it may be hard to provide the full context of what issues need to be resolved before publishing. Markdown Comment Block adds an inline comments system, letting team members pass in-text notes.

Theme developers should appreciate that the block uses CSS custom properties too, which makes it easy to overwrite its default style rules. In moments, I was able to make it match my theme:

Customized output of the Markdown Comment Block.
Custom color, font, and line-height styles.

The --markdown-comment-font-size, --markdown-comment-line-height, and --markdown-comment-color variables are available for theme developers who want to add in support.

The one complaint I had about the block is its title: “Comment.” It is easy to confuse it with the six other comment-related blocks already in the WordPress block list. And, there will only be more in upcoming versions. Giving it a title of “Markdown Comment” would better distinguish it from others.

True.ID Adds SIM Swap Protections to 2FA Via API

As identity fraud mitigation has evolved on the internet, two-factor authentication (2FA) has become the gold standard for account creation and identity management. SIM swap fraud, a hardware hack that bypasses SMS 2FA, adds a new security wrinkle that must be solved. Tru.ID claims to solve this problem via a new API.

What does `font: 110%/1.4 system-ui` mean?

I use this line, or one like it, in a lot of quick demos. Not that it’s not a production-worthy line of code—I just tend to be a bit more explicit on bigger projects.

html {
  font: 110%/1.4 system-ui;
}

Someone wrote in confused by it, and I could see how a line like that is a bit bewildering at first.

The first thing to know is that it is called shorthand. The font property in CSS gives you the opportunity to set a bunch of font-* properties all at once. In this case, we’re setting:

html {
  font-family: system-ui;
  font-size: 110%;
  line-height: 1.4;
}

There are a few more little specific things to know. For example, the order matters.

/* invalid */
html {
  font: system-ui 100%/1.4;
}

You also can’t set the line-height without also setting the font-size. If you’re going to set line-height, you have to set both. Be extra careful there because something like 20px is both a valid line-height and font-size, and if you only set one, it’ll be the font-size. If you go for a unitless number, which is a great idea for line-height, and try to set it alone, it’ll just fail.

/* invalid */
html {
  font: 1.5 system-ui;
}

Of course, we’ve got all this detailed in the Almanac entry for font. But I’ll also give a shout to Mateusz Hadryś who has a detailed article titled “Full Text Styling With a Single Line of CSS” with some detailed figures like this that are helpful in understanding everything:

Showing the font property declaration. Style, variant and weight are in yellow with a label above that says order doesn't matter and a label beneath saying these have to be first. Next is size with a forward slash then line-height in red. Above them is a label that says these have to be next to each other. Next is family in light blue with a label that says it has to be last. There is an additional white label that connects size and family that says they are required.

Lastly, if system-ui was part of the confusion there, that’s one of those System Things.


The post What does `font: 110%/1.4 system-ui` mean? appeared first on CSS-Tricks. You can support CSS-Tricks by being an MVP Supporter.

The Beginners Guide to Form 944

Every small business that withholds income and payroll taxes from their employees‘ paychecks is obligated to report that withholding to the government.

Typically, you would use IRS Form 941 or the Employer’s Quarterly Federal Tax Return to file this information. But if your business is smaller and has a limited tax liability, you may be eligible to file a different IRS tax form: Form 944, also known as the Employer’s Annual Federal Tax Return.

Eligible employers can use Form 944 to file and pay federal income tax withheld from employees, along with Social Security and Medicare payments owed by employers and employees, only once a year instead of every quarter.

What is Form 944?

Form 944 is an IRS form that reports taxes, including state income tax (where applicable) and FICA taxes for Social Security and Medicare, that you withdraw from your employees’ paychecks.

The primary purpose of creating this form was for smaller businesses that have fewer employees and hence, less tax liability. Think of this form as an annual tax return. You can be eligible to file IRS Form 944 if your employment tax liability is $1000 or less–in other words, if you expect to pay $4000 or less in total employee wages for the year.

Moreover, Form 944 also requires information concerning the Additional Medicare Tax. While an employer isn’t required to pay this additional tax, it’s withheld from high-income employees and must be paid, along with the other employment taxes.

The Basics of Form 944

Now that you have a basic understanding of Form 944, let’s dive deeper to understand what needs to be done to fill the form accurately.

Determining Employer Eligibility

Form 944 eligibility cannot be self-assumed. You can’t just say you want to use it and have the IRS sign off.

First and foremost, you need a confirmation of your eligibility in writing by the IRS. It’s possible for the IRS to notify you that your business is either eligible or required to complete Form 944. Once you get the go-ahead, you cannot file Form 941 in its place unless you’ve requested and received the IRS’s permission to do so. That said, you may continue to submit Form 941 every quarter even if you’re eligible for Form 944.

If you haven’t received an IRS notification but believe your employment tax liability makes you eligible, you can contact the IRS by phone or email them to request this change. Be sure you make this request within the first few months of the year. If the IRS does change your file requirements, you should be receiving written notification from them soon enough.

Additionally, you can request to be eligible to complete IRS Form 944 if you’re a new employer. When filing Form SS-4 (this is the application you must fill to get an employer identification number or EIN), you can mention you think you’ll meet the Form 944 filing requirements.

The IRS will inform you about your employment tax filing requirements—whether you’ll file for IRS 944 or 941—when you’re issued your EIN.

Gathering All Payroll Data—And Doing It Accurately

You must collect all information you need ahead of time before you start filing Form 944.

As you now know, this form relates to payroll taxes, Social Security and Medicare taxes, and the federal income taxes that you’ve withheld from your employees’ paychecks. Make sure you have access to this information, along with the total compensation you’ve given to your employees throughout the year.

Even better if you use reliable accounting or payroll software for this purpose. You see, these systems make it easier to access the necessary financial data quickly. Plus, some solutions also generate a report specifically detailing all of the information you need for Form 944.

Knowing the Filing Right Dates

Your request to file Form 944 must be made in writing between January 1 and March 15 of the current year. Alternatively, you can also call 800-829-4933 between January 1 and April 1 of the current year.

As for filing, everything must be done by January 31 of the year after being reported. That said, you have until February 10 of the following year to file Form 944 if you made all the deposits on time and in full.

The amount of your tax liability determines the deadline by which you must pay your payroll taxes.

  • Employment taxes for your business included on Form 944 can be payable when you file Form 944 if your total tax liability is less than $2500 for the year.
  • If your total tax liability is $2500 or more for the year but less than $2005 for the quarter, you can pay deposits by the last day of the month after the end of the quarter.
  • You can pay the fourth quarter’s tax liability with Form 944 if your fourth-quarter tax liability is less than $2500.
  • If your total tax liability is over $2500 for a quarter, you must pay monthly or semi-weekly deposits depending on your schedule.

Note: Make sure you pay your payroll tax deposits using the IRS EFTPS system.

Social Security and Medicare Wages Calculation

You must calculate the appropriate Social Security wages and tips, Medicare wages and tips, and wages and tips subject to additional Medicare withholding in form 944.

Once you do this, multiply these expenses with the specific amounts mentioned on the form. These amounts reflect the percentage of wages and tips that get deducted for Social Security and Medicare tax.

You can make adjustments for sick pay or life insurance as specified on the IRS Form 944 instructions document, as well as any tax credit for performing or participating in research to get your final employment tax liability. Keep in mind you’ll have to report any deposits you’ve already made for the year too.

Calculating all wages and tips is more nuanced. I’ve only given you a gist of things to keep this guide brief.

Payroll taxes are complicated, and if you end up making any mistake, you’ll find yourself being penalized or fined. I highly recommend enlisting the help of a tax professional or outsourcing your payroll tasks if you face any difficulty when completing IRS Form 944.

5 Tools to Improve Filing Form 944

You can’t file Form 944 accurately if you don’t have the correct payroll information. For this purpose, you need a reliable accounting and payroll solution—preferably that can fine-tune all the needed data—that gives you uninterrupted access to all compensation-related information. Below is a list of the five best payroll software solutions.

OnPay

OnPay is a highly reliable and secure payroll service that comes packed with features and benefits. From unlimited monthly cycles to automated tax filing and payment to flexible periods and schedules, this tool gives you all—and more.

It offers specialized payroll solutions for businesses operating in specific industries with specific requirements. For example, if you’re running a restaurant, OnPay can easily handle the unique taxes and wage reporting systems. Plus, you also get HR benefits that can be incredibly useful for mixed workforces comprising W2 employees and independent contractors.

QuickBooks Payroll


Although more renowned for its accounting solutions, QuickBooks Payroll also has an excellent online payroll solution. While choosing this software is a given if you already use QuickBooks Accounting, you can give it a shot even if you don’t.

The software automates local, state, and federal tax calculation and payment every pay cycle. It has an Auto Payroll feature that can considerably reduce the time you take to run weekly payroll. However, one of its biggest USPs, in my opinion, is its tax penalty protection. QuickBooks will pay up to $25,000 if you get a tax penalty because of an error in your payroll.

Wave Payroll

Wave is another popular accounting software that offers a wide range of free accounting services. The payroll solution isn’t free, but it’s still one of the cheapest options on the market.

Since this is a cloud-based payroll service, you can log in to your account via the Wave website from any device. It also offers tax support services for 14 states in the United States. If you reside in any one of these states, Wave will pay and file your state and federal taxes when you run payroll. The employee portal functionality, where you can invite employees to create and manage their own accounts, is another plus.

Patriot

Patriot is a flexible payroll software solution that lets you choose between full-service payroll and a more affordable DIY solution where you’re responsible for filing your own taxes.

You’re assured of unlimited payroll runs using any device, various payroll frequencies, and customizable hours, money, and deductions for both plans. Patriot also has an employee portal that employees can use to keep track of pay stubs, pay history, time off balances, and electronic W-2 information. Moreover, there’s no restriction on how you pay your employees. It allows payments via direct deposit or manual checks both.

Gusto

No payroll solution list can be complete without mentioning Gusto.

In addition to providing an unparalleled user experience, Gusto can calculate and file your taxes with little to no supervision from you. All your local, state, and federal taxes are automatically paid to the right government office for every payroll. Even the onboarding is super easy and straightforward customized according to the employer type.

5 Tricks for Filling and Filing Form 944 Correctly

Here are some of the best tips to help you minimize errors and frustrations when filing Form 944. Let’s take a look.

Hire a Reliable Accountant

A good accountant should do more than simply preparing financial statements and doing your taxes. They should be willing to work with you all year round to keep track of income and spending. They must regularly monitor your gross and net profit and make sure you don’t have a cash flow problem.

Start working with your accountant from day one—not just during the tax season. After all, good accounting is key for accurate data, which is key for filing Form 944 and avoiding expensive penalties and fines.

Store Your Paperwork All Year Long

It’s crucial to keep all tax-related paperwork throughout the year. You want to save every receipt related to your employees’ compensation. You see, having all your paperwork handy and organized will make the process a lot easier.

The IRS recommends keeping records for at least three years.

Keep Up With All Your Deadlines

When dealing with Form 944, not only do you need to pay the federal income taxes, state income tax taxes, and FICA taxes on time but also request the IRS to get their written approval to file this particular form instead of Form 941.

As you may realize, deadlines are vital here. If you don’t get the go-ahead from the IRS, you won’t have any other option other than filing Form 941.

Separate Your Business Expenses From Your Personal Expenses

The IRS may start looking at your personal accounts because of commingled money if they find your personal expenses mixed with your business expenses while auditing.

Precisely why you should make a point to get a separate bank account and credit card for your business, and only business expenses—in this case, paying your employees—through them.

Manage All Payroll-Related Activities Properly

If you face any difficulty filing Form 944, don’t hesitate to get in touch with a reputable company for assistance.

Many business owners hire a lesser-known and unreliable payroll service to save money. Don’t be one of them. These company owners end up on the hook as they realize far too late the service wasn’t remitting any payroll taxes for the company. The IRS will check every year to check whether you’ve paid your tax liability, so you really don’t want to mess this up.

What to Do Next

If you’re eligible for filing Form 944, you have to start collecting all the crucial information related to your employees’ compensation ASAP to avoid making any mistakes. Remember, any error can result in you getting heavily fined.

Fortunately, having the right software tools to keep track of onboarding, payroll, and time and attendance will make the process less intimidating and time-consuming. You can check out these Quick Sprout guides to set yourself up for success.

Apache Cassandra 4.0: Taming Tail Latencies with Java 16 ZGC

Like so many others in the Apache Cassandra community, I’m extremely excited to see that the 4.0 release is finally here. There are many, many improvements to Cassandra 4.0. One enhancement that is more important than it might look is the addition of support for Java versions 9 and up. This was not trivial, because Java 9 made changes to some internal APIs that the most performance-oriented Java projects like Cassandra relied on (you can read more about this here).

This is a big deal because with Cassandra 4.0, you not only get the direct improvements to performance added by the Apache Cassandra committers, you also unlock the ability to take advantage of seven years of improvements in the JVM (Java Virtual Machine) itself.

Chromium spelling and grammar features

Delan Azabani digs into the (hopefully) coming soon ::spelling-error and ::grammar-error pseudo selectors in CSS. Design control is always nice. Hey, if we can style scrollbars and style selected text, why not this?

The squiggly lines that indicate possible spelling or grammar errors have been a staple of word processing on computers for decades. But on the web, these indicators are powered by the browser, which doesn’t always have the information needed to place and render them most appropriately. For example, authors might want to provide their own grammar checker (placement), or tweak colors to improve contrast (rendering).

To address this, the CSS pseudo and text decoration specs have defined new pseudo-elements ::spelling-error and ::grammar-error, allowing authors to style those indicators, and new text-decoration-line values spelling-error and grammar-error, allowing authors to mark up their text with the same kind of decorations as native indicators.

This is a unique post too, as Delan is literally the person implementing the feature in the browser. So there is all sorts of deep-in-the-weeds stuff about how complex all this is and what all the considerations are. Kinda like, ya know, web development. Love to see this. I’ve long felt that it’s weird there is seemingly such little communication between browser engineers and website authors, despite the latter being a literal consumer of the former’s work.

Direct Link to ArticlePermalink


The post Chromium spelling and grammar features appeared first on CSS-Tricks. You can support CSS-Tricks by being an MVP Supporter.

How to Create an AWS ALB and ASG

In this post, you will learn how to create an AWS Application Load Balancer (ALB) for your EC2 instances running a Spring Boot application. You will also create an Autoscaling Group (ASG) which will simplify the setup and will automatically scale-in and scale-out.

1. Introduction

A load balancer will make it possible to distribute the workload across multiple EC2 instances. A client application will connect to the load balancer without knowing which EC2 instance will handle the request. Because of this, EC2 instances can come and go without impacting your client requests. It is transparent because of the load balancer. It is easy to scale-out and thus to add more EC2 instances when traffic increases, or to scale-in and reduce the number of EC2 instances in order to reduce costs when traffic gets low.

A Brief Rundown About the Flourishing Uber X App

If you are an entrepreneur who needs to start an on-demand service to flourish in the market and your business, then here’s your chance. There are many business owners who find the dire need to start a business but are short of the fortune that is needed for the investment. However, all of these shortcomings can be overcome when you go for an on-demand service app development. This market is finding a lot of growth both in its services and potential. So, if you want to choose one particular business from it, it is easier. 

Therefore, there is no better time for you to start the business than right now. Let’s go over the reasons:

:nth-child Between Two Fixed Indexes

I needed to select some elements between two fixed indexes the other day — like literally the second through fifth elements. Ironically, I have a whole post on “Useful :nth-child Recipes” but this wasn’t one of them.

The answer, it turns out, isn’t that complicated. But it did twist my brain a little bit.

Say you want to select all divs from the second one and beyond:

div:nth-child(n + 2) {

}
/* [ ]  [x]  [x]  [x]  [x]  [x]  [x]  [x], etc. */

That makes logical sense to me. If n is 0, the expression is 2, and n increments upwards from there and selects everything beyond it.

But then how do you “stop” the selecting at a specific index? Like…

/* Not real */
div:nth-child(minmax(2, 5)) {

}
/* [ ]  [x]  [x]  [x]  [x]  [x]  [ ]  [ ], etc. */

Well, we can do the opposite thing, selecting only the first set of elements then stopping (constraining in the other direction) by reversing the value of n.

div:nth-child(-n + 6) {

}
/* [x]  [x]  [x]  [x]  [x]  [ ]  [ ]  [ ], etc. */

That will select the the first five elements and then stop because, as n gets bigger, the expression value goes to 0 and into negative numbers.

So, the CSS trick here is to combine both of those :nth-child expressions.

We know that CSS pseudo-selectors are additive in the sense that they must both be true in order to select them.

a:first-child:hover {
  /* selects the <a> if it is BOTH the first child and in a hover state */
}

To accomplish the idea of “2 and over” and “5 and under” we chain the pseudo-selectors:

div:nth-child(n + 2):nth-child(-n + 6) {
  background: green;
}

That’ll do:

The part that twisted my brain was thinking about “additive” pseudo-selectors. I was thinking that selecting “2 and up” would do just that, and “5 and under” would do just that, and those things combined meant “all elements.” But that’s just wrong thinking. It’s the conditions that are additive, meaning that every element must meet both conditions.

If you found this confusing like I did, wait until you check out Quanity Queries. By nesting a lot of nth-style pseudo-selectors, you can build logic that, for example, only selects elements depending on how many of them are in the DOM.

div:nth-last-child(n+2):nth-last-child(-n+5):first-child, 
div:nth-last-child(n+2):nth-last-child(-n+5):first-child ~ div {
  /* Only select if there are at least 2 and at most 5 */
}

Una broke this down even further for us a while back.


The post :nth-child Between Two Fixed Indexes appeared first on CSS-Tricks. You can support CSS-Tricks by being an MVP Supporter.

Breaking Down Bulky Builds With Netlify And Next.js

One of the biggest pains of working with statically generated websites is the incrementally slower builds as your app grows. This is an inevitable problem any stack faces at some point and it can strike from different points depending on what kind of product you are working with.

For example, if your app has multiple pages (views, routes) when generating the deployment artifact, each of those routes becomes a file. Then, once you’ve reached thousands, you start wondering when you can deploy without needing to plan ahead. This scenario is common on e-commerce platforms or blogs, which are already a big portion of the web but not all of it. Routes are not the only possible bottleneck, though.

A resource-heavy app will also eventually reach this turning point. Many static generators carry out asset optimization to ensure the best user experience. Without build optimizations (incremental builds, caching, we will get to those soon) this will eventually become unmanageable as well — think about going through all images in a website: resizing, deleting, and/or creating new files over and over again. And once all that is done: remember Jamstack serves our apps from the edges of the Content Delivery Network. So we still need to move things from the server they were compiled at to the edges of the network.

On top of all that, there is also another fact: data is often dynamic, meaning that when we build our app and deploy it, it may take a few seconds, a few minutes, or even an hour. Meanwhile, the world keeps spinning, and if we are fetching data from elsewhere, our app is bound to get outdated. Unacceptable! Build again to update!

Build Once, Update When Needed

Solving Bulky Builds has been top of mind for basically every Jamstack platform, framework, or service for a while. Many solutions revolve around incremental builds. In practice, this means that builds will be as bulky as the differences they carry against the current deployment.

Defining a diff algorithm is no easy task though. For the end-user to actually benefit from this improvement there are cache invalidation strategies that must be considered. Long story short: we do not want to invalidate cache for a page or an asset that has not changed.

Next.js came up with Incremental Static Regeneration (ISR). In essence, it is a way to declare for each route how often we want it to rebuild. Under the hood, it simplifies a lot of the work to the server-side. Because every route (dynamic or not) will rebuild itself given a specific time-frame, and it just fits perfectly in the Jamstack axiom of invalidating cache on every build. Think of it as the max-age header but for routes in your Next.js app.

To get your application started, ISR just a configuration property away. On your route component (inside the /pages directory) go to your getStaticProps method and add the revalidate key to the return object:

export async function getStaticProps() {
  const { limit, count, pokemons } = await fetchPokemonList()

  return {
    props: {
      limit,
      count,
      pokemons,
    },
    revalidate: 3600 // seconds
  }
}

The above snippet will make sure my page rebuilds every hour and fetch for more Pokémon to display.

We still get the bulk-builds every now and then (when issuing a new deployment). But this allows us to decouple content from code, by moving content to a Content Management System (CMS) we can update information in a few seconds, regardless of how big our application is. Goodbye to webhooks for updating typos!

On-Demand Builders

Netlify recently launched On-Demand Builders which is their approach to supporting ISR for Next.js, but also works across frameworks including Eleventy and Nuxt. In the previous session, we established that ISR was a great step toward shorter build-times and addressed a significant portion of the use-cases. Nevertheless, the caveats were there:

  1. Full builds upon continuous deployment.
    The incremental stage happens only after the deployment and for the data. It is not possible to ship code incrementally
  2. Incremental builds are a product of time.
    The cache is invalidated on a time basis. So unnecessary builds may occur, or needed updates may take longer depending on the revalidation period set in the code.

Netlify’s new deployment infrastructure allows developers to create logic to determine what pieces of their app will build on deployment and what pieces will be deferred (and how they will be deferred).

  • Critical
    No action is needed. Everything you deploy will be built upon push.
  • Deferred
    A specific piece of the app will not be built upon deploy, it will be deferred to be built on-demand whenever the first request occurs, then it will be cached as any other resource of its type.

Creating an On-Demand builder

First of all, add a netlify/functions package as a devDependency to your project:

yarn add -D @netlify/functions

Once that is done, it is just the same as creating a new Netlify Function. If you have not set a specific directory for them, head on to netlify/functions/ and create a file of any name to your builder.

import type { Handler } from '@netlify/functions'
import { builder } from '@netlify/functions'

const myHandler: Handler = async (event, context) => {
  return {
    statusCode: 200,
    body: JSON.stringify({ message: 'Built on-demand! 🎉' }),
  }
}
export const handler = builder(myHandler)

As you can see from the snippet above, the on-demand builder splits apart from a regular Netlify Function because it wraps its handler inside a builder() method. This method connects our function to the build tasks. And that is all you need to have a piece of your application deferred for building only when necessary. Small incremental builds from the get-go!

Next.js On Netlify

To build a Next.js app on Netlify there are 2 important plugins that one should add to have a better experience in general: Netlify Plugin Cache Next.js and Essential Next-on-Netlify. The former caches your NextJS more efficiently and you need to add it yourself, while the latter makes a few slight adjustments to how Next.js architecture is built so it better fits Netlify’s and is available by default to every new project that Netlify can identify is using Next.js.

On-Demand Builders With Next.js

Building performance, deploy performance, caching, developer experience. These are all very important topics, but it is a lot — and takes time to set up properly. Then we get to that old discussion about focusing on Developer Experience instead of User Experience. Which is the time things go to a hidden spot in a backlog to be forgotten. Not really.

Netlify has got your back. In just a few steps, we can leverage the full power of the Jamstack in our Next.js app. It's time to roll up our sleeves and put it all together now.

Defining Pre-Rendered Paths

If you have worked with static generation inside Next.js before, you have probably heard of getStaticPaths method. This method is intended for dynamic routes (page templates that will render a wide range of pages). Without dwelling too much on the intricacies of this method, it is important to note the return type is an object with 2 keys, like in our Proof-of-Concept this will be [Pokémon]dynamic route file:

export async function getStaticPaths() {
  return {
    paths: [],
    fallback: 'blocking',
  }
}
  • paths is an array carrying out all paths matching this route which will be pre-rendered
  • fallback has 3 possible values: blocking, true, or false

In our case, our getStaticPaths is determining:

  1. No paths will be pre-rendered;
  2. Whenever this route is called, we will not serve a fallback template, we will render the page on-demand and keep the user waiting, blocking the app from doing anything else.

When using On-Demand Builders, make sure your fallback strategy meets your app’s goals, the official Next.js docs: fallback docs are very useful.

Before On-Demand Builders, our getStaticPaths was slightly different:

export async function getStaticPaths() {
  const { pokemons } = await fetchPkmList()
  return {
    paths: pokemons.map(({ name }) => ({ params: { pokemon: name } })),
    fallback: false,
  }
}

We were gathering a list of all pokémon pages we intended to have, map all the pokemon objects to just a string with the pokémon name, and forwarding returning the { params } object carrying it to getStaticProps. Our fallback was set to false because if a route was not a match, we wanted Next.js to throw a 404: Not Found page.

You can check both versions deployed to Netlify:

The code is also open-sourced on Github and you can easily deploy it yourself to check the build times. And with this queue, we slide onto our next topic.

Build Times

As mentioned above, the previous demo is actually a Proof-of-Concept, nothing is really good or bad if we cannot measure. For our little study, I went over to the PokéAPI and decided to catch all pokémons.

For reproducibility purposes, I capped our request (to 1000). These are not really all within the API, but it enforces the number of pages will be the same for all builds regardless if things get updated at any point in time.

export const fetchPkmList = async () => {
  const resp = await fetch(`${API}pokemon?limit=${LIMIT}`)
  const {
    count,
    results,
  }: {
    count: number
    results: {
      name: string
      url: string
    }[]
  } = await resp.json()
  return {
    count,
    pokemons: results,
    limit: LIMIT,
  }
}

And then fired both versions in separated branches to Netlify, thanks to preview deploys they can coexist in basically the same environment. To really evaluate the difference between both methods the ODB approach was extreme, no pages were pre-rendered for that dynamic route. Though not recommended for real-world scenarios (you will want to pre-render your traffic-heavy routes), it marks clearly the range of build-time performance improvement we can achieve with this approach.

Strategy Number of Pages Number of Assets Build time Total deploy time
Fully Static Generated 1002 1005 2 minutes 32 seconds 4 minutes 15 seconds
On-Demand Builders 2 0 52 seconds 52 seconds

The pages in our little PokéDex app are pretty small, the image assets are very lean, but the gains on deploy time are very significant. If an app has a medium to a large amount of routes, it is definitely worth considering the ODB strategy.

It makes your deploys faster and thus more reliable. The performance hit only happens on the very first request, from the subsequent request and onward the rendered page will be cached right on the Edge making the performance exactly the same as the Fully Static Generated.

The Future: Distributed Persistent Rendering

On the very same day, On-Demand Builders were announced and put on early access, Netlify also published their Request for Comments on Distributed Persistent Rendering (DPR).

DPR is the next step for On-Demand Builders. It capitalizes on faster builds by making use of such asynchronous building steps and then caching the assets until they’re actually updated. No more full-builds for a 10k page's website. DPR empowers the developers to a full control around the build and deploy systems through solid caching and using On-Demand Builders.

Picture this scenario: an e-commerce website has 10k product pages, this means it would take something around 2 hours to build the entire application for deployment. We do not need to argue how painful this is.

With DPR, we can set the top 500 pages to build on every deploy. Our heaviest traffic pages are always ready for our users. But, we are a shop, i.e. every second counts. So for the other 9500 pages, we can set a post-build hook to trigger their builders — deploying the remaining of our pages asynchronously and immediately caching. No users were hurt, our website was updated with the fastest build possible, and everything else that did not exist in cache was then stored.

Conclusion

Although many of the discussion points in this article were conceptual and the implementation is to be defined, I am excited about the future of the Jamstack. The advances we are doing as a community revolve around the end-user experience.

What is your take on Distributed Persistent Rendering? Have you tried out On-Demand Builders in your application? Let me know more in the comments or call me out on Twitter. I am really curious!

References

My Business Needs Local SEO

To expand your customer base, it is pertinent to launch an organic search engine optimization campaign.
Avail these highly beneficial local SEO Tactics
At first claim Google My Business Listing
Google hosts 75% of the Global Search Engine market. Get benefit from Free listing at Google My Business. Make your company easily approachable. Make an account on these sites.

MerchantCircle
Thumbtack
Facebook
Whitepages

Prioritize your Customer Reviews
Approximately, 90% customers value the reviews on your website. Also consider the star rating.

Localized Your Website Content
Always add your name, address, and phone number easily scrollable on your website, make a header or footer of this information.

Always Avoid Keyword Stuffing, otherwise, Google Search Engine would detect your content as spammy.

How to Connect Any WordPress Forms to Google Sheets (Easy Way)

Do you want to connect your WordPress forms to Google Sheets?

Google Sheets makes it easy for you manage your form data inside a spreadsheet, and they have built-in collaboration tools to improve workflows.

In this article, we’ll show you how to easily connect any WordPress forms to Google Sheets, so you can automatically send WordPress form data to Google sheets.

How to connect any WordPress forms to Google Sheets (the easy way)

Why Connect WordPress Forms to Google Sheets?

Google Sheets is a popular free spreadsheet software from Google. Connecting your WordPress forms to Google Sheets makes it easier to manage and sort your form data.

No matter if you’re creating a questionnaire, gathering testimonials, building a survey form, or something else, you can connect your WordPress forms to Google Sheets with just a few clicks.

Integrating your form entries with Google Sheets can help your WordPress website in a lot of ways.

  • Makes it easy to give your team access to form data without creating a new WordPress login
  • Makes it easier to interpret and analyze your form / survey data
  • Set up automatic data collection and reduce errors from manual data entry

With that said, let’s take a look at how you can connect any WordPress forms to Google Sheets, the easy way.

Step 1. Create a WordPress Form Using WPForms

First thing, you need is to have an active contact form on your WordPress site which will act as the data collection source.

For the sake of this tutorial, we’ll be using the WPForms plugin. It’s the best contact form plugin for WordPress used by over 4 million websites.

Their beginner friendly form builder can be used to create nearly any kind of WordPress form. You can start with one of their 150+ form templates or simply use the drag and drop builder to add form fields and customize them to your liking.

For more details, see our step by step guide on how to create a contact form in WordPress.

If you haven’t created a Google Sheets spreadsheet, then you’ll need to do that now.

Head over to the Google Sheets website and click ‘Blank’ to add a new spreadsheet.

New Google spreadsheet

Then, when you’re adding spreadsheet columns, you want these to match your WordPress form fields.

In this case, we’ll have three columns for the ‘Name’, ‘Email’, and ‘Message’.

Google Sheets spreadsheet

Step 2. Install and Activate the Uncanny Automator WordPress Plugin

To connect your WordPress forms to Google Sheets, we’re going to be using an automation plugin.

The best WordPress automation plugin is Uncanny Automator. It acts as a connecter between WordPress plugins and other third-party apps, so they can easily talk to each other.

It’s the most powerful way to automate your WordPress blog processes without any code.

The best part about Uncanny Automator is that it doesn’t charge you a tax on each data transfer like other SaaS providers such as Zapier.

Uncanny Automator also works with all major form solutions including, WPForms, Formidable Forms, Gravity Forms, Ninja Forms, WooCommerce, and more.

However, the focus of this tutorial will be on the integration with WPForms.

Note: there is a free version of the plugin available, but we’ll use the Pro version for this tutorial since it has the Google Sheets integration we need.

Uncanny Automator

For more details, see our guide on how to create automated workflows in WordPress with Uncanny Automator.

Step 3. Connect Your Google Account to Uncanny Automator

After Uncanny Automator is activated and set up, you need to connect the plugin to your Google account.

To do this, navigate to Automator » Settings and then click the ‘Google’ menu item.

Connect Google account

After that, click the ‘Connect an account’ button.

This will bring you to a screen where you need to authorize your Google account.

Simply select the Google account you want to use and then click the ‘Allow’ button.

Grant Google account permission

Then, you’ll need to click ‘Allow’ one more time to confirm your choices.

Once your account is successfully connected, you’ll be taken back to the plugin settings screen in your WordPress dashboard.

Google account integration success

Step 4. Connect Your WordPress Form to Google Sheets with Uncanny Automator

Now, it’s time to connect your WordPress form to the Google Sheet you created earlier.

Uncanny Automator uses what are called “recipes” to connect different apps and plugins.

To create one, go to Automator » Add new, click the ‘Anonymous’ option and then click ‘Confirm’.

You want to choose Anonymous because most of the time it will be new anonymous visitors filling out the forms on your website.

Select anonymous recipe

Next, you can give your recipe a name.

After that, select ‘WPForms’ in the ‘Anonymous trigger’ meta box.

Select WPForms trigger

Then, you’ll have two different options to choose from.

We’ll select the ‘A form is submitted’ option since this will send all form submissions to Google Sheets.

Select form submitted trigger

Then, select your form from the drop down list.

After that, click the ‘Save’ button.

Choose WPForms form

Since you chose an Anonymous recipe above, you need to create a new ‘Subscriber’ user in WordPress. This new Subscriber role will be used to send the form data through.

For more details, see our guide on how to add new users and authors to your WordPress blog.

Then, choose the ‘Existing user’ option in the ‘Actions’ meta box.

Select existing user option

This will bring up a popup where you can choose the new user account.

Select the ‘ID’ field and enter the ID number from the new user you created.

Enter user ID

To find this go to Users » All Users in your WordPress dashboard.

Then, open up the new user and locate the ID in the URL for the page.

Find user ID

Once you’ve done that, select ‘Do nothing’.

Make sure to click ‘Save’ to save the recipe so far.

Select do nothing and save

After that, click the ‘Add action’ button.

Next, you need to select ‘Google Sheets’ from the list of integrations.

Select Google Sheets

Then, choose the ‘Create a row in a Google Sheet’ option under the ‘Select an action’ section.

Create a row in Google Sheet

This will bring up a menu to select the spreadsheet that you created earlier.

You can search for the name of your spreadsheet, and it will bring up a list of options.

Select the right spreadsheet

After you’ve selected the spreadsheet, click the ‘Get columns’ button in the ‘Row’ section.

This will bring up a list of columns from the spreadsheet.

Select get columns

You’ll want to map the form fields to your spreadsheet columns.

Next to each form column, find the matching spreadsheet field. The ‘Column’ name should be the same as the ‘Value’ name.

Match column and value

Once you’ve matched up all the fields, it will look similar to the settings above.

Make sure you click ‘Save’ once you’re done creating the recipe.

After that, you need to publish your new recipe. This will make sure that form entries will automatically be sent to your Google Sheets spreadsheet.

To publish the recipe, all you have to do is switch the recipe toggle to ‘Live’.

Make recipe live

Now, whenever a visitor fills out your form, the information will instantly appear in Google Sheets.

There are many other no-code integrations and automations that you can create with this plugin like integrating Slack with WordPress, and even setting up SMS notifications in WooCommerce.

We hoped this article helped you connect any WordPress forms to Google Sheets the easy way. You may also want to see our expert picks of the best no-code drag and drop WordPress page builders, and our list of the must have WordPress plugins for businesses.

If you liked this article, then please subscribe to our YouTube Channel for WordPress video tutorials. You can also find us on Twitter and Facebook.

The post How to Connect Any WordPress Forms to Google Sheets (Easy Way) appeared first on WPBeginner.