#310: Front-End Monorepo

Featured Imgs 23

We talked about our transition to a monorepo back in episode 305. This move has all sorts of advantages for us, like the simplicity of having a single repo to pull and be up to date with and linting/formatting code in a consistent way across the entire code base of CodePen.

This time we’ll get into more of the repercussions of the monorepo from a front-end perspective. For example, since a bit part of the point of the monorepo is sharing code across areas of the site, it made sense to yoink out things that are intentionally sharable into top-level folders. For example, we pulled out our component library that way, then had to figure out how best to consume those components across different areas (e.g. how Next.js consumes those components is different than how our Rails app does. We also pulled out things like common utilities, icons, and shared styles, each of them having their own little journey on getting to work just how we wanted them to.

Timestamps

  • 00:30 More Monorepo
  • 01:46 Benefits of monorepo
  • 04:48 Choices we made about the CodePen code
  • 07:06 Problems with combining packages
  • 09:45 What about Next?
  • 15:48 Sponsor: Jetpack
  • 18:04 CP Library of components
  • 23:00 Sharing global styles
  • 27:52 Icon library

Sponsor: Jetpack

Jetpack is celebrating it’s 10th year! Jetpack does a lot, from major search improvements, full site backup, social media integration, speed boosts, and security measures. Take a look at some of those statistics on their landing page. They are really helping WordPress site owners make their sites better and the web writ large.

The post #310: Front-End Monorepo appeared first on CodePen Blog.

How I can web scrape data from 2 different website

558fe5180e0e8fc922d31c23ef84d240

I want to make sqlite table like this format:

| Matric | Name                        | GitHub Link               | Status |
|--------|--------------------------   |---------------------------|--------|
| 243340 | Yu Zhixiong                 | https://github.com/abcde  | Yes    |
| 250634 | Ahmad Afham Bin Noor Azizan |                           | No     |

I get two link is first link is about student who have submit the githublink,the second is about matric and name.and the status is not given the two of link

Now I already get second link information and I do not know how to get githublink and the status because the githublink is not everyone have the githublink.So how i can identified it and connect it like a table?

link1:https://github.com/STIW3054-A202/Main-Data/issues/1
link2:https://github.com/STIW3054-A202/Main-Data/wiki/List_of_Student

Gaps? Gasp!

Category Image 091

At first, there were flexboxes (the children of a display: flex container). If you wanted them to be visually separate, you had to use content justification (i.e. justify-content: space-between), margin trickery, or sometimes, both. Then along came grids (a display: grid container), and grids could have not-margin not-trickeried minimum gaps between grid cells, thanks to grid-gap. Flexboxes did not have gaps.

Now they can, thanks to the growing support of gap, the grid-gap successor that isn’t confined to grids. With gap, you can gap your grids, your flexboxes, and even your multiple columns. It’s gaptastic!

Gap with Grid

Let’s start where gap is the most robust: CSS Grid. Here’s a basic grid setup in HTML and CSS:

<section>
  <div>div</div>
  <div>div</div>
  <div>div</div>
  <div>div</div>
  <div>div</div>
  <div>div</div>
  <div>div</div>
</section>
section {
  display: grid;
  grid-template-rows: repeat(2,auto);
  grid-template-columns: repeat(4,auto);
  gap: 1em;
}
section div {
  width: 2em;
}

That places the grid cells at least 1em apart from each other. The separation distance can be greater than that, depending on other conditions beyond the scope of this post, but at a minimum they should be separated by 1em. (OK, let’s do one example: gap’s gaps are in addition to any margins on the grid cells, so if all the grid items have margin: 2px;, then the visual distance between grid cells would be at least 1em plus 4px.) By default, changes to the gap size causes resizing of the grid items, so that they fill their cells.

This all works because gap is actually shorthand for the properties row-gap and column-gap. The gap: 1em is interpreted as gap: 1em 1em, which is shorthand for row-gap: 1em; column-gap: 1em;. If you want different row and column gap distances, then something like gap: 0.5em 1em will do nicely.

Gap with Flexbox

Doing the same thing in a flexbox context gives you gaps, but not in quite the same way they happen in grids. Assume the same HTML as above, but this CSS instead:

section {
  display: flex;
  flex-wrap: wrap;
  gap: 1em;
}

The flexboxes are pushed apart by at least the value of gap here, and (thanks to flex-wrap) wrap to new flex lines when they run out of space inside their flex container. Changing the gap distance could lead to a change in the wrapping of the flex items, but unlike in Grid, changing gaps between flex items won’t change the sizes of the flex items. Gap changes can cause the flex wrapping to happen at different places, meaning the number of flex items per row will change, but the widths will stay the same (unless you’ve set them to grow or shrink via flex, that is).

Gap with Multi-Column

In the case of multicolumn content, there is bit of a restriction on gap: only column gaps are used. You can declare row gaps for multicolumn if you want, but they’ll be ignored.

section {
  columns: 2;
  gap: 1em;
}

Support

Support for gap, row-gap, and column-gap is surprisingly widespread. Mozilla’s had them since version 61, Chromium since version 66, and thanks to work by Igalia’s Sergio Villar, they’re coming to Safari and Mobile Safari soon (they’re already in the technology preview builds). So if your grid, flex, or multicolumn content needs a bit more space to breathe, get ready to fall into the gap!


The post Gaps? Gasp! appeared first on CSS-Tricks.

You can support CSS-Tricks by being an MVP Supporter.

How to Highlight Author’s Comments in WordPress

Featured Imgs 29

Do you want to highlight the author’s comments in WordPress posts on your website?

Highlighting the author’s comments in your WordPress blog can help you build engagement. Users are more likely to leave a comment when they see the author is actively participating in the discussion.

In this article, we’ll show you how to easily highlight the author’s comments in WordPress to boost engagement.

Highting comments by an author in WordPress blog posts

Why Highlight Author’s Comments in WordPress?

Comments are a great way to build user engagement on your website. If you want to get more comments on your articles, then you can encourage that by actively participating in the discussions.

For a new WordPress blog, you can easily reply comments during comment moderation. If you run a multi-author blog, then you can encourage authors to take part in the discussion as well.

However, most WordPress themes don’t distinguish between comments and list them using the same style.
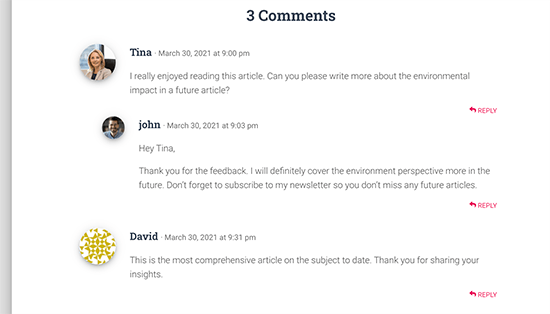
Regular comments layout with no author highlighting

A casual reader may scroll through the comments, not realizing the additional content contributed by the author in the discussion.

Highlighting author’s comments helps you remedy that and makes the author’s comments stand out and be more noticeable.

The ultimate goal here is to encourage new users to join in the comments and ultimately subscribe to your newsletter or become a customer.

That being said, let’s take a look at how to easily highlight author comments in WordPress.

Highlighting Comment Author in WordPress

The easiest way to highlight comments by post author is by adding custom CSS to your WordPress theme. This allows you to easily add the code needed and see a live preview of how it would look on your website without saving it.

First, you need to visit Appearance » Customize in WordPress admin area. This will launch the WordPress theme customizer interface. You’ll notice a bunch of options in a column on your left and a live preview of your website.
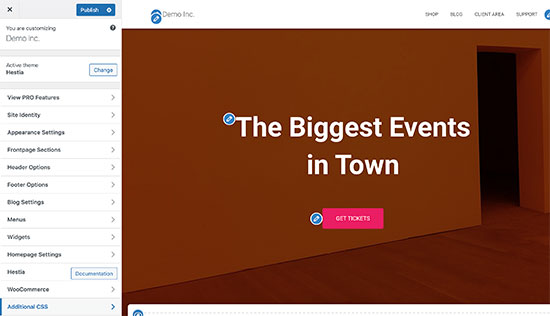
Theme customizer in WordPress

From here, you need to click on the Additional CSS tab. This will open a text area where you’ll be adding the Custom CSS.

Additional CSS tab

However, you would want to see how the custom CSS will look when applied. To do that, you need to navigate to a blog post that contains comments by a post author.
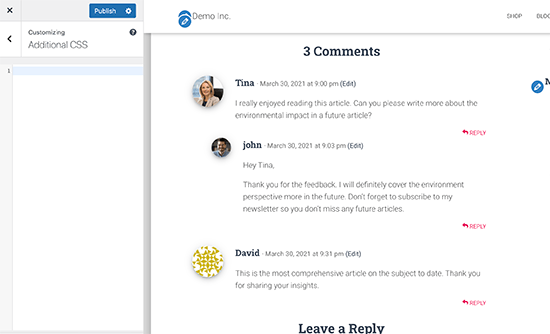
Viewing comments in Theme Customizer

Scroll down to the comments section and then add the following custom CSS in the Custom CSS box on the left.

.bypostauthor { 
background-color: #e7f8fb;
}

You’ll immediately notice the author comment change matching the Custom CSS you entered.
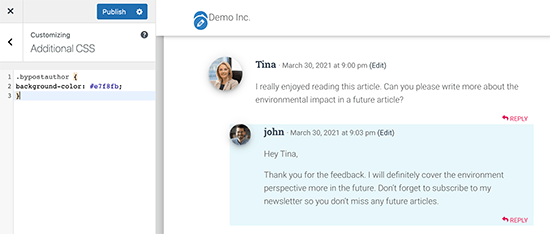
Author's comment highlighted with a different background color

So how does this all work?

You see WordPress adds some default CSS classes to different areas of your website. These CSS classes are there regardless of which WordPress theme you are using.

In this sample code, we have used the .bypostauthor CSS class which is added to all comments added by a post author.

Let’s add some more CSS styles to make it even more prominent. Here is a sample code that adds a small ‘Author’ label to the comments by the post author and a border around the author’s avatar image.

.bypostauthor:before { 
content:"Author";
float:right;
background-color:#FF1100;
padding:5px;
font-size:small;
font-weight:bold;
color:#FFFFFF;
}
.bypostauthor .avatar {
border:1px dotted #FF1100;
}

This is how it looked on our test website.
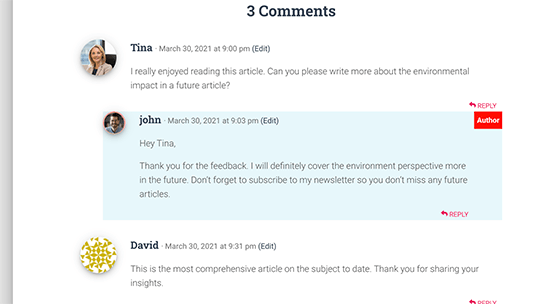
Comment author highlighted with the Author label

Highlighting Comments by User Role in WordPress

Now, many WordPress blogs have team members responsible for answering comments. Popular websites may have post author, administrator, and moderators all answering comments to boost user engagement.

How do you highlight a comment added by a staff member that is not the actual author of the post?

There is an easy hack to achieve that. However, it requires you to add custom code to your WordPress website. If you haven’t done this before, then see our article on how to easily add custom code in WordPress.

First, you need to add the following code to the code snippets plugin or your theme’s functions.php file.

if ( ! class_exists( 'WPB_Comment_Author_Role_Label' ) ) :
class WPB_Comment_Author_Role_Label {
public function __construct() {
add_filter( 'get_comment_author', array( $this, 'wpb_get_comment_author_role' ), 10, 3 );
add_filter( 'get_comment_author_link', array( $this, 'wpb_comment_author_role' ) );
}
 
// Get comment author role 
function wpb_get_comment_author_role($author, $comment_id, $comment) { 
$authoremail = get_comment_author_email( $comment); 
// Check if user is registered
if (email_exists($authoremail)) {
$commet_user_role = get_user_by( 'email', $authoremail );
$comment_user_role = $commet_user_role->roles[0];
// HTML output to add next to comment author name
$this->comment_user_role = ' <span class="comment-author-label comment-author-label-'.$comment_user_role.'">' . ucfirst($comment_user_role) . '</span>';
} else { 
$this->comment_user_role = '';
} 
return $author;
} 
 
// Display comment author                   
function wpb_comment_author_role($author) { 
return $author .= $this->comment_user_role; 
} 
}
new WPB_Comment_Author_Role_Label;
endif;

This code simply adds the user role label next to the comment author’s name. This is how it would look without any custom styling.
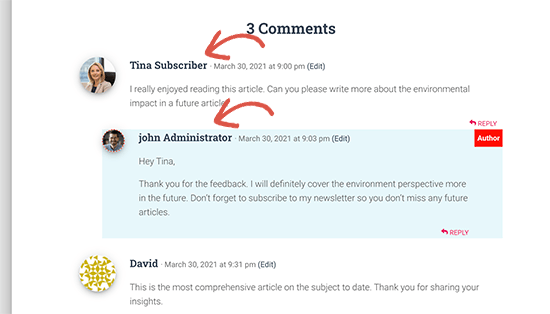
User role labels added to comments

Let’s make it a little prettier by adding some custom CSS. Go to Appearance » Customize page and switch to the Additional CSS tab.

After that, you can use the following CSS to style the user role label in the comments.

.comment-author-label {
    padding: 5px;
    font-size: 14px;
    border-radius: 3px;
}
 
.comment-author-label-editor {  
background-color:#efefef;
}
.comment-author-label-author {
background-color:#faeeee;
}
 
.comment-author-label-contributor {
background-color:#f0faee;   
}
.comment-author-label-subscriber {
background-color:#eef5fa;   
}
 
.comment-author-label-administrator { 
background-color:#fde9ff;
}

This is how it looked on our test site. Feel free to modify the code to match your theme’s colors and style.
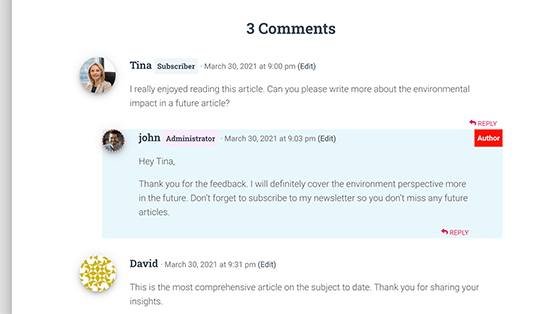
User role highlighted

For more details, you may want to read our article on how to add user role labels to WordPress comments.

We hope this article helped you learn how to highlight author comments in WordPress. Want to see how users interact with your website? See our tutorial on how to track user engagement in WordPress, and how to add web push notification on your WordPress site to grow your traffic.

If you liked this article, then please subscribe to our YouTube Channel for WordPress video tutorials. You can also find us on Twitter and Facebook.

The post How to Highlight Author’s Comments in WordPress appeared first on WPBeginner.

Graphic Designer Near Me: 5 Ways to Tell if They Are Worth Hiring

Featured Imgs 23

When you are searching for a graphic designer, you will find that there are plenty of choices out there. However, you need to know what makes a graphic designer a good one. How do you spot a professional graphic designer? What are some traits they would show?

Today, we’re going to discuss 5 ways to tell if the graphic designer is worth hiring for a job. 

Decide Between Freelance and In-House Graphic Designers

Before gathering up a pool of candidates for your project, you should consider what kind of graphic designer you want. Freelance graphic designers and in-house designers can both have the same amount of education and experience, but there are also places where they differ greatly. An in-house graphic designer is a great choice for brands who need a designer’s full attention. The downside to hiring an in-house designer is that you need to pay them even when you don’t need their skills. They also have a set capacity and are often specialized. 

Freelance graphic designers are usually far more flexible with what they can do. You can hire them whenever you need them, but they will be less familiar with your brand and marketing than an in-house designer. Unlike an in-house graphic designer, a freelancer may not always have the flexibility to expedite your projects. 

Know What You Need When Hiring 

Setting your expectations too high could make the hiring process much more stressful. So, first things first, understand what a graphic designer does for your company. Graphic designers are not web designers or developers in most cases. While they excel at crafting the feel of a brand with imagery, they will not code. Furthermore, graphic designers are not meant to shape your brand. They need your guidance. You may be lucky and find a graphic designer who is also a creative director or web developer, but you should assume that most will need input from you. 

Because of this, you need to have a firm idea of what kind of graphic designer you are looking for before you even begin interviewing. You won’t hire a logo designer if you need a brand book. Understand your brand identity—the color scheme, fonts, images, targeted demographics, etc. When you start searching, you will know which graphic designer is worth hiring based on their resume or CV and how well it matches your needs. 

Ask The Right Questions

So you have several graphic designers lined up. How do you choose the best of the bunch? You interview them. Ask questions about their experiences and their education. Some graphic designers might have excessive experience without ever receiving formal education, while others could have freshly graduated from university but a limited portfolio. Again, it depends on what you are looking for. 

Candidates should have proficiency in proper tools, namely Adobe Creative Cloud or similar software. If they don’t have experience with Adobe, they should display signs that they will quickly pick up the proper skills to do the work. 

Also learn about their adaptability. Ask them to give an example of a time when the scope of a project suddenly changed. A good graphic designer is one who can go with the tide. They cannot be too protective of the original idea in their head. Keep an eye out for candidates who seem resistant to changing or who struggled with the notion of adaptability. 

If you decide to go with a freelance graphic designer, ask them if they can handle two projects at once. A professional will include their time management techniques within their response. You want to know your graphic designer isn’t going to fumble the ball in times of stress. 

Evaluate Their Portfolio

The right designer for your brand or business may not always be the one with the most education. Sometimes, you will like someone based on their interview answers and quirkiness. That is why you should consider the interview only half of the whole hiring process. The next part is evaluating the portfolio. A designer worth hiring is always going to have a portfolio of samples. The pieces that they share will give you a clear idea of their personal aesthetic, their strengths and weaknesses, and how they interpret instructions. 

Evaluating a portfolio can be a bit challenging if this is your first time, so look for three things: relevant samples, design aesthetic, and experience. 

Relevant samples help you find the designer that is strongest in skills befitting your project. For instance, you wouldn’t choose a logo designer for a marketing ad. Some graphic designers might be good at it all, but others specialize. Always compare oranges to oranges. 

From there, take in their design aesthetic. Edgy brands are going to need edgy designers over those who prefer a toned down look. A whimsical designer won’t match a sophisticated brand, either. Another thing to look for is whether they keep up with the trends. Designs that look outdated could mean that the graphic designer is not continuing their education or in tune with design advancements. 

Lastly, the samples you see will show just how much experience someone has. If you are making a logo for a coffee shop, it helps to work with a designer who has worked with the restaurant industry. They will comprehend your needs better than someone with less experience in your field. 

Try a Small Project Before Committing 

After looking over a graphic designer’s portfolio and learning about their experiences, you will definitely have candidates. The next step to figuring out whether or not to hire them is to see what they can do for you. Give the graphic designer a small project. See how they listen to the instructions, use a specific drawing style, take criticism and feedback, and how well you communicate together. If they produce a satisfactory result without any mishaps, then you know you have someone you will enjoy hiring.

Unsure about what kind of small project to give them? The best is something that has already been designed, such as your business logo or a marketing piece. See how they revise the piece.

Wrapping Up

Finding a graphic design that suits your brand isn’t as hard as it seems at first. Keep these tips in mind! Have some questions ready to ask the candidates then evaluate their previous work. From there, you should have a good impression of one designer, especially when they match your brand aesthetic. 

11 Popular Marketplace APIs

Featured Imgs 23

Buyers and sellers of the world rejoice! Online marketplaces are the new normal, rapidly replacing fading shopping malls. Multiple sellers can now offer their goods in one sleek, centrally located place, and buyers can search and find desired products from multiple vendors and purchase them with one click, tap, or swipe--from their home, or from anywhere else.

help me to write this code?

558fe5180e0e8fc922d31c23ef84d240

Write a program that reads a telephone number from a file phnum.txt (available in lab folder) in
the form xxx-xxxx. The first three digits represent an area code and the next 4 digits represent
the phone number. Your task is to print these numbers into another file (outFile.txt) without any
space or - between the area code and the number. Your program should define a function that
has input and output file streams as arguments.
For example,
If the phone number is 042-5610, the output should be 0425610.

8+ Pre-Launch Checks for New WooCommerce Stores

Set Up Woocommerce

Pre-Launch Checks for New WooCommerce StoresLaunching an eCommerce store is a tedious task. There are so many things that need your attention, and there is very little that guarantees any success. From product imagery and website copy to store navigation and security certification — building an eCommerce store requires an eye-to-detail, and not to forget, immense effort and patience. Even […]

The post 8+ Pre-Launch Checks for New WooCommerce Stores appeared first on WPExplorer.

Splitting string into individual variables

558fe5180e0e8fc922d31c23ef84d240

Hi Group,

I'm using the split function for the very first time. I understand what it's doing. However I don't know how to output each individual word into a specific variable.

As an example, the string is "Dickerson Tile Company". I have defined 7 variables to accept up to 7 word splits.

Dim Search1, Search2, Search3 ...... Search7

Ultimately I want to output the split into

Search1 = "Dickerson"
Search2 = "Tile"
Search3 = "Company"

My code is currently

Dim s As String = tbxCustomerName.Text
Dim words As String() = s.Split(New Char() {" "c}) 'words are delimited with a space " "

This is where I'm struggling: How do I get my output into the individual buckets? My assumption is I would use an array or For statement. However I can't seem to find the correct syntax to create the name of the variable (Search1, Search2, etc.) and then to get the individual word into each variable. Can you help?

Thanks for your assistance.

Papa Don

Split a string into individual words

558fe5180e0e8fc922d31c23ef84d240

Hi Group,

I'm using the split function for the very first time. I understand what it's doing. However I don't know how to output each individual word into a specific variable.

As an example, the string is "Dickerson Tile Company". I have defined 7 variables to accept up to 7 word splits.

Dim Search1, Search2, Search3 ...... Search7

Ultimately I want to output the split into

Search1 = "Dickerson"
Search2 = "Tile"
Search3 = "Company"

My code is currently

Dim s As String = tbxCustomerName.Text
Dim words As String() = s.Split(New Char() {" "c}) 'words are delimited with a space " "

This is where I'm struggling: How do I get my output into the individual buckets? My assumption is I would use an array or For statement. However I can't seem to find the correct syntax to create the name of the variable (Search1, Search2, etc.) and then to get the individual word into each variable. Can you help?

Thanks for your assistance.

Papa Don

How to Fix the Deceptive Site Ahead Google Warning

Category Image 032

Fixing the Deceptive Site Ahead Google Warning MessageWhile surfing the web, you might have observed a google warning message as “Deceptive site ahead”. Whenever google recognizes a website for exposing personal user information it flags that website as “Deceptive”. Deceptive site warning creates a lot of negative impact on the website. It may even lead to a sudden loss of user traffic, […]

The post How to Fix the Deceptive Site Ahead Google Warning appeared first on WPExplorer.