GitHub Updates its Code Scanning API

Featured Imgs 23

The GitHub Code Scanning API, a service that is available for all public repositories and private repositories with advanced security enabled, has recently been updated. These updates provide access to more robust code data and alert statuses.

The updated API will now return additional status information when uploading a SARIF (Static Analysis Results Interchange Format) file, including “a pointer to the analyses endpoint for that result.” The API will also now support the ability to export files in SARIF format.

Recipe websites, data modeling, and user experience

Category Image 052

Simeon Griggs with some nice UX ideas for a recipe website:

  • No math. Swap between units and adjust servings on-the-fly.
  • Offer alternative ingredients.
  • Re-list the ingredient amounts when they’re referenced in the instructions.

I totally agree, especially on that last one:

Of all our improvements I think this is my favourite.

A typical recipe layout contains ingredients with amounts at the start. Then, a bullet point list of instructions to perform the method.

The method though typically does not reference those amounts again, so if you don’t prepare all your amounts ahead of time (which is what you’re probably supposed to do but come on who does that) you’ll have to keep scanning back and forward.

Part of what makes this stuff possible is how you set up the data model. For example, an ingredient might be an Array instead of a String so that you’re set up for offering alternatives right out of the gate.

Direct Link to ArticlePermalink


The post Recipe websites, data modeling, and user experience appeared first on CSS-Tricks.

You can support CSS-Tricks by being an MVP Supporter.

Barebones CSS for Fluid Images

Featured Imgs 23

Zach takes a look at some fundamental HTML+CSS usage for fluid, responsive images. Most of it, I’d say, is what you’d expect, but things get weird when srcset gets involved.

I poked my way through, and in addition to the weird thing Zach noted, wanted to add one more thing. Let’s start like this:

<img src="./img.jpg" alt="" />

With no other CSS involved, this renders at the “intrinsic size” of the image. Say the original image is 400px wide, it renders 400px wide.

We should be putting width and height attributes on images, because it allows the browser to make space for them even before they are downloaded (even when they are fluid, which is super cool). So:

<img src="./img.jpg" alt="" width="400" height="300" />

Also nothing terribly weird there. Even if we slap max-width: 100% in the CSS, that’ll do what we want: preserving space, behave fluidly, and not growing bigger than it should.

But let’s hold off on the max-width: 100% thing for a second. If we just use srcset and set up multiple sources.

<img src="./img.jpg" alt=""
     srcset="./img-200.jpg 200w, ./img-400.jpg 400w" />

BAM, we blow out the width of the thing.

That won’t render at 200px or 400px—it’ll actually render at 100vw, believe it or not. I think that’s because that’s the default sizes value. I normally think of the sizes attribute as not information about anything to do with actual layout, but just information for the browser to choose a source. But that’s not true here. It really does effect layout (in all browsers I tested). Here’s proof:

See the little one below it where all I change is the sizes.

Anyway that’s not what Zach honed in on, but it’s similar. Let’s put back the responsible thing and add in width and height attributes.

<img src="./img.jpg" alt="" width="200" height="137"
     srcset="./img-200.jpg 200w, ./img-400.jpg 200w" />

No more blowout (with or without sizes) but now we have a new weird problem. This is basically like saying max-width: 200px. Even though we have sources that are wider than 200px, we’ve capped the width at 200px. Zach puts it like:

Using max-width: 100% constrains the image to the container, but be careful when you use this with srcset—it may cap smaller than you want when using [width]! Pair with width: auto to fix this.

Zach’s final snippet is this, which I think reigns in all the weirdness:

img {
  max-width: 100%;
}
img[width] {
  width: auto; /* Defer to max-width */
}
img[width][height] {
  height: auto; /* Preserve Aspect ratio */
}

/* Let SVG scale without boundaries */
img[src$=".svg"] {
  width: 100%;
  height: auto;
  max-width: none;
}

Direct Link to ArticlePermalink


The post Barebones CSS for Fluid Images appeared first on CSS-Tricks.

You can support CSS-Tricks by being an MVP Supporter.

You want…

Category Image 052

I’ve been enjoying these little “You want…” style posts. Post titles like that are a little more… forceful for my normal taste, but I like the spirit of sharing a best practice that perhaps isn’t well-known-enough.

Got an idea along these lines? You should blog it! Here or elsewhere.


The post You want… appeared first on CSS-Tricks.

You can support CSS-Tricks by being an MVP Supporter.

problem with zuEuz server

558fe5180e0e8fc922d31c23ef84d240

Hello ..

i have created an asp net web app (.Net FrameWork ) website local "which has connection with my local sql database " on my device and i want some other client to work on it remotly ... i have tried to get IIS but faced different some problems in it ...

so i have used zuEuz server instead ... but still facing same problem in accessing it remotly however i have managed to get it work on my pc and my devices connected to same network ...

i have done the followig ::

assigning firewall port for it ..
changed my router port to allow it ...

but when someone tries to access it remotly it gets thet page that it took long time to reposne how to solve that ...

thanks

Anglia Components Launches Product Database API

Featured Imgs 23

Anglia Components, one of the UK’s largest providers of electronic components, has launched a new API that will provide access to the company’s product database. Developers can utilize the API to integrate inventory, pricing, and availability data into third-party systems.

Additionally, this new resource provides access to delivery lead time data and long-term product availability information.

Maximally optimizing image loading for the web in 2021

Featured Imgs 25

Malte Ubl’s list for:

8 image loading optimization techniques to minimize both the bandwidth used for loading images on the web and the CPU usage for image display.

  1. Fluid width images in CSS, not forgetting the height and width attributes in HTML so you get proper aspect-ratio on first render.
  2. Use content-visibility: auto;
  3. Send AVIF when you can.
  4. Use responsive images syntax.
  5. Set far-out expires headers on images and have a cache-busting strategy (like changing the file name).
  6. Use loading="lazy"
  7. Use decoding="async"
  8. Use inline CSS/SVG for a blurry placeholder.

Apparently, there is but one tool that does it all: eleventy-high-performance-blog.

My thoughts:

  • If you are lazy loading, do you really need to do the content-visibilty thing also? They seem very related.
  • Serving AVIF is usually good, but it seems less cut-and-dry than WebP was. You need to make sure your AVIF version is both better and smaller, which feels like a manual process right now.
  • The decoding thing seems weird. I’ll totally use it if it’s a free perf win, but if it’s always a good idea, shouldn’t the browser just always do it?
  • I’m not super convinced blurry placeholders are in the same category of necessary as the rest of this stuff. Feels like a trend.

Direct Link to ArticlePermalink


The post Maximally optimizing image loading for the web in 2021 appeared first on CSS-Tricks.

You can support CSS-Tricks by being an MVP Supporter.

Transferito: Easy WordPress Transfers & Migrations

Featured Imgs 14

Transferito for Easy WordPress Transfers & MigrationsAre you looking to migrate your WordPress website? If so, you’ll love today’s review of a brilliant migration tool and plugin created by Transferito. There are countless reasons why you would want to migrate your website. Perhaps your current host sucks and you’ve had enough of their shenanigans. Perhaps you were developing your site locally […]

The post Transferito: Easy WordPress Transfers & Migrations appeared first on WPExplorer.

How to Send Confirmation Emails after WordPress Form Submission

Category Image 091

Are you looking to send confirmation emails after a user submits a form on your website?

Confirmation emails can be a great way to let users know that you received their message, and that you’ll be in touch soon.

In this tutorial, we’ll show you how to send confirmation emails to your users after a WordPress form submission (step by step).
How to send confirmation emails after WordPress form submission

Why Set Up Automated Confirmation Emails in WordPress?

Confirmation emails are sent when a user fills out a contact form or another form on your WordPress site.

Sending an automated confirmation email is a nice gesture. Plus, it lets your users know you’ve received their information. This also lets your users double-check their entries to see if any errors were made.

There are a lot of good reasons to set up WordPress form confirmation emails:

  • Allows you to open a line of communication with your subscribers
  • Can provide valuable follow-up information, like links and tutorials
  • Let’s you confirm the email is a real email
  • Can confirm email newsletter subscription and start an autoresponder sequence
  • If you’re selling something, this gives you a chance to offer an upsell or cross-sell
  • It’s great for your email deliverability

The best part is that setting up a WordPress form submit email is easy to do.

Setting Up Confirmation Emails after WordPress Form Submission

For this tutorial, we’ll be using the WPForms plugin to send a WordPress confirmation email. It is the best contact form plugin for WordPress used by over 4 million websites.

If you’re on a budget, you can use the free version called WPForms Lite, which allows you to set up email confirmations.

However, the Pro version will give you access to even more features like conditional logic forms, additional templates, order forms, integration with email marketing tools, and much more.

The first thing you’ll need to do is install and activate the WPForms plugin. For more details on installing a plugin, see our step by step guide on how to install a WordPress plugin.

Once you’ve installed and activated the form builder plugin, you’ll have a new WPForms tab on the left-hand side of your WordPress dashboard.
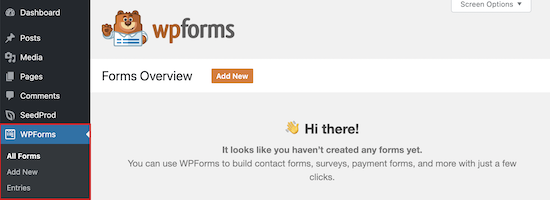
WPForms plugin install menu

If you don’t already have a form on your site, then you’ll need to create one. We have a detailed tutorial on how to create a WordPress contact form that you can use as a guide to get started.

Next, it’s time to set up a WordPress confirmation email. This email will send out automatically and lets your users know their form submission was successfully received.

To do this, head over to WPForms » Settings » Notifications.
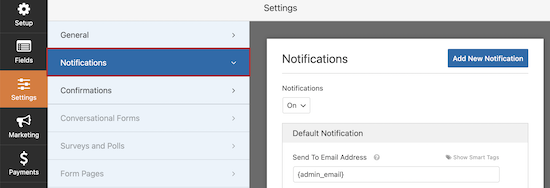
You’ll notice that email notifications are already on.

If you don’t want to turn on notifications, then you can toggle this option off.
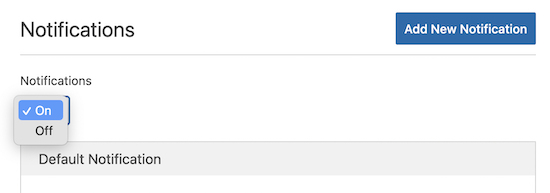
Leave notifications toggle on

If you want to send an automated confirmation email, then you’ll need to leave this setting turned on.

Next, we’re going to choose who we want our emails to send to by customizing the form fields.

The default setting will use the admin email Smart Tag {admin_email}. This is the email you used to set up up your WordPress blog. This will deliver all form submissions directly to your inbox.

To make sure that form responses also get delivered to your users, you’ll need to add new email address to the email field. This is similar to how blind carbon copy (BCC) works in standard emails.

To do this, simply click on the ‘Show Smart Tags’ option that’s directly to the right of the ‘Send to Email Address’ field.
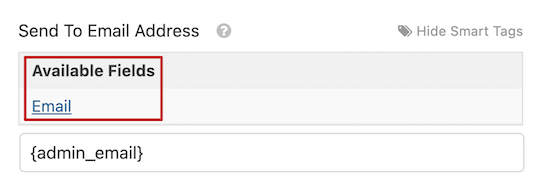
Send to email address field

You need to select ‘Email’ from the drop-down menu.

This tags your user’s email address that they enter into your WordPress form. The plugin will use this email address to send the confirmation email.

Note, that you’ll need a comma between the two Smart Tags.

Send to user and admin email address

Next, it’s time to change the subject line of your email.

The default email subject line is “New Entry”. You’ll want to change this to something that makes sense for your user.

Default email subject line

For example, if you have a simple contact form, you can change the subject line to something like, “Thanks for Reaching Out!”. Or, if it’s an order confirmation email, “Thank You for Your Order!”.

To change it, delete the existing text that’s in the box beneath ‘Email Subject’ and add your new subject line.

Change email subject line

Now, you’re ready to change the email from name.

It makes sense to use your company or website name here.

To do this simply change the text in the ‘From Name’ box.

Change email from name

Next, you have the ‘From Email’ field.

You can leave this as is, and the email will be the same as your admin email.

Admin from email

After that, you’ll want to change the ‘Reply-To’ field, so your users can respond to your automated email.

If you leave this blank, then the email will be the same as the default admin email.

Reply to email

It’s not necessary to change it, but there are some situations where you’ll want the Reply-To email to be different than your standard email address.

For example, if you have a photography website, and you have a form for new clients to request a quote, then you may want these emails to go to a different email address.

The final step is customizing your email message.

In the ‘Message’ box you can write out the email that will send to everyone who submits the form. You can also change the appearance of your plain text emails by adding HTML.
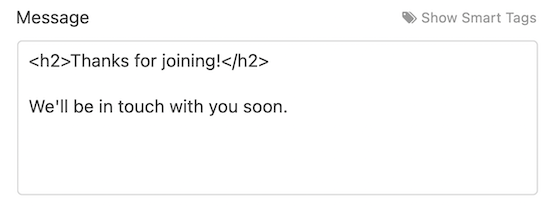
Custom email message

You can also include the {all_fields} Smart Tag which will add on the user-submitted information to the email.
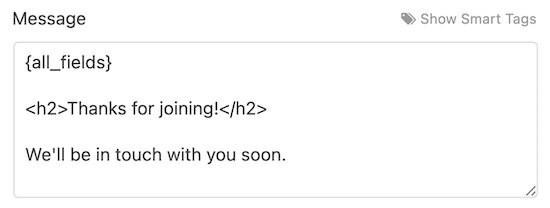
Custom email message with all fields

Congratulations, you’ve successfully installed and set up WPForms, added a form to your site, and set up an automated email confirmation message.

Troubleshooting WordPress not Sending Email Issue

One big issue that a lot of WordPress users experience is where your website will stop sending your WordPress emails.

WordPress uses PHP to send emails, which can be falsely flagged as spam. If this happens to your emails, then they will never reach your user’s inbox, or they’ll end up in the spam folder.

This is why we recommend everyone use SMTP for sending emails in WordPress. An SMTP plugin adds another level of verification and sends emails via an official mail server.

We recommend using WP Mail SMTP. It perfectly integrates with WPForms and is the best SMTP WordPress plugin.

We hoped this article helped you learn how to send confirmation emails after a WordPress form submission. You may also want to see our guide on creating a contact form with multiple recipients, and our expert pick on 24 must-have WordPress plugins for business websites.

If you liked this article, then please subscribe to our YouTube Channel for WordPress video tutorials. You can also find us on Twitter and Facebook.

The post How to Send Confirmation Emails after WordPress Form Submission appeared first on WPBeginner.

Visual studio – Add static string to text in a cycle

558fe5180e0e8fc922d31c23ef84d240

Hi, all I've a question, i have a series of links and need to put it in a specific point of a static string, that will need to stay with every cycle and don't want to lose it I make this one till now:

Public Class Form1
    Private Sub Button1_Click(sender As Object, e As EventArgs) Handles Button1.Click
        For Each line As String In TextBox1.Lines
            TextBox2.Text = "[link ]" & "(" & TextBox1.Text & ")" & vbCrLf
        Next
    End Sub
End Class

The problem I'm encounting it's when i put text in the first one textbox (That I use as input for after convert with a button and on the other one textbox2 will give me the result) for ex:
Textbox1 text
https first link
http second link
but the result will be that, only the first line, link will be correctly inserted inside of it. How can I fix it, keeping that string also for others too, because there are a lot of it, and also it's possible to make sure that if I'll put ex:
google - https first link
yahoo - http second link
The program find by itself the link part and add this static string ? ex:
google - (link ) (https first link)
yahoo - (link) (https second link)
Thank you in advice.

Uploading files to forum

Featured Imgs 23

Hello. I'm busy with something for which I opened a forum topic. Now, I'm trying to upload some pictures but I can't succeed. It says the files are to big. What are the ways to do this?

Thanks

Leon

INSERT UPDATE process not working

Category Image 101

I have a snippet that inserts data in a row in a MySql database. If that data already exists the existing row should be updated. In my case, I continue to get insert only. What is wrong with this snippet?

Legalesign Launches New Real-Time Events API

Featured Imgs 23

Legalesign, a provider of esignature services that are aimed at enterprise businesses, has launched a new API: Legalesign Firehose. This new real-time events API provides developers with esignature integration capabilities and implements OAuth 2.0.