Fastly Launches Developer Hub for its Cloud Platform

Fastly, a provider of an edge cloud platform, today announced the launch of its new Developer Hub, a central place for developers to easily access all the tools they need to build fast, scalable, and secure modern applications on the Fastly edge cloud platform. Housed within the Developer Hub is a testing sandbox, ready-to-deploy code snippets, and a growing repository of structured tutorials, reference materials, and documentation.

Shinobi Blocks WordPress Plugin Adds How-To and FAQ Blocks

Shinobi Works, a web development and illustration company based in Japan, released Shinobi Blocks last week. It is the second plugin the team has added to the WordPress plugin directory. The plugin is a block collection that currently has two blocks for creating how-to and FAQ sections on a site.

Overall, the blocks work well. The developers also make sure to only load any scripts or styles on the front end when the blocks are in use, so it should not add any weight to page speed across the site.

The largest downside of the plugin is that neither of its blocks has wide or full alignment options. This is one feature that I am hoping more block developers begin to add support for. It takes minimal code and would make blocks more flexible for end-users. The workaround is to wrap the blocks in a core Group block and add alignment to it.

As a user, I would like to see the How-To block split into its own, single-purpose block. It would be a nice addition to the official WordPress block directory as a standalone solution for users.

Right now, there seems to be a bit of a mad race toward who can build the biggest block collection plugins. It is unclear what the future of Shinobi Blocks holds. Given that it is early in its life as a plugin, I would urge the plugin authors to consider building single-use blocks. This way, users can install only the blocks they need on their sites.

In this particular case, the How-To block would make a good option as a single block plugin. As for the FAQ block, users can find such blocks in several other plugins with more options.

How-To Block

The plugin’s How-To block is what drew me in. Its purpose is to allow end-users to provide step-by-step instructions with both a text block and an image for each step. It is a pattern that is common on sites such as wikiHow and other tutorial websites.

The design of the block is well thought out and easy to use. For more complex tutorials, users can split their how-to into multiple sections, each with their own steps. In tests against several themes, I ran into no issues inputting custom content in the editor and it appearing correctly on the front end.

The plugin provides an option to change the dot type, which is the number for each step. Users can choose between displaying numbers or using an icon for individual steps. The available icons are from the core WordPress Dashicons set. The color of the dot type can also be customized. By default, it displays a gradient, but the user can select a solid color if preferred.

The downside of the available color options is the block does not make use of the active theme’s color palette if registered. Using this would help the block better blend into the user’s current site design.

One option that I would add is to allow the user to input optional, additional text below the image while using the main text as a sort of headline. This would provide more flexibility for how-to instructions that need more information. However, it would also add an extra layer of complexity that may not be desired.

FAQ Block

Screenshot of the Shinobi Blocks FAQ block's front end output.
FAQ block accordion on the front end.

The FAQ block almost feels like an afterthought. It does not have the level of detail that was put into the How-To block. There are no color or other options for changing the design. It is basically a bare-bones tabbed accordion. The block works well enough for what it needs to do. Nevertheless, it still feels like a letdown after tinkering with the plugin’s first block.

Inputting content on the admin side is simple. Both the question and answer inputs are rich text fields, which allow the same formatting as a standard Paragraph block.

Each inner block for the FAQ block offers a single option that allows users to choose whether to display the tab in an open state. One issue I ran into with disabling this option is that it closes the tab in the editor, which essentially disabled editing the answer’s content for the item, at least until I re-ticked the checkbox.

It is not a poorly-designed block. For the most part, I would rather see the How-To and FAQ blocks split into separate, standalone block plugins. They serve two different purposes and would allow users to install just the pieces that they need.

Block Links: The Search for a Perfect Solution

I was reading this article by Chris where he talks about block links — you know, like wrapping an entire card element inside an anchor — being a bad idea. It’s bad accessibility because of how it affects screen readers. And it’s bad UX because it prevents simple user tasks, like selecting text.

But maybe there’s something else at play. Maybe it’s less an issue with the pattern than the implementation of it. That led me to believe that this is the time to write follow-up article to see if we can address some of the problems Chris pointed out.

Throughout this post, I’ll use the term “card” to describe a component using the block link pattern. Here’s what we mean by that.

Let’s see how we want our Card Components to work:

  1. The whole thing should be linked and clickable.
  2. It should be able to contain more than one link.
  3. Content should be semantic so assistive tech can understand it.
  4. The text should be selectable, like regular links.
  5. Things like right-click and keyboard shortcuts should work with it
  6. Its elements should be focusable when tabbing.

That’s a long list! And since we don’t have any standard card widget provided by the browser, we don’t have any standard guidelines to build it. 

Like most things on the web, there’s more than one way to make a card component. However, I haven’t found something that checks all the requirements we just covered. In this article, we will try to hit all of them. That’s what we’re going to do now!

Method 1: Wrap everything an <a>

This is the most common and the easiest way to make a linked card. Take the HTML for the card and wrap the entire thing in an anchor tag.

<a href="/">
  <!-- Card markup -->
</a>

Here’s what that gives us:

  1. It’s clickable.
  2. It works with right-click and keyboard shortcuts.

Well, not great. We still can’t:

  1. Put another link inside the card because the entire thing is a single link
  2. Use it with a screen reader — the content is not semantic, so assistive technology will announce everything inside the card, starting from the time stamp
  3. Select text

That’s enough 👎 that we probably shouldn’t use it. Let’s move onto the next technique.

Method 2: Just link what needs linking

This is a nice compromise that sacrifices a little UX for improved accessibility.

With this pattern we achieve most of our goals:

  1. We can put as many links as we want. 
  2. Content is semantic.
  3. We can select the text from Card.
  4. Right Click and keyboard shortcuts work.
  5. The focus is in proper order when tabbing.

But it is missing the main feature we want in a card: the whole thing should be clickable! Looks like we need to try some other way.

Method 3: The good ol’  ::before pseudo element

In this one, we add a ::before or ::after element, place it above the card with absolute positioning and stretch it over the entire width and height of the card so it’s clickable.

But now:

  1. We still can’t add more than one link because anything else that’s linked is under the pseudo element layer. We can try to put all the text above the pseudo element, but card link itself won’t work when clicking on top of the text.
  2. We still can’t select the text. Again, we could swap layers, but then we’re back to the clickable link issue all over again.

Let’s try to actually check all the boxes here in our final technique.

Method 4: Sprinkle JavaScript on the second method

Let’s build off the second method. Recall that’s what where we link up everything we want to be a link:

<article class="card">
  <time datetime="2020-03-20">Mar 20, 2020</time>
  <h2><a href="https://css-tricks.com/a-complete-guide-to-calc-in-css/" class="main-link">A Complete Guide to calc() in CSS</a></h2>
  <p>
    In this guide, let’s cover just about everything there is to know about this very useful function.
  </p>
  <a class="author-name" href="https://css-tricks.com/author/chriscoyier/" target="_blank">Chris Coyier</a>
    <div class="tags">
      <a class="tag" href="https://css-tricks.com/tag/calc/" >calc</a>
    </div>
</article>

So how do we make the whole card clickable? We could use JavaScript as a progressive enhancement to do that. We’ll start by adding a click event listener to the card and trigger the click on the main link when it is triggered.

const card = document.querySelector(".card")
const mainLink = document.querySelector('.main-link')


card.addEventListener("click", handleClick)


function handleClick(event) {
  mainLink.click();
}

Temporarily, this introduces the problem that we can’t select the text, which we’ve been trying to fix this whole time. Here’s the trick: we’ll use the relatively less-known web API window.getSelection. From MDN:

The Window.getSelection() method returns a Selection object representing the range of text selected by the user or the current position of the caret.

Although, this method returns an Object, we can convert it to a string with toString().

const isTextSelected = window.getSelection().toString()

With one line and no complicated kung-fu tricks with event listeners, we know if the user has selected text. Let’s use that in our handleClick function.

const card = document.querySelector(".card")
const mainLink = document.querySelector('.main-link')


card.addEventListener("click", handleClick)


function handleClick(event) {
  const isTextSelected = window.getSelection().toString();
  if (!isTextSelected) {
    mainLink.click();
  }
}

This way, the main link can be clicked when no text selected, and all it took was a few lines of JavaScript. This satisfies our requirements:

  1. The whole thing is linked and clickable.
  2. It is able to contain more than one link.
  3. This content is semantic so assistive tech can understand it.
  4. The text should be selectable, like regular links.
  5. Things like right-click and keyboard shortcuts should work with it
  6. Its elements should be focusable when tabbing.

We have satisfied all the requirements but there are still some gotchas, like double event triggering on clickable elements like links and buttons in the card. We can fix this by adding a click event listener on all of them and stopping the propagation of event.

// You might want to add common class like 'clickable' on all elements and use that for the query selector.
const clickableElements = Array.from(card.querySelectorAll("a"));
clickableElements.forEach((ele) =>
ele.addEventListener("click", (e) => e.stopPropagation())
);

Here’s the final demo with all the JavaScript code we have added:

I think we’ve done it! Now you know how to make a perfect clickable card component.

What about other patterns? For example, what if the card contains the excerpt of a blog post followed by a “Read More’ link? Where should that go? Does that become the “main” link? What about image?

For those questions and more, here’s some further reading on the topic:

The post Block Links: The Search for a Perfect Solution appeared first on CSS-Tricks.

Blocksy Review – An Innovative, Gutenberg Ready and 100% Free WordPress Theme

This post is originally published on Designmodo: Blocksy Review – An Innovative, Gutenberg Ready and 100% Free WordPress Theme

Blocksy Review - An Innovative, Free WordPress Theme

If you’re on the lookout for a fresh Gutenberg WordPress theme that will make your website look great but also give you rich customization options, then perhaps you should give Blocksy a look. In this Blocksy review, we take a …

For more information please contact Designmodo

How to Convert a Date String into a Human-Readable Format

I’ll be the first to admit that I’m writing this article, in part, because it’s something I look up often and want to be able to find it next time. Formatting a date string that you get from an API in JavaScript can take many shapes — anything from loading all of Moment.js to have very finite control, or just using a couple of lines to update it. This article is not meant to be comprehensive, but aims to show the most common path of human legibility.

ISO 8601 is an extremely common date format. The “Z” at the end means the time in ISO 8601 format is using the UTC standard, i.e. no timezone. Here’s an example: 2020-05-25T04:00:00Z. When I bring data in from an API, it’s typically in ISO 8601 format.

If I wanted to format the above string in a more readable format, say May 25, 2020, I would do this:

const dateString = '2020-05-14T04:00:00Z'

const formatDate = (dateString) => {
  const options = { year: "numeric", month: "long", day: "numeric" }
  return new Date(dateString).toLocaleDateString(undefined, options)
}

Here’s what I’m doing…

First, I’m passing in options for how I want the output to be formatted. There are many, many other options we could pass in there to format the date in different ways. I’m just showing a fairly common example.

const options = { year: "numeric", month: "long", day: "numeric" }

Next, I’m creating a new Date instance that represents a single moment in time in a platform-independent format.

return new Date(dateString)

Finally, I’m using the .toLocaleDateString() method to apply the formatting options.

return new Date(dateString).toLocaleDateString(undefined, options)

Note that I passed in undefined. Not defining the value in this case means the time will be represented by whatever the default locale is. You can also set it to be a certain area/language. Or, for apps and sites that are internationalized, you can pass in what the user has selected (e.g. 'en-US' for the United States, 'de-DE' for Germany, and so forth). There’s a nice npm package that includes list of more locales and their codes.

Hope that helps you get started! And high fives to future Sarah for not having to look this up again in multiple places. 🤚

The post How to Convert a Date String into a Human-Readable Format appeared first on CSS-Tricks.

7 Reasons to Use Illustrations on Your Website (And Examples of How to Do It)

When building a new website, one of the very first decisions you’ll need to make is: 

What kind of visual style do you want to use? 

Does the practical and realistic nature of photographs fit well with your brand? Or does it make more sense to turn to a more abstract and creative approach and use illustrations instead? 

If you decide that you want to take the illustrative approach, keep in mind that it comes in many different forms. As a result, a very different style and story can be depicted from illustrated website to illustrated website. 

This is something we’ve accounted for when creating our pre-built sites for BeTheme. We wanted to reflect a wide array of illustration styles so our customers not only get to see how diverse this visual style is, but also have a robust source of inspiration for their own designs. 

We’re not alone. There are many great websites out there that creatively use illustrations. And, today, we’re going to take a look at a number of them as we explore the seven reasons why you may want to use illustrations to style a website:

1. When a photograph can’t fully capture a complicated subject

If you’ve ever tried to find a photo for a brand and struggled to pick out something that accurately reflected who they were or what they did, it’s probably because the subject was too difficult to capture. 

That can mean any number of things. 

It could mean that the subject itself is too difficult to photograph. Copywriters are a good example of this. While they could get someone to photograph them while typing away on their computer, there’s nothing very exciting about that. A photograph would simply capture the mundane task of writing, which is what the client would be trying to avoid. 

If you take a look at the BeCopywriter 2 pre-built site, you’ll see that an illustrative style is a much better way to approach this: 

The design is striking. The words are powerful. And the illustrative touches add a unique touch to the overall look. 

There are other kinds of websites that would be better off with illustrations if their subjects are too complicated to capture. Take, for instance, a recycling services company like WeRecycle

While it’s possible to pick out images or take real-life photos of recycling, that doesn’t fully capture what this company does. Rather than focus on individual scraps of trash, illustrations enable companies like these to give website visitors the full scope of what they do. 

It’s a much more powerful image, to say the least. 

2. When a brand has a unique look that requires a unique approach

Every brand has its own style and personality. Without a unique edge, it would be hard for consumers to differentiate between similar solutions. 

That said, some companies have styles that are way out there, which means that some of the traditional rules of web design can get thrown out the window. 

One way we see this happening is when photographs and illustrations blend. This allows a brand with a surreal, edgy, imaginative, or whimsical look to leverage the traditional elements of design while shaking things up. 

For example, this is how the BeFoodTruck pre-built site handles it: 

The illustrations are a unique choice for a business in the food industry, which would instantly make this site a standout. That said, without real photos of food, it would be difficult to convince customers to dine in or out. 

That’s why the balance between the two styles works so well. 

Handwrytten is a website that uses a similar balance between real photos and eye-catching illustrations:

In this case, the illustrations are animated, which gives the homepage yet another unique twist. This concept alone is already quite innovative and now they have a site to match it.

3. When a company wants to stand out from photo-strewn sites

When it comes to certain industries, the expectation is that their websites will have a similar look to them. 

Take the travel and hospitality industries, for instance. Because they’re in the business of selling in-person experiences — or telling stories about them — you’d figure that photos are the only option for those websites. 

But if your website is trying to compete amongst an endless supply of lookalike companies, using illustrations may be the thing that sets them apart. 

Case in point, BeJourney 2

Although the site isn’t complete devoid of photos, the majority of it is designed with illustrations or illustrative touches. 

Bateau Mon Paris is a boat rental company in France that takes a similar approach: 

You can see the peekaboo photo poking out there, but, for the most part, this website’s main visual style is illustration. 

4. When a new company wants to leverage the style of a brand that consumers already trust

You see this quite often when brand new companies enter high-risk spaces. They design their branding and website to be reminiscent of a well-established company that customers already trust. 

That way, there’s an unconscious association in prospects’ minds between the two companies and it eases the concerns and doubts that often arise when working with a new company.

One such company’s website that became the standard for other software companies entering the space is Stripe

Stripe’s illustrative style (as well as its choice to use gradients) has been copied for years. And it’s been a good look to emulate. 

Our BePay 2 site takes the trust-building elements that we see in Stripe and puts a unique spin on them:

The site is designed using illustrations, including the mobile application images. The color blue is also prevalent, which is a color that’s symbolic of stability and trust. 

5. When a creator has an interesting story and work to share

Although you’ll find some design agencies and web developers who use photos of themselves and their teams on their websites, many times creative types use illustrations instead. 

One reason why they go this route is because it’s another way to flex their creative muscles and to show prospective clients what they can do. 

Another reason takes us back to point #1 in this post. Unless they have a large team and an interesting-looking studio they work from, photos aren’t going to be the most exciting way to capture what it is they do.  

The BeBand 5 pre-built site, for example, uses illustrations and animations to give its site an 80s-style look. 

Unless band members are in the habit of dressing up like rockers from the 80s, photos wouldn’t accurately capture the style of music the band plays. But this unique illustrative style certainly does and also proves useful in drawing attention over to their music. 

 Artist Polly Kole has taken a unique approach to building an illustrative website:

In addition to the dramatic and intriguing look of the site, it’s interactive too. It’s almost as though the site emulates the experience of going to look at art (maybe not the interacting part, but being able to walk around it).

6. When a company is selling a smart app or resource

Companies that sell “smart” tools to users commonly design their websites with illustrations instead of photographs. And it makes a lot of sense. 

For one, these companies aren’t really selling the product itself. While the experience inside an app or using a device matters, what they’re selling on a website is a solution to the users’ problems which often involves managing a lot of data. That’s not an easy thing to depict with photos. 

Another reason they use illustrations — or, more specifically, vector graphics — is because geometric styling is a good way to give a website a stable and logical feel. 

BeApp 6 uses data visualizations to really hammer home the strengths of the app: 

While designers could use screenshots from within their apps to do something similar, this approach enables them to highlight important elements within the product in an attractive way.

Swiggy Labs builds products that solve big problems for consumers: 

While the designer of the site could’ve chosen to display the actual products they’ve built, this is a much more interesting approach. When you drag the “Swiggy It” toggle to the right, the hero image comes to life with animations and messages that allude to what the company does.

7. When a brand’s target audience is children (or their parents)

This is another no-brainer use case for illustrations on the web. Considering how comfortable children are with cartoons, games, and apps, an illustrative style is much more relatable when trying to reach this audience — or even their parents. 

You might also argue that illustrations are presented in a manner that’s easier for kids to understand because of how much better illustrations are able to simplify a complex subject.

BeLanguage 3 is an interesting case because it’s a language learning website:

You might argue that illustrations are a universal language. You don’t need to understand English or Japanese or Italian in order to understand what is going on with a website or the company it represents when illustrations tell the story. 

Other kinds of organizations that serve children or their families can use illustrations to simplify language and strengthen their sales pitch as See Make Play does: 

The illustrations on this site give it a fun and youthful quality. In this particular part of the homepage, the illustrations are static images. However, elsewhere on the page, parents and their kids will encounter animated graphics that bring a lighthearted touch to this site. 

Will you use illustrations to style your website?

If you’re finding it difficult to use photography to tell your brand’s visual story or are thinking about pursuing something a little less conventional, illustration might be the solution. 

As you can see in the websites from BeTheme and others around the web, illustrated websites are in no short supply. And, yet, whenever you encounter one, they tend to have a unique look you can’t help but look away from. 

If you want to make your website really stand out, an illustrated website would be a fantastic style to experiment with.

7 Reasons to Use Illustrations on Your Website (And Examples of How to Do It) was written by Bogdan Sandu and published on Codrops.

5 Tips for Streamlining Your Freelance Workflow

When you work as a freelancer, it’s essential to save time in your workflow wherever you can. After all, it’s likely that you’re required to wear many hats every single day. From marketing to finances, freelancers are in charge of steering their own ships – and that means being well-rounded business managers. And that’s on top of the actual workload you have. You know, the tasks that actually earn you an income?

Again, that’s why streamlining operations as much as possible is so important. You should be spending most of your work time completing assignments that make money. So, the more you can limit the time you need to spend on day-to-day operations the better. What follows are five tips and suggestions for streamlining your freelance workflow starting immediately.

The Freelance Designer Toolbox

Unlimited Downloads: 500,000+ Web Templates, Icon Sets, Themes & Design Assets
All starting at only $16.50 per month


1. Use a Project Management Tool

If you do nothing else on this list, setting up a project management tool alone will save you a ton of time. Why? Because these tools already eliminate the need for so many other apps and software.

For instance, some tools allow you to add projects, create milestones or tasks for each project, and assign tasks to other people. These tools are also helpful for organizing assignments, creating priorities, and tracking progress. The “at-a-glance” ability project management tools make it easy to see where you’re at on your projects, keep tabs on how projects are progressing, and manage all related files and communication.

The latter point is the most time-saving, in my opinion, because you’ll no longer have to hunt through emails to find that PDF a client sent over as a reference or the login information to someone’s WordPress site. It’ll all be stored safely in one spot for quick-access and reference at any time.

A few popular choices for project management tools include Trello, Asana, and Basecamp. Personally, I use Trello to keep track of my assignments, due dates, article specifications, and client information.

A sign that reads "PROJECTS".

2. Streamline Communication

This ties into number one on our list but it warrants its own section. One of the things that can take up most of your time as a freelancer is correspondence. Responding to messages is time-consuming enough, but add in the actual wrangling of messages and you’ve got a huge time suck on your hands.

Many project management tools include chat or commenting features. However, if you need a live chat option, Slack is always a good choice. This app allows you to create channels for talking with clients and colleagues. With paid plans, you should be able to create dedicated channels for each of your clients. This makes it super easy to stay in touch and to ask questions (or answer them) quickly. It has an accompanying desktop and mobile app as well, so communicating is easy and intuitive.

Basically, if you want to free up some time, ditch emails for good.

A chat application on a smartphone.

3. Create a Project Scope Document for Each Project

Scope creep is a real problem for freelancers. And it happens all too often. You start out on a project with an idea of what it will entail. Cut to a few weeks later and you’re five rounds of edits in with no end in sight. When the scope of a project continually expands, you lose time and money.

To prevent this issue, take the extra time at the beginning of your projects to write up a quick project scope document. After having initial talks with your client, write out what you both agreed the project would involve. Send it to the client for review. Detail the number of revisions you’ll cover before additional fees are required.  After you both agree upon the document’s contents, you can begin working in confidence.

People viewing documents.

4. Automate Invoicing and Finances

Dealing with the financial part of your freelance business can be super time-consuming. But it doesn’t have to be if you use the right tools. First of all, don’t spend hours manually creating invoices each month to send out to your clients. Use templates, for starters. Or better yet, use an invoicing service like FreshBooks, Harvest, or Invoicely to create, manage, and send invoices. In fact, you can configure these services to automatically send your invoices on a given date each month to save you even more time.

All of this financial info is compiled in a straightforward way as well, so it can be exported into your financial tracking software or linked directly to it so the data is updated in real-time without you having to lift a finger.

Dollar signs.

5. Eliminate Guesswork in Creating Media

A major part of doing work online is creating media. Now, certainly those in the graphic design field will need to create a lot more media and images than those who aren’t. But the need for media and graphics applies across the board. From writers to videographers, the need for stock images and graphical elements remain.

To save time, you can use a reliable source of images for everything. A one-stop shop, if you will. For that, I like to use Envato Elements, which streamlines how I find templates and graphics to accompany articles. With it, I source hundreds of photos, graphics, and media templates, which is a huge time saver for everything from marketing to actual client work.

Once you get your resource materials, you can customize as you see fit. Many use something like Photoshop for this work, but something simpler like Canva is highly effective, too.

A woman using a computer.

Make Your Freelance Workflow Easier

Hopefully you’ve found these five tips useful. With them, you can shave time off your freelance workflow and find ways to simplify how you do business. And at the very least, you’ll be more organized overall.

Best of luck to you!

How to Change the Text Color in WordPress (3 Easy Methods)

Recently, one of our readers asked if there was an easy way to change the text color in WordPress?

The answer is yes. You can easily change your font color in WordPress across your whole site, or even just for a single word inside your post content.

In this guide, we’ll show you how to easily change the text color in WordPress, step by step.
Easily change text color in WordPress

There are lots of reasons why you might want to change the text color in your posts or pages. Maybe you’d like to emphasize a keyword, or perhaps you want to use colored subheadings on a particular page.

Alternatively, you might want to change the text color across your whole site. Perhaps your theme uses a gray color for text, but you’d rather make it black, or a darker gray, for better readability.

In this tutorial, we’ll be covering the following methods:

Just click one of those links to jump straight to that method.

Method 1. Changing the Text Color Using the Visual Editor

You can use the default WordPress editor to put words, paragraphs, or even subheadings in a different color from your main text.

An example of colored text in a WordPress page

Here’s how you can change your text color using the block editor.

First, you’ll need to edit the post or page that you want to change, or create a new one.

Next, type in your text. You’ll need to create a paragraph block or a heading block as appropriate. For help with this, take a look at our tutorial on how to use the WordPress block editor.

Once your text is in place, you can change the color.

Changing the Text Color of a Block

For this first example, we’re going to change the text color of the whole block.

Simply click on the block and the Block Settings panel should open up on the right hand side of your screen. Next, click on the arrow for ‘Color settings’ to expand that tab. You’ll see the text color settings here.
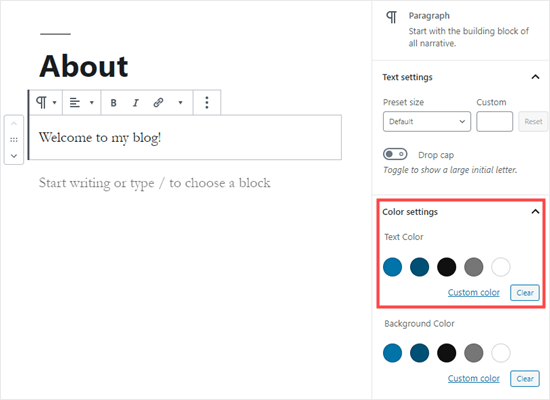
Picking a text color for the whole block in WordPress

Now, you can pick a new color for the text. The visual editor will show you some options based on your theme. You can simply click on one of these to change your text color.

Alternatively, if you have a specific color in mind, click the ‘Custom Color’ link. This will open up a color picker where you can manually select a color. You can also use this to type in a hex code.
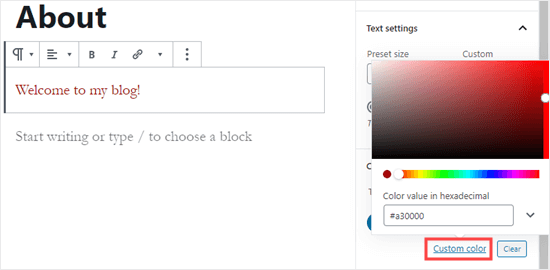
Picking a custom text color for your block

If you change your mind and want to go back to the default text color, just click the ‘Clear’ button below the color options:

Setting your block back to the default text color

Pro Tip: If you want to change the background color for a block, you can do that here too.

Changing the Text Color of a Word or Phrase

What if you only want to change the color of one or two words? That’s easy using the block editor as well.

First, you’ll need to highlight the word(s) that you want to change. Then, click the small downward arrow on the content editor toolbar.

Highlight the words that you want to change the color of

Next, simply click on the ‘Text Color’ link at the bottom of the dropdown list:
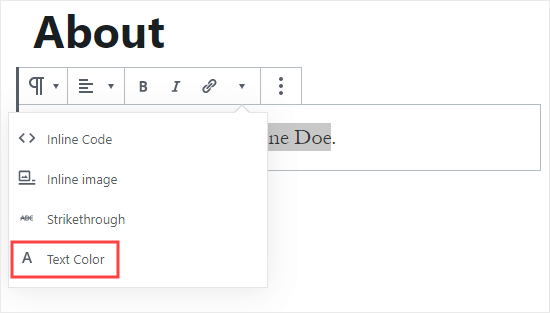
Click the 'Text Color' link at the bottom of the dropdown list

You’ll now see the same color options as for the whole block. Again, you can pick from one of the default options or use the ‘Custom color’ link to select any color you want.
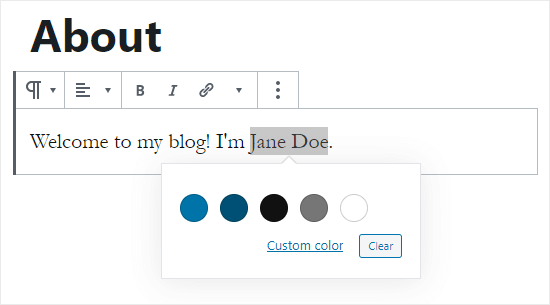
Choose the text color for your highlighted word(s)

The color options aren’t limited to paragraph blocks. You can also change the text color of heading blocks. As with paragraph blocks, you can set text color for the whole block in the block settings. Alternatively, you can highlight individual words and change their color.
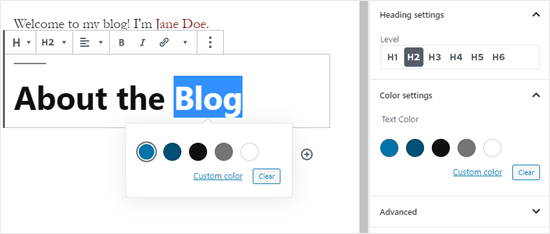
Changing the text color of a heading block in WordPress

Note: You cannot set a background color for heading blocks.

You can also change the text color in a list block, but only by highlighting the word(s) and using the toolbar. There’s no option in the block settings to change the text color for the whole of a list block.

Changing the Font Color Using the Classic Editor

If you’re still using the classic WordPress editor, then you can change the font color using the toolbar.

In the classic editor, click on the Toolbar Toggle on the far right. You’ll then see a second row of icons:
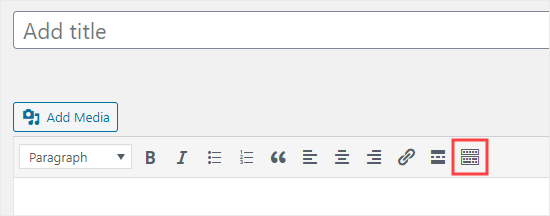
Click the Toolbar Toggle button to see the second row of icons

Now, you can select your text and change the font color using the font color dropdown.
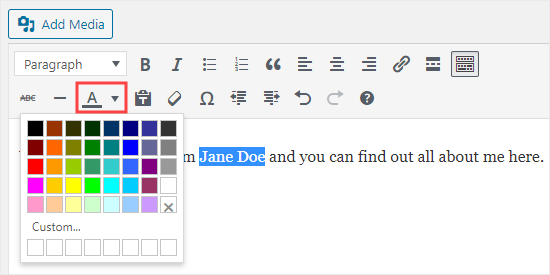
Use the text color button in the classic editor

Method 2. Changing the Text Color in the Theme Customizer

What if you want to change the text color across your whole website? Many of the best WordPress themes will allow you to do this using the theme customizer.

For this example, we’re using the OceanWP theme. It’s one of the top free themes available for WordPress.

In your WordPress dashboard, go to Appearance » Customize to open up the Theme Customizer.
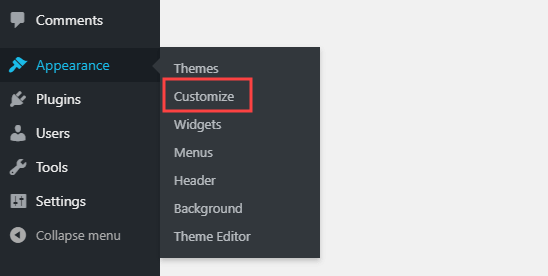
Go to Appearance then Customize in your WordPress dashboard

Next, you need to look for an option such as ‘Typography’. The available options, and what they’re called, will vary depending on your theme.
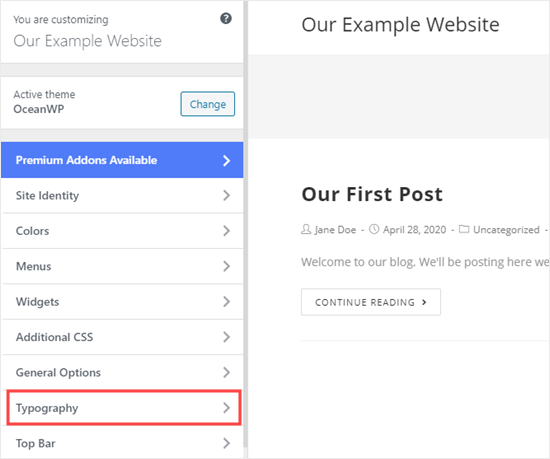
Select 'Typography' or a similar option in the theme customizer

Let’s go ahead and click on the Typography tab, or an equivalent option. Next, look for a setting where you can change the text of your posts and pages. In OceanWP, this is called the ‘Body’ text. You need to click on this, so you’ll can customize the font color and more.
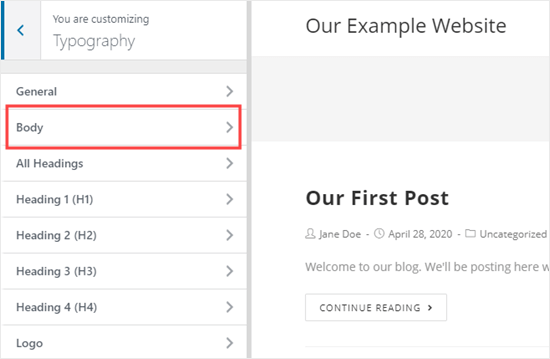
Select the Body text to modify in the customizer

When you click on the Font Color selector, you’ll see a color picker. Choose whatever color you want to use for your text. This will change the text color in all your posts and pages.
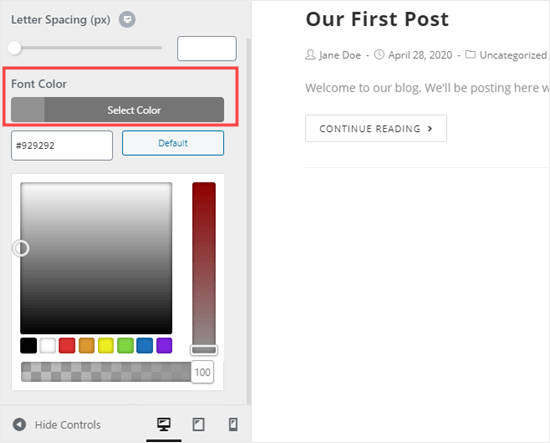
Picking the color for your body text using the theme customizer

You can also change your heading colors in a similar way, by using the options to change H1, H2, and so on.

Once you’re happy with your changes, click the ‘Publish’ button at the top of the screen.
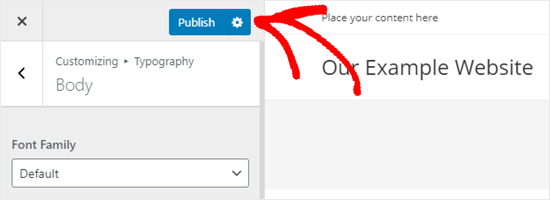
Publishing your changes to your website

Tip: Choosing black or dark gray text on a white or very light background is usually best for readability.

Method 3. Changing the Text Color Using CSS Code

What if your theme doesn’t have the option to change the text color?

You can still change font color across a whole site by using the theme customizer. Go to Appearance » Customizer in the WordPress dashboard.

At the bottom of the list of options, you’ll see a tab that reads ‘Additional CSS’.
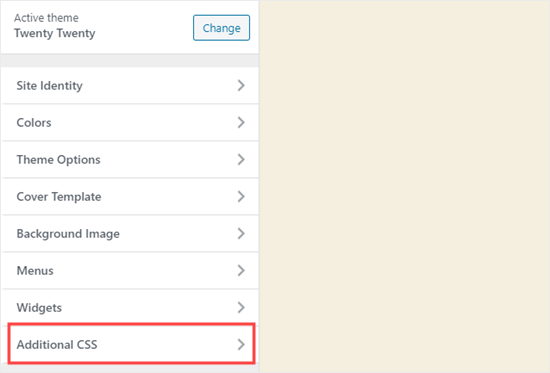
Open up the Additional CSS section of the theme customizer

Next, click on the Additional CSS tab, and you’ll see some instructions plus a box where you can enter CSS code.

For starters, you can copy this code into the box. After that, you can change the 6 numbers to the hex code of your chosen color.

p { color:#990000; }
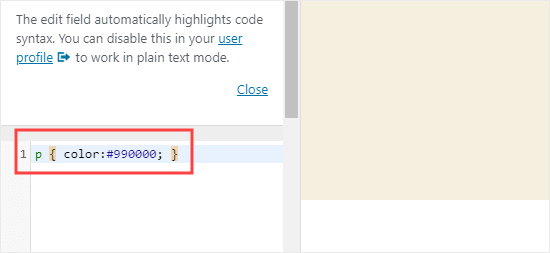
Enter the CSS for changing the paragraph color into the theme customizer

This will change the font color of the regular text in all your posts and pages to dark red (or whatever color you chose), like this:
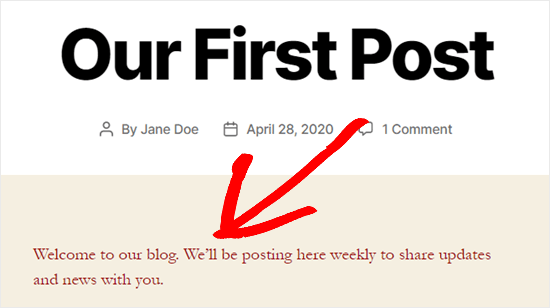
Text color customized site-wide using CSS code

If you want to change the color of the headings within your post, you can add this code instead:

h2 { color:#990000; }

Again, change the hex code to whatever color you want.

If you’re not familiar with CSS or want a beginner-friendly CSS editor that lets you easily customize the entire styles of your website, then we recommend looking into CSS Hero. It’s a powerful visual editor that lets you customize the styles of your entire site.
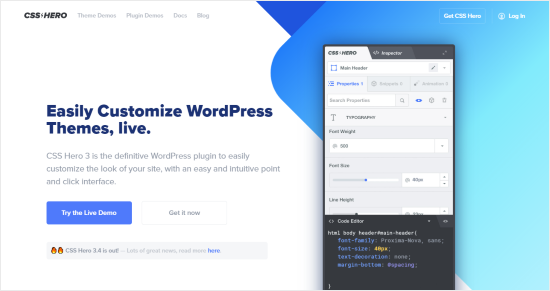
CSS Hero plugin

We hope this tutorial helped you learn how to change the text color in WordPress. You might also like our tutorials on how to change the font size in WordPress, and how to add custom fonts in WordPress.

If you liked this article, then please subscribe to our YouTube Channel for WordPress video tutorials. You can also find us on Twitter and Facebook.

The post How to Change the Text Color in WordPress (3 Easy Methods) appeared first on WPBeginner.

Building Reusable React Components Using Tailwind

Building Reusable React Components Using Tailwind

Building Reusable React Components Using Tailwind

Tilo Mitra

In this post, we’ll look at several different ways you can build reusable React components that leverage Tailwind under the hood while exposing a nice interface to other components. This will improve your code by moving from long lists of class names to semantic props that are easier to read and maintain.

You will need to have worked with React in order to get a good understanding of this post.

Tailwind is a very popular CSS framework that provides low-level utility classes to help developers build custom designs. It’s grown in popularity over the last few years because it solves two problems really well:

  1. Tailwind makes it easy to make iterative changes to HTML without digging through stylesheets to find matching CSS selectors.
  2. Tailwind has sane conventions and defaults. This makes it easy for people to get started without writing CSS from scratch.

Add the comprehensive documentation and it’s no surprise why Tailwind is so popular.

These methods will help you transform code that looks like this:

<button className="bg-blue-500 hover:bg-blue-700 text-white font-bold py-2 px-4 rounded">
  Enable
</button>

To code that looks like this:

<Button size="sm" textColor="white" bgColor="blue-500">
  Enable
</Button>

The difference between both snippets is that in the first we made use of a standard HTML button tag, while the second used a <Button> component. The <Button> component had been built for reusability and is easier to read since it has better semantics. Instead of a long list of class names, it uses properties to set various attributes such as size, textColor, and bgColor.

Let’s get started.

Method 1: Controlling Classes With The Classnames Module

A simple way to adapt Tailwind into a React application is to embrace the class names and toggle them programmatically.

The classnames npm module makes it easy to toggle classes in React. To demonstrate how you may use this, let’s take a use case where you have <Button> components in your React application.

// This could be hard to read.
<button className="bg-blue-500 hover:bg-blue-700 text-white font-bold py-2 px-4 rounded">Enable</button>

// This is more conventional React.
<Button size="sm" textColor="white" bgColor="blue-500">Enable</Button>

Let’s see how to separate Tailwind classes so people using this <Button> component can use React props such as size, textColor, and bgColor.

  1. Pass props such as bgColor and textColor directly into the class name string template.
  2. Use objects to programmatically switch class names (as we have done with the size prop)

In the example code below, we’ll take a look at both approaches.

// Button.jsx
import classnames from 'classnames';

function Button ({size, bgColor, textColor, children}) {
    return (
        <button className={classnames("bg-${bgColor} text-${textColor} font-bold py-2 px-4 rounded", {
    "text-xs": size === 'sm'
    "text-xl": size === 'lg',
    })}>
        {children}
    </button>
    )
};

export default Button;

In the code above, we define a Button component that takes the following props:

  • size
    Defines the size of the button and applies the Tailwind classes text-xs or text-xl
  • bgColor
    Defines the background color of the button and applies the Tailwind bg-* classes.
  • textColor
    Defines the text color of the button and applies the Tailwind text-* classes.
  • children
    Any subcomponents will be passed through here. It will usually contain the text within the <Button>.

By defining Button.jsx, we can now import it in and use React props instead of class names. This makes our code easier to read and reuse.

import Button from './Button';
<Button size="sm" textColor="white" bgColor="blue-500">Enable</Button>

Using Class Names For Interactive Components

A Button is a very simple use-case. What about something more complicated? Well, you can take this further to make interactive components.

For example, let’s look at a dropdown that is made using Tailwind.


An interactive dropdown built using Tailwind and class name toggling.

For this example, we create the HTML component using Tailwind CSS classnames but we expose a React component that looks like this:

<Dropdown 
  options={\["Edit", "Duplicate", "Archive", "Move", "Delete"\]} 
  onOptionSelect={(option) => { 
    console.log("Selected Option", option)}
  } 
/>

Looking at the code above, you’ll notice that we don’t have any Tailwind classes. They are all hidden inside the implementation code of <Dropdown/>. The user of this Dropdown component just has to provide a list of options and a click handler, onOptionSelect when an option is clicked.

Let’s see how this component can be built using Tailwind.

Removing some of the unrelated code, here’s the crux of the logic. You can view this Codepen for a complete example.

import classNames from 'classnames';

function Dropdown({ options, onOptionSelect }) {

  // Keep track of whether the dropdown is open or not.
  const [isActive, setActive] = useState(false);
  
  const buttonClasses = `inline-flex justify-center w-full rounded-md border border-gray-300 px-4 py-2 bg-white text-sm leading-5 font-medium text-gray-700 hover:text-gray-500 focus:outline-none focus:border-blue-300 focus:shadow-outline-blue active:bg-blue-500 active:text-gray-200 transition ease-in-out duration-150`;

  return (
    // Toggle the dropdown if the button is clicked
    <button onClick={() => setActive(!isActive)} className={buttonClasses}>
      Options
    </button>
    // Use the classnames module to toggle the Tailwind .block and .hidden classes
    <div class={classNames("origin-top-right absolute right-0 mt-2 w-56 rounded-md shadow-lg", {
      block: isActive,
      hidden: !isActive
    })}>
    // List items are rendered here.
    {options.map((option) => <div key={option} onClick={(e) => onOptionSelect(option)}>{option}</div>)}
   </div>
  )
}

export default Dropdown;

The dropdown is made interactive by selectively showing or hiding it using the .hidden and .block classes. Whenever the <button> is pressed, we fire the onClick handler that toggles the isActive state. If the button is active (isActive === true), we set the block class. Otherwise, we set the hidden class. These are both Tailwind classes for toggling display behavior.

In summary, the classnames module is a simple and effective way to programmatically control class names for Tailwind. It makes it easier to separate logic into React props, which makes your components easier to reuse. It works for simple and interactive components.

Method 2: Using Constants To Define A Design System

Another way of using Tailwind and React together is by using constants and mapping props to a specific constant. This is effective for building design systems. Let’s demonstrate with an example.

Start with a theme.js file where you list out your design system.

// theme.js (you can call it whatever you want)
export const ButtonType = {
    primary: "bg-blue-500 hover:bg-blue-700 text-white font-bold rounded",
    secondary: "bg-blue-500 hover:bg-blue-700 text-white font-bold rounded",
    basic: "bg-white hover:bg-gray-700 text-gray-700 font-bold rounded",
  delete: "bg-red-300 hover:bg-red-500 text-white font-bold rounded"
};

export const ButtonSize = {
  sm: "py-2 px-4 text-xs",
  lg: "py-3 px-6 text-lg"
}

In this case, we have two sets of constants:

  • ButtonType defines how buttons are styled in our app.
  • ButtonSizes defines the sizes of buttons in our app.

Now, let’s write our <Button> component:

import {ButtonType, ButtonSize} from './theme';

function Button({size, type, children}) {

  // This can be improved. I’m keeping it simple here by joining two strings.
  const classNames = ButtonType[type] + " " + ButtonSize[size];

  return (
    <button className={classNames}>{children}</button>
  )
}
export default Button;

We use the ButtonType and ButtonSize constants to create a list of class names. This makes the interface of our <Button> much nicer. It lets us use size and type props instead of putting everything in a class name string.

// Cleaner and well defined props.
<Button size="xs" type="primary">Enable</Button>

Versus the prior approach:

// Exposing class names
<button className="py-2 px-4 text-xs bg-blue-500 hover:bg-blue-700 text-white font-bold rounded">Enable</button>

If you need to redefine how buttons look in your application, just edit the theme.js file and all buttons in your app will automatically update. This can be easier than searching for class names in various components.

Method 3: Composing Utilities With @apply

A third way to improve the legibility of your React components is using CSS and the @apply pattern available in PostCSS to extract repeated classes. This pattern involves using stylesheets and post-processors.

Let’s demonstrate how this works through an example. Suppose you have a Button group that has a Primary and a Secondary Button.

A Button Group consisting of a primary and secondary button
A Button Group consisting of a primary and secondary button. (Large preview)
<button className="py-2 px-4 mr-4 text-xs bg-blue-500 hover:bg-blue-700 text-white font-bold rounded">Update Now</button>

<button className="py-2 px-4 text-xs mr-4 hover:bg-gray-100 text-gray-700 border-gray-300 border font-bold rounded">Later</button>

Using the @apply pattern, you can write this HTML as:

<button className="btn btn-primary btn-xs">Update Now</button>
<button className="btn btn-secondary btn-xs">Later</button>

Which can then be adopted to React to become:

import classnames from "classnames";

function Button ({size, type, children}) {
  const bSize = "btn-" + size;
  const bType = "btn-" + type;
  return (
    <button className={classnames("btn", bSize, bType)}>{children}</button>
  )
}

Button.propTypes = {
  size: PropTypes.oneOf(['xs, xl']),
  type: PropTypes.oneOf(['primary', 'secondary'])
};


// Using the Button component.
<Button type="primary" size="xs">Update Now</Button>
<Button type="secondary" size="xs">Later</Button>

Here’s how you would create these BEM-style classnames such as .btn, .btn-primary, and others. Start by creating a button.css file:

/\* button.css \*/ 
@tailwind base;
@tailwind components;

.btn {
  @apply py-2 px-4 mr-4 font-bold rounded;
}
.btn-primary {
  @apply bg-blue-500 hover:bg-blue-700 text-white;
}
.btn-secondary {
  @apply hover:bg-gray-700 text-gray-700 border-gray-300 border;
}
.btn-xs {
  @apply text-xs;
}
.btn-xl {
  @apply text-xl;
}

@tailwind utilities;

The code above isn’t real CSS but it will get compiled by PostCSS. There’s a GitHub repository available here which shows how to setup PostCSS and Tailwind for a JavaScript project.

There’s also a short video that demonstrates how to set it up here.

Disadvantages Of Using @apply

The concept of extracting Tailwind utility classes into higher-level CSS classes seems like it makes sense, but it has some disadvantages which you should be aware of. Let’s highlight these with another example.

First, by extracting these class names out, we lose some information. For example, we need to be aware that .btn-primary has to be added to a component that already has .btn applied to it. Also, .btn-primary and .btn-secondary can’t be applied together. This information is not evident by just looking at the classes.

If this component was something more complicated, you would also need to understand the parent-child relationship between the classes. In a way, this is the problem that Tailwind was designed to solve, and by using @apply, we are bringing the problems back, in a different way.

Here’s a video where Adam Wathan — the creator of Tailwind — dives into the pros and cons of using @apply.

Summary

In this article, we looked at three ways that you can integrate Tailwind into a React application to build reusable components. These methods help you to build React components that have a cleaner interface using props.

  1. Use the classnames module to programmatically toggle classes.
  2. Define a constants file where you define a list of classes per component state.
  3. Use @apply to extract higher-level CSS classes.

If you have any questions, send me a message on Twitter at @tilomitra.

Recommended Reading on SmashingMag:

Smashing Editorial (ks, ra, il)

Challenges in programming career

I am good in different languages, that is:
Java, python, C#, VB.NET, php, javascript
I have been programming for a while now it's about 2 and half years but the issue is when I focus on one language I tend to concentrate on it more than the others which leads to some challenge going back and use other comfortably.
I also want to become a full stack developer and focus more on android.

Here now is the question:
Should I focus on one domain and drop the others that is, android, data science, web developer etc. Should I pick one field of focus?
If any has had this kind of challenge speak your heart and how you understand the best way to output your best.

9 Top Free WordPress Author Bio Box Plugins

Drawing attention to the author or authors on your site may be a key piece of your overall strategy. Perhaps you’re trying to establish a more personal tone. Perhaps you’re trying to build a reputation. Perhaps you’re trying to attract quality contributors. These are but a few potential reasons why you might want to make sure your readers connect the content with the person writing it.

Out of the box, WordPress provides users with a biographical info section in the User Profile screen where post authors and site users or members can add information about themselves.

WordPress User Profile - Biographical info
The default WordPress User Profile author bio box is not the be-all and the end-all of bio boxes.

Depending on your theme and how its settings are configured, information about the author can display in Post author archives…

Post Author Archive Page
Not happy with your post author archive page? You can have it as you like it…with plugins! (Theme: WordPress Twenty Twenty)

And at the end of every post…

WordPress Twenty Twenty Theme - Post Author Bio
A post author bio at the end of every post? I guess you can have too much of a good thing!

With some WordPress themes, however, you may find that all that glitters is not gold.

For example, you might want an author box that lifts your writers above the ground with cheerful thoughts and links to their social profiles, and discover that, while you love your theme with a love that shall not die, you can’t customize its bio boxes to your heart’s content.

So, do your current author boxes perform as well as they could? Or are they a tragedy of Shakespearean proportions? If you’re looking to liven up your author profiles, then one of the plugins below may just do the trick.

So, without further ado…

  • 1. Simple Author Box

    Simple Author Box may have started out as a way to create simple and beautiful minimalistic design for author bio boxes without having to break into the code, but since being taken over by WebFactory Ltd, the plugin now offers a huge range of customization options for your author bio box.

    Simple Author Box Settings screen.
    Simple Author Box settings screen.

    This plugin gives you the ability to easily customize everything about your bio box. The range of settings and options is quite impressive.

    For starters, you can edit your author bio directly from the plugin’s settings screen, add/edit social media icons, and even set up a custom gravatar.

    Tabbed sections offer everything from toggle settings that let you do things like display a bio box anywhere on your site using a shortcode or code snippet, show author email address, or hide various elements and features, to customizing its appearance, changing different colors of elements like author name, borders, backgrounds, etc., and then make it stand out from the rest of your site’s content using unique typography styles.

    You can also preview changes to your bio box in real-time while you play with the settings.

    Simple Author Box Live Preview Feature
    Extemporize your inner bard with Simple Author Box’s settings and live preview feature.

    Beware when tapping into the suite power of this plugin’s sweet customizable options. Deceive not thy sweet self into thinking that having complete control of your bio box designs will make thee a cutting-edge bio box designer.

    Simple Author Box plugin bio box example.
    “Could beauty have better commerce than with honesty?” Create eye-catching bio boxes with Simple Author Box plugin.

    The free version of Simple Author Box incorporates mobile responsiveness, a Gutenberg block, and is fully customizable to match your existing theme design.

    Upgrade to Pro for advanced features like changing author box position in the content, linking the author’s name to their website or page, adding author avatar hover effects and changing image position, social icons settings, color palette and font and font sizes for additional elements, as well as enabling guest authors and co-authors, and adding widgets to your site.

    Interested in 1. Simple Author Box?

  • 2. Branda

    If you’re looking to add feature-rich author boxes that blend in perfectly with your website or blog, try our WordPress white labeling plugin Branda.

    Branda is our full white label solution for WordPress, so it lets you customize your site’s front-end and back-end, including author boxes.

    Branda author box settings screen.
    Branda’s author box settings screen is found in the Front-End section of the plugin’s customization settings menu.

    Branda takes care of every aspect of your author box design from configuring design options, visibility, and elements of the author box, to customizing author and social media profiles, colors, avatars, etc. You can also use custom CSS.

    Branda Author Box example.
    “This brand[a] she quenched in a cool well…” to thine own site be true.
    Branda is the only premium and 100% free white label plugin for WordPress. So, if you’re looking to customize a whole lot more than just author boxes on your site, with Branda, all the world’s your stage.

  • 3. WP Post Author

    WP Post Author by AF Themes is another great plugin you can use to add an author bio box with custom settings to your WordPress site.

    The plugin offers a widget and shortcode designed to be used in WordPress single post author and author pages, and custom styling can be added through a CSS box.

    WP Post Author Settings screen.
    WP Post Author bio box plugin settings screen.

    Although this plugin may have fewer customization options than the previous plugin, it still offers an impressive range of useful options and settings for tweaking your site’s author bio boxes styling.

    WP Post Author Bio Box Example.
    WP Post Author bio box example. Simple, plain bio box, I do love thee so!

    Interested in 3. WP Post Author?

  • 4. Author Bio Box

    If all you need is a simple plugin that will make your site’s author bio boxes stand out from the content, the Author Bio Box plugin offers a one-page settings screen with colorful design and border styling options.

    Author Bio Box Settings screen.
    Author Bio Box plugin settings screen.

    The plugin also gives you the choice of displaying author bio boxes only in posts, the home page and posts, or none.

    Author Bio Box example
    There are no tricks in this plain and simple Author Bio Box.

    Interested in 4. Author Bio Box?

  • 5. Starbox

    Starbox offers a fairly functional free version, with various toggle and dropdown options, plus customizable fields for adding author information.

    Starbox Settings screen.
    Starbox author box plugin settings screen.

    Fields are limited in the free version, but you have complete control and many more options to choose from when you buy the Starbox PRO premium version of the plugin.

    The free Starbox plugin aims to make it as easy as possible to add attractive author boxes to your website. Activating the plugin adds additional fields to the default WordPress user profile page allowing your users to enter links to their Facebook and Twitter social media profiles, submit their job title, company name, company URL, as well as the default biographical info.

    The plugin’s settings let you choose whether to activate the author boxes on posts and/or pages, display the box before, after, or before and after the post content, and more. The free version provides six themes for styling the author boxes on your site. Depending on your chosen theme, the author box may include a latest posts tab. You can also quickly change the size of the text used to display the name and author bio, independently from each other. A handy preview panel lets you see how your choices will display in real-time.

    Starbox Author Bio Box Example.
    “It is not in the stars to hold our destiny” but Starbox can definitely help authors become masters of their own fate.

    While most author box plugins rely on Gravatar to display your profile picture, Starbox also gives you the option of uploading an image directly to your user profile page. Through the individual user profile pages, users can choose from one of the available themes, and set the author box position themselves.

    Author boxes can also be manually inserted directly into posts, pages, and the sidebar areas of your website by using the included shortcodes. This makes it easy to add multiple author boxes to a single post or page.

    This author box plugin is packed with useful features, making it a popular and highly recommended choice. The premium version of Starbox gives you the ability to add links to more social media websites and also offers a number of themes to choose from, incorporating HTML5. However, the free version is more than capable of displaying professional author bio boxes on your WordPress website.

  • 6. About Author

    With the About Author author bio box plugin, you must first create a shortcode that includes your choice of template style and the information you want to include in your template, and then you configure your author settings and select the template you have created.

    About Author Settings screen
    About Author plugin settings screen.

    This can feel a little confusing at first, but it gives you the option of configuring and using multiple post author templates throughout your site, including posts, pages, sidebars, etc.

    About Author author box plugin example.
    “Let me be that I am and seek not to alter me.” But you can alter this bio box using shortcodes and templates.

    With the free version, you can create functional author bio boxes with customizable font, color, and social media options but you are limited to two template styles, two profile image layouts, and a few other restrictions. The Pro version gives you 10 design author templates, more profile image layouts, more social media settings, profile header backgrounds, multiple author options for images, widgets, and shortcodes, responsive design, and more.

    Interested in 6. About Author?

  • 7. Molongui Authorship

    The plugin developers claim that Molongui Authorship “provides you all the missing features you might need to properly manage and credit all the contributors to your site.”

    This may not be an exaggerated claim. This comprehensive and feature-rich author box plugin is suitable for all types of WordPress sites, especially sites featuring multi-authors, co-authors, and guest authors.

    The plugin’s settings screen has a number of tabs for configuring and customizing a wide range of options from layouts, templates, typography, avatars, and social media icons, to SEO metadata, byline modifiers, conditional logic, shortcodes, and more. It also integrates with the WordPress Theme Customizer.

    Molongui Authorship plugin settings screen.
    Molongui Authorship plugin settings screen.

    Choose the free version of the plugin if you just want to display an enhanced author box on your site. If your strategy depends on attracting content authors or promoting multi-authoring, guest authoring, or co-authoring on your site, then the premium version unlocks a range of additional elements and advanced customization features (like shortcodes and the ability to make links ‘nofollow’) that will let you dive deep under the hood to tinker, tweak, and finetune your author bio box settings to your heart’s content.

    Molongui Authorship plugin bio box example.
    “O Romeo, wherefore art thou?” Maybe try searching in the house of Molongui.

    The premium version also includes export/import settings tools, REST API, and access to premium support (in case you run into a tragedy).

    Interested in 7. Molongui Authorship?

  • 8. Co-Authors Plus

    Co-Authors Plus is another plugin you can install if you collaborate with multiple authors on the same post and need an easy way to give all authors credit.

    Co-Authors Plus isn’t an ‘author bio box’ plugin in the sense that it helps you define the design and structure of author bio elements. Instead, this plugin makes it simple to credit more than one person for the creation of an article. As such, this plugin is great if you plan to publish articles with two or more authors and want to give both equal credit for their contributions.

    Co-authors plus lets you add multiple authors to posts.
    Need to add multiple authors to your posts? Co-authors plus lets a wavering multitude play upon it.

    The plugin upgrades the core authors meta box, which is displayed on the edit post and page screens. This lets you search for existing users on your blog and then add them as a co-author for the post or page you are working on. You can drag and drop the authors that have been added to a post in order to change the order their bio boxes are displayed in when your post is published.

    When you assign a co-author to a post or page, they can then edit that page according to their WordPress user role settings.

    Another interesting feature of this plugin is the ability to add bylines without having to create a user account for each author. This makes it easy to create guest author accounts, allows you to credit guest posters by giving them a byline, and eliminates the need to create an actual user account for one-time authors who submit content for your WordPress site or blog.

    Note: To display multiple bio boxes on a single post, you will need to manually add some code to your theme’s templates files, so bear this in mind before downloading and installing this plugin. If you don’t mind messing with code, there is helpful documentation on the plugin’s site to help you achieve this without drama.

    Also, if you are using the Genesis theme framework on your website, then you will want to install the Genesis Co-Authors Plus plugin. This free tool works alongside this plugin, enabling support for multiple author boxes on a single post.

    Interested in 8. Co-Authors Plus?

  • 9. Meks Smart Author Widget

    Meks Smart Author Widget lets you display your author/user profile info inside a WordPress widget.

    Meks Smart Author Widget settings.
    Meks Smart Author Widget settings.

    The widget provides a range of flexible display options, including custom avatar size, linking avatar image and user display name to author archive page (you can also override the author link URL and link to any page or URL you like), and a smart feature that can auto-detect and display the current post author on single post and author templates.

    Meks Author Widget displaying on sidebar.
    “Sit by my side, and let the world slip…” Display thy author info on the sidebar[d].

    Note: This plugin provides only an author box widget. To display the author info on a widgetized area of your site (e.g. your sidebar) and within your posts/pages, we recommend installing both this plugin and one of the other plugins listed in this post.

    Interested in 9. Meks Smart Author Widget?

Hiding the Original Author Box

Many themes already include an author box, and if this is your case, then you will probably find that the plugins above add a second author box to your pages.

This was the case when I tried creating this post using the WordPress Twenty Twenty theme.

Twenty-twenty theme with duplicated author boxes.
Yiikes… the Twenty Twenty theme creates double, double toil and trouble!

So, I used a theme called Newsphere instead from AF Themes to create this tutorial.

Newsphere Theme for WordPress by AF Themes
One author box only … now, Newsphere is the winner of dis content!

Of course, you don’t want two author boxes displaying throughout your site, so in order to remove the original author box, you will need to dig into your code a little.

As always, if you’re making changes to your theme, it’s better to use a child theme.

In order to remove the default author box for your theme, you will need to find out where the code is located. Most often author boxes will show up on your single post pages, and so you will want to check your single.php file and search around for the code that pulls in your author box.

In many themes, however, the single.php pulls in other files, and the code you need will be in one of those other files.

For example, when searching for themes that I could use for testing, I looked at the WordPress Twenty Twenty theme. I didn’t find information about my author box, but I found that the singular.php file (normally single.php in most themes) pulls in a file called content, which looked like what I wanted.

Twenty Twenty: Singular Template (singular.php)
“O single.php-soled jest, solely singular.php for the singleness.”

I then went to the content.php file and tracked down the code that was displaying my author box.

Depending on the theme, this could be just a little bit or a lot of code. With the Twenty Twenty theme, it was just a little bit of code.

Twenty Twenty: content.php template file
“Out, damned spot! Out, I say!”

I could simply delete that code. (Again, remember that using a child theme is best. You could just copy the original content.php file into your child theme and then delete the part you need to delete.)

Here’s the code I would want to delete in the Twenty Twelve theme.

Author bio code in content.php file
“You can take him and cut him out”…
Instead of deleting the code, however, another way to do it is to simply comment out that portion of the code. You can do this as follows:

<?php
/*

…code…

*/
?>

Here’s an example:

Section of commented out code from content.php template.
This better work…I’m all commented out!

This worked. Now, the Twenty Twenty theme displays just one author bio box … the one we have added via the plugin.

Twenty Twenty theme with a single author bio box displayed.
Twenty Twenty theme now displays only one author bio box. All’s well that ends well.

And that’s it. If you’d like to spice up your author profiles, methinks one of the above plugins should work out for you – making your bios stand out a little more and hooking these up to the authors’ social profiles at the same time. Try them. You may love all, trust a few, and do wrong to none.