GitHub Adds Account Successors Feature

Yesterday, GitHub added a new setting to user-owned repositories called “Account Successors.” It allows users to designate repository access to another user to maintain ownership continuity in the event of any kind of personal disruption.

“Open source maintainers, you can now invite a trusted user to manage your open source projects in the event that you are unable to do so yourself,” GitHub Senior Product Manager Ben Balter said in an announcement on Twitter. “Help ensure the future of your work (and the work of others) by inviting an account successor today.”

The new feature can be found under the Settings » Account » Successor Settings menu in GitHub. Successors will not be given the ability to log into accounts but will have the following permissions:

  • Archive your public repositories.
  • Transfer your public repositories to their own user owned account.
  • Transfer your public repositories to an organization where they can create repositories.

Successors cannot be set on a per-project or per-organization basis yet, but Balter said that is something GitHub would like to build.

This new setting complements GitHub’s Deceased User Policy, in which the company will work with the deceased person’s next of kin, a pre-designated successor, or other authorized individual to determine the future of the account.

GitHub began testing the Account Successors feature last week, taking suggestions from the greater community. Public feedback from testers has been positive so far. Users hope not to need the feature anytime soon, though some said it is a real worry they have regarding their projects on GitHub. Setting up a successor is now the easy part, where identifying a trusted individual may prove more difficult for some.

Account Successors is a timely addition to the platform, as the pandemic continues to sweep the globe, although the feature can be useful for many other types of scenarios. Given the high fevers that can accompany COVID-19 and the rapid decline often associated with the worst outcomes, identifying a successor while still feeling healthy is an important precaution to ensure the continuity of your project.

5 things to consider before choosing a Web Hosting Provider

There are many web hosting options out there, and sometimes it can become challenging to settle on one. This is especially because all these providers offer different features and functionalities, and each promises to be the best with 99.9% uptime, 24/7 technical support, super speeds, etc. One of the most raging debates in this area […]

The post 5 things to consider before choosing a Web Hosting Provider appeared first on designrfix.com.

Asset Hosting, Revamped.

Asset Hosting is one of our PRO features here on CodePen. We’ve just totally redesigned and rewritten it to make the experience much better. Let’s walk through all the things you can do with it, showing off the new interface and functionality.

Uploading an image and using it

This is likely the #1 usage of Asset Hosting: you have an image that you need to use in a Pen, and you need to upload it somewhere reliable to link to and use. Here’s how quick and easy it is:

  1. Open the Assets Panel
  2. Drag and Drop the image (or any other asset)
  3. Grab the URL

Cropping an image during upload

The Assets Panel right within the Pen Editor is extremely useful as it’s right within the editor where you likely need the files. Because of that, we try and stay out of your way in uploading as best as possible, just drag and drop.

But we also have an Asset Manager page that has also been entirely revamped and offers new functionality, even during uploading itself!

Note the other options available there to while editing and image, making it into a circle, and rotating. All these options, and in fact the whole uploader itself, come by way of Filestack, which we’re now using. The Filestack uploader is really well done and allows us to offer this much more reliable and fully-featured asset upload experience. Heck, you even get an upload progress bar now instead of just a spinner!

Filtering, Searching, Sorting

We wanted to make it as easy as possible to find all your existing assets. You can do a quick search for them, filter by file type groupings, and sort by useful things like date uploaded, file size, and alphabetical based on file name.

Previewing Assets

Rollovers on images, video, and audio assets will show you a preview (hover either the filename or the 👁 icon). Or, click on the asset to see a larger preview.

This works in the Asset Manager, but the popups also work in the Asset Panel right in the Pen Editor. Here’s an example of some video and audio previews:

Quick Access Actions

The three-dot “kebab” (•••) menu for each asset has a variety of actions you can do with that asset. All of them have certain common actions, and different file types have specific actions that are useful to them.

All assets have:

  • Copy URL
  • Duplicate
  • Delete

Image assets have:

  • Copy as HTML <img>
  • Copy as CSS background-image
  • Copy as Markdown ![]() image

JavaScript assets have:

  • Copy as HTML <script>
  • Add as External Resource*

CSS assets have:

  • Copy as HTML <link>
  • Copy as CSS @import
  • Add as External Resource*

* Super useful! Rather than copy-and-pasting the URL over there, it’s a one-click action.

Uploading from URLs

Say you have a URL to the image already somewhere on the internet. You might be able to use the asset directly from there, but that isn’t really under your control all the time*. With our new uploader (Asset Manager only), you can paste in the URL for that asset and we’ll upload that way.

* Speaking of control, assets hosted through us have the correct CORS headers via our S3 bucket policy, which you aren’t likely to get with random assets around the internet. We might change the URL we give out for assets eventually so we can offer more features, but your existing URLs will always work and always have the right CORS.

Easy Multiple File Upload

You can upload as many files as you want! We literally don’t cap the number of files you have in assets there is only a total storage limit and per-file size limit. If you have a bunch of files to upload, it’s never been easier.

Here’s another little thing to know: if you upload a file with a duplicate name, we’ll just rename it for you so it doesn’t conflict. That way we just stay out of your way. If you don’t like the name, you can always change it easily, as long as it doesn’t conflict. And if it does conflict, you can change or delete the original.

You don’t have to re-upload to duplicate either, duplication can be done right from any assets menu.

Mobile Uploading Support

You can now upload from your phone, so that’s nice.

Higher Limits!

To cap off this release we literally more than doubled everything.

Per File LimitTotal Storage
FreeNone (upgrade!)None (upgrade!)
Starter PRO5 MB2 GB
Developer PRO10 MB10 GB
Super PRO15 MB20 GB

The post Asset Hosting, Revamped. appeared first on CodePen Blog.

ENEMY SHOOTING NON STOP

which code can i use to make enemy shoot at the player non stop and when the bullet catches the player the health decreases
any kind of help i appreciate - pygame

4 Things You Need to Know Before Building a Gadget eCommerce Website

If you want to build a store that will bring you profit quickly, you should consider starting your own gadget eCommerce store. Gadgets are very popular among people of all ages and it’s almost impossible to find a person who doesn’t own at least one. All of this makes them the ideal mass-market product, so […]

The post 4 Things You Need to Know Before Building a Gadget eCommerce Website appeared first on WPArena.

Codugh Pays Developers for Every API Call

Codugh wants developers to directly earn money for the APIs they create. The company is building a marketplace where developers publish APIs. As those APIs are used, regardless of integrated application, the API developer gets paid. It's a pay per call model, and Codugh has partnered with Bitcoin SV (BSV) to make it happen.

Highlight, Underline, and Control Font Size with RichText Extension

Last week, Tetsuaki Hamano contributed his first plugin to the official WordPress plugin repository. RichText Extension grants additional options for inline text in the block editor.

RichText is a component in the editor that allows end-users to add and edit text. Typically, users may think of this component when dealing with paragraphs. However, it also applies to headings, lists, quotes, image captions, and any other area where textual content can be added.

Many plugins add settings on the block level. This means when you apply a particular style, it applies to the entire block. Inline text refers to the individual characters and words within the block. By default, WordPress allows end-users to control inline text by adding links, creating italic or bold characters, changing the text color, and more. Superscript and subscript inline options have already landed in the Gutenberg plugin, which should ship with WordPress 5.5.

RichText Extension extends the editor toolbar to add new options for highlighting, underlining, and changing the font size of inline text. It also adds an option to clear all formatting.

Overall, the plugin is a solid outing for a first-time contributor to the plugin directory. With luck, we will get to see more of Hamano’s work in the future.

Plugin Features

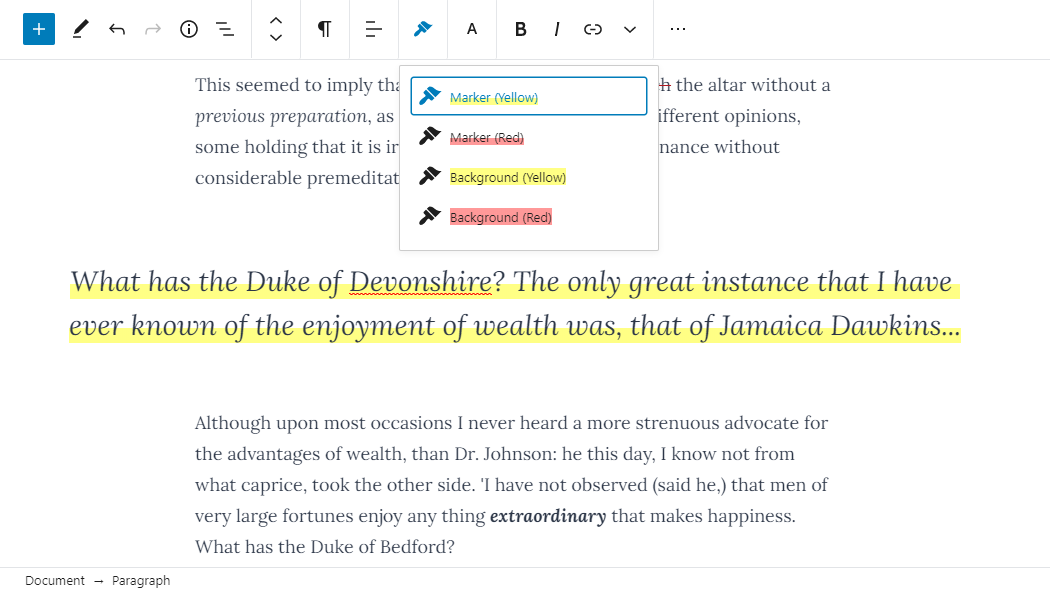
The primary feature of RichText Extension is its highlighter option, which allows users to highlight text. The plugin adds a paintbrush icon to the toolbar. Once clicked, it opens four highlighting options. By default, users can add a red or yellow marker effect or background directly behind a piece of text. This feature can be useful for adding a bit of flair to make specific words or characters to stand out.

Screenshot of the RichText Extension plugin's highlighter feature in the editor.
Using the marker highlight in a pullquote.

The plugin also adds a font size option to the toolbar. I am unsure how useful changing the font size for inline text is for the average end-user. Typically, this is best left to the block level. However, there may be some edge cases that others will want to use it for.

Along with the core editor’s inline options in the toolbar’s dropdown menu, RichText extension adds Clear Format and Underline options. The former allows users to clear all inline formatting. The latter underlines text.

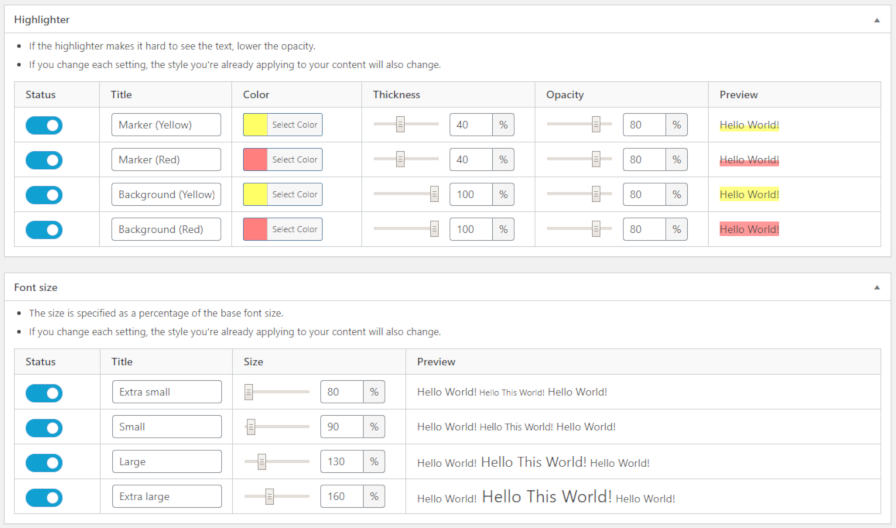
Each of the plugin’s features can be configured via the plugin’s settings screen. Users can change the highlight colors, their thickness, and transparency. The four available font sizes can be adjusted. It also allows users to enable or disable each feature.

Screenshot of the RichText Extension WordPress plugin's options page.
RichText Extension’s settings screen.

It would be nice to see the plugin’s highlighting and font-size features use the theme-defined color palette and font sizes, respectively. The plugin could further allow users to define custom colors and sizes outside of those added by the theme.

More than anything, I would like to see a fully-featured plugin tackle every conceivable inline text option with the ability to enable or disable each. This would give end-users ultimate flexibility over how they write their content. Perhaps RichText Extension can be that plugin in the future. Otherwise, another developer may step in and do the job.

Dolby Simplifies Access to Audiovisual Tech via API Platform, Dolby.io

Dolby, a provider of audiovisual solutions and the company best known for its surround sound technology that is licensed to consumer electronics manufacturers, has launched an API platform to support the media and communications industries. The new platform, Dolby.io, will offer a collection of APIs that streamline integration with the company’s real-time AV technology.

Why does writing matter in remote work?

Talk to anyone who has an active blog and I bet they’ll tell you it’s been valuable to them. Maybe it’s opened doors. Maybe it’s got them a job. Maybe it’s got them a conference invite. Maybe they just like the thrill of knowing people have read and responded to it. Maybe they learned a lot through its creation and maintenance.

Khoi Vinh said:

It’s hard to overstate how important my blog has been, but if I were to try to distill it down into one word, it would be: “amplifier.”

But what about other kinds of writing? Just day to day writing? Is that important for web workers? “Especially now”?

Tim Casasola:

In remote work, we communicate primarily through writing. We send messages in Slack. We document projects in Notion. We send meeting invites with a written description of the purpose. We’re writing all the time.

It’s just so damn important for team work of any kind, particularly when you aren’t next to each other physically.

While writing forces people to think clearly, writing also forces teams to think clearly. In my experience, having a clearly written thing makes it easy for folks to collaborate with me. This is because people naturally enjoy poking holes in arguments, adding points that were missed, or mentioning any risks that weren’t taken into account. I’ve found it helpful to use this human tendency to my advantage. Extra opinions and poked holes are hard to surface if you didn’t write something in the first place.

Direct Link to ArticlePermalink

The post Why does writing matter in remote work? appeared first on CSS-Tricks.

Accepting Payments (including Recurring Payments) on WordPress.com

I’m a fan of building websites with the least amount of technical debt and things you have to be responsible for as possible for what you wanna do. Sometimes you take on this debt on purpose because you have to, but when you don’t, please don’t ;).

Let’s say you need to build a site that can take money from customers, but on a recurring basis. WordPress.com can do that now, and it’s a fantastic choice because it’s all of the power and control and none of the debt.

Here’s my thinking…

1) WordPress.com is the fastest way to spin up a WordPress site.

Not only is it fast, but you don’t have to worry about anything. Servers, SSL, security, performance, accessibility… that’s all handled for you and you can focus on what you do best. Even if you’re a seasoned developer, I’m sure you can understand how this is compelling. Automating work is what the best developers do.

2) WordPress.com sites can be eCommerce sites.

Not only sell-a-product style sites, but also recurring payments sites. Meaning you can very easily set up a subscription service, membership site, or site for monthly donations.

The pricing is like this:

WordPress.com PlanJetpack planRelated Fees
WordPress.com eCommerce —None
WordPress.com BusinessJetpack Professional2%
WordPress.com PremiumJetpack Premium4%
WordPress.com PersonalJetpack Personal 8%

So you do the math and figure out the most economical plan for you. That eCommerce plan on WordPress.com is only $45/month and means zero additional fees, so I imagine once you’re up and running and making sales, that plan becomes the obvious choice.

Ideas!

  • You build custom weekly meal plans for families and charge monthly for that.
  • You have a membership site for physical training videos where people have to be a member to see the videos.
  • Your site is has a bunch of completely free great content, and you offer a way to give yearly donations to support it.

Why roll your own eCommerce when you don’t have to?

3) It used to be that your WordPress site was a bit limited on WordPress.com, but those days are over.

eCommerce is one aspect of that, but I’m talking full SFTP and database access. You can build custom themes, use your own plugins, just like any other WordPress site. So if you’re thinking that you’re giving up too much control by going with WordPress.com, make sure to re-evaluate that.


So knowing all that, I’d say you really should give WordPress.com a hard look when you’re about to spin up an eCommerce site. I’ve seen far too much over-engineering and mountains of technical debt in my life, I’d rather see people use simpler tools and get started doing their actual business, especially to start.

The post Accepting Payments (including Recurring Payments) on WordPress.com appeared first on CSS-Tricks.

Lazy Loading GAM

I am using GAM as so:

<script async src="https://securepubads.g.doubleclick.net/tag/js/gpt.js"></script>
<script>
window.googletag = window.googletag || {cmd: []};
googletag.cmd.push(function() {

        googletag.defineSlot('/86406173/ArticleLeaderboard', leader_size, 'div-gpt-ad-1321481451196-0').addService(googletag.pubads());
        // etc.

        googletag.pubads().collapseEmptyDivs();
        googletag.pubads().enableLazyLoad();        
        googletag.pubads().enableLazyLoad({
            fetchMarginPercent: 200,
            renderMarginPercent: 100,
            mobileScaling: 2.0
        });
        googletag.pubads().enableSingleRequest();
        googletag.enableServices();

});
</script>        

Is there a conflict of interest between enableLazyLoad() and enableSingleRequest()?

Thanks!

Dealing With Stale Props and States in React’s Functional Components

There’s one aspect of JavaScript that always has me pulling my hair: closures. I work with React a lot, and the overlap there is that they can sometimes be the cause of stale props and state. We’ll get into exactly what that means, but the trouble is that the data we use to build our UI can be totally wrong in unexpected ways, which is, you know, bad.

Stale props and states

Long story short: it’s when code that is executed asynchronously has a reference to a prop or state that is no longer fresh, and thus, the value it returns is not the latest one.

To be even more clear, let’s play around with the same stale reference example React has in its documentation.

function Counter() {
  const [count, setCount] = useState(0);

  function handleAlertClick() {
    setTimeout(() => {
      alert("You clicked on: " + count);
    }, 3000);
  }

  return (
    <div>
      <p>You clicked {count} times</p>
      <button onClick={() => setCount(count + 1)}>Click me</button>
      <button onClick={handleAlertClick}>Show alert</button>
    </div>
  );
}

(Live demo)

Nothing fancy here. We have a functional component named Counter. It keeps track of how many times the user has clicked one button and shows an alert that displays how many times that button was clicked when clicking another button. Try this:

  1. Click the “Click me” button. You are going to see the click counter go up.
  2. Now click the “Show alert”button. Three seconds should go by and then trigger an alert telling you how many times you clicked the “Click me” button.
  3. Now, click the “Show alert” button again and quickly click the “Click me” button before it triggers the alert in three seconds.

See what happens? The count shown on the page and the count shown in the alert do not match. The number in the alert is not just some random number, though. That number is the value the count variable had in the moment the asynchronous function inside the setTimeout was defined, which is the moment the “Show alert” button is clicked.

That’s just how closures work. We’re not going to get into the specifics of them in this post, but here are some docs that cover them in greater detail.

Let’s focus on how we can avoid these stale references with our states and props.

React offers a tip on how to deal with stale dates and props in the same documentation where the example was pulled.

If you intentionally want to read the latest state from some asynchronous callback, you could keep it in a ref, mutate it, and read from it.

By keeping the value  asynchronously in a ref, we can bypass stale references. If you need to know more about ref in functional components, React’s documentation has a lot more information.

So, that begs the question: How can we keep our props or state in a ref?

Let’s do it the dirty way first.

The dirty way to store props and state in a ref

We can easily create a ref using useRef() and use count as its initial value. Then, wherever the state is being updated, we set the ref.current property to the new value. Lastly, use ref.current instead of count in the asynchronous part of our code.

function Counter() {
  const [count, setCount] = useState(0);
  const ref = useRef(count); // Make a ref and give it the count

  function handleAlertClick() {
    setTimeout(() => {
      alert("You clicked on: " + ref.current); // Use ref instead of count
    }, 3000);
  }

  return (
    <div>
      <p>You clicked {count} times</p>
      <button
        onClick={() => {
          setCount(count + 1);
          ref.current = count + 1; // Update ref whenever the count changes
        }}
      >
        Click me
      </button>
      <button
        onClick={() => {
          handleAlertClick();
        }}
      >
        Show alert
      </button>
    </div>
  );
}

(Live demo)

Go ahead and do the same as last time. Click “Show alert” and then click “Click me” before the alert is triggered in three seconds.

Now we have the latest value!

Here’s why it works. When the asynchronous callback function is defined inside setTimeout, it saves a reference to the variables it uses, which is count in this case. This way, when the state updates, React not only changes the value but the variable reference in memory is completely different as well.

This means that — even if the state’s value is non-primitive — the variable you are working with in your asynchronous callback is not the same in memory. An object that would typically keep its reference throughout different functions now has a different value.

How does using a ref solve this? If we take a quick look at React’s docs again, we find an interesting, but easy-to-miss, bit of information:

[…] useRef will give you the same ref object on every render.

It doesn’t matter what we do. Throughout the lifetime of your component, React will give us the exact same ref object in memory. Any callback, no matter when it’s defined or executed, is working with the same object. No more stale reference.

The cleaner way to store props and state in a ref

Let’s be honest… using a ref like that is an ugly fix. What happens if your state is being updated in a thousand different places? Now you have to change your code and manually update the ref in all those places. That’s a no-no.

We are going to make this more scalable by giving ref the value of the state automatically when the state changes.

Let’s start by getting rid of the manual change to the ref in the “Click me”button.

Next, we make a function called updateState that is called whenever we need to change the state. This function takes the new state as an argument and it sets the ref.current property to the new state and updates the state as well with that same value.

Finally, let’s substitute the original setCount function React gives us with the new updateState function where the state is being updated.

function Counter() {
  const [count, setCount] = useState(0);
  const ref = useRef(count);

  // Keeps the state and ref equal
  function updateState(newState) {
    ref.current = newState;
    setCount(newState);
  }

  function handleAlertClick() { ... }

  return (
    <div>
      <p>You clicked {count} times</p>
      <button
        onClick={() => {
          // Use the created function instead of the manual update
          updateState(count + 1);
        }}
      >
        Click me
      </button>
      <button onClick={handleAlertClick}>Show alert</button>
    </div>
  );
}

(Live demo)

Using a custom hook

The cleaner solution works just fine. It gets the job done just like the dirty solution, but only calls a single function to update the state and ref.

But guess what? We can do better. What if we need to add more states? What if we want to do this in other components too? Let’s take the state, ref and updateState function and make them truly portable. Custom hooks to the rescue!

Outside the Counter component, we are going to define a new function. Let’s name it useAsyncReference. (It can be named anything, really, but note that it’s common practice to name custom hooks with “use” as a prefix.) Our new hook will have a single parameter for now. We’ll call it value.

Our previous solution had the same information stored twice: once in the state and once in the ref. We are going to optimize that by keeping the value just in ref this time. In other words, we will create a ref and give it the value parameter as its initial value.

Right after the ref, we will make an updateState function that takes the new state and sets it to the ref.current property.

Lastly, we return an array with ref and the updateState function, very similar to what React does with useState.

function useAsyncReference(value) {
  const ref = useRef(value);

  function updateState(newState) {
    ref.current = newState;
  }

  return [ref, updateState];
}

function Counter() { ... }

We are forgetting something! If we check the useRef documentation, we learn that updating a ref does not trigger a re-render. So, while ref has the updated value, we wouldn’t see the changes on screen. We need to force a re-render every time ref gets updated.

What we need is a fake state. The value doesn’t matter. It’s only going to be there to provoke the re-render. We can even ignore the state and only keep its update function. We are calling that update function forceRender and giving it an initial value of false.

Now, inside updateState, we force the re-render by calling forceRender and passing it a state different to the current one after setting ref.current to newState.

function useAsyncReference(value) {
  const ref = useRef(value);
  const [, forceRender] = useState(false);

  function updateState(newState) {
    ref.current = newState;
    forceRender(s => !s);
  }

  return [ref, updateState];
}

function Counter() { ... }

Take whatever value it has and return the opposite. The state doesn’t really matter. We are merely changing it so React detects a change in state and re-renders the component.

Next, we can clean the Count component and remove the previously used useState, ref and updateState function, then implement the new hook. The first value of the returned array is the state in the form of a ref. We’ll keep calling it count, where the second value is the function to update the state/ref. We’ll continue calling it setCount.

We also have to change the references to the count since now that they all must be count.current. And we must call setCount instead of calling updateState.

function useAsyncReference(value) { ... }

function Counter() {
  const [count, setCount] = useAsyncReference(0);

  function handleAlertClick() {
    setTimeout(() => {
      alert("You clicked on: " + count.current);
    }, 3000);
  }

  return (
    <div>
      <p>You clicked {count.current} times</p>
      <button
        onClick={() => {
          setCount(count.current + 1);
        }}
      >
        Click me
      </button>
      <button onClick={handleAlertClick}>Show alert</button>
    </div>
  );
}

Making this work with props

We have a truly portable solution for our problem. But guess what… there’s still a little more to do. Specifically, we need to make the solution compatible with props.

Let’s take the “Show alert” button and handleAlertClick function to a new component outside the Counter component. We are gonna call it Alert and it’s going to take a single prop called count. This new component is going to show the count prop value we are passing it in an alert after a three second delay.

function useAsyncReference(value) { ... }

function Alert({ count }) {
  function handleAlertClick() {
    setTimeout(() => {
      alert("You clicked on: " + count);
    }, 3000);
  }

  return <button onClick={handleAlertClick}>Show alert</button>;
}

function Counter() { ... }

In Counter, we’re swapping the “Show alert” button for the Alert component. We’ll pass count.current to the count prop.

function useAsyncReference(value) { ... }

function Alert({ count }) { ... }

function Counter() {
  const [count, setCount] = useAsyncReference(0);

  return (
    <div>
      <p>You clicked {count.current} times</p>
      <button
        onClick={() => {
          setCount(count.current + 1);
        }}
      >
        Click me
      </button>
      <Alert count={count.current} />
    </div>
  );
}

(Live demo)

Alright, time to run through the testing steps again. See? Even though we are using a safe reference to the count in Counter, the reference to the count prop in the Alert component is not asynchronously safe and our custom hook is not suitable to use with props… yet.

Lucky for us, the solution is fairly simple.

All we have to do is add a second parameter to our useAsyncReference hook named isProp, with false as the initial value. Just before we return the array with ref and updateState, we set up a condition. If isProp is true, we set the ref.current property to value and only return ref.

function useAsyncReference(value, isProp = false) {
  const ref = useRef(value);
  const [, forceRender] = useState(false);

  function updateState(newState) {
    ref.current = newState;
    forceRender(s => !s);
  }

  if (isProp) {
    ref.current = value;
    return ref;
  }

  return [ref, updateState];
}

function Alert({ count }) { ... }

function Counter() { ... }

Now let’s update Alert so that is uses the hook. Remember to pass true as a second argument to useAsyncReference since we are passing a prop and not a state.

function useAsyncReference(value) { ... }

function Alert({ count }) {
  const asyncCount = useAsyncReference(count, true);

  function handleAlertClick() {
    setTimeout(() => {
      alert("You clicked on: " + asyncCount.current);
    }, 3000);
  }

  return <button onClick={handleAlertClick}>Show alert</button>;
}

function Counter() { ... }

(Live demo)

Give it another try. Now it works perfectly whether you use states or props.

One last thing…

There’s one last change I’d like to make. React’s useState docs tell us that React will bail out of a re-render if the new state is identical to the previous one. Our solution doesn’t do that. If we pass the current state again to the hook’s updateState function, we will force a re-render no matter what. Let’s change that.

Let’s put the body of updateState inside an if statement and execute it when ref.current is different than the new state. The comparison must be done with Object.is(), just like React does.

function useAsyncReference(value, isProp = false) {
  const ref = useRef(value);
  const [, forceRender] = useState(false);

  function updateState(newState) {
    if (!Object.is(ref.current, newState)) {
      ref.current = newState;
      forceRender(s => !s);
    }
  }

  if (isProp) {
    ref.current = value;
    return ref;
  }

  return [ref, updateState];
}

function Alert({ count }) { ... }

function Counter() { ... }

Now we are finally done!


React can sometimes seem like a black box that is full of little quirks. Those quirks might be daunting to deal with, like the one we just tackled. But if you are patient and enjoy being challenged, you’ll soon realize it’s an awesome framework and a pleasure to work with.

The post Dealing With Stale Props and States in React’s Functional Components appeared first on CSS-Tricks.

How to Resubscribe an Unsubscribed Email Address in Mail Merge

The Mail Merge for Gmail app lets you include an unsubscribe link in your email message. If a user clicks the unsubscribe link to opt-out of your mailing lists, you’ll not be able send future email campaigns to that email address.

You can always send emails to the unsubscribed user manually via Gmail but they will not be included in the email campaigns sent via Mail Merge for Gmail.

Reactivate an Email Address

If your contact has unsubscribed their email address from your mailing list accidentally, or if you manually unsubscribed a user from your email system, you can easily reset their subscriber status from withing the Mail merge app. You’ll then be able to resume sending email campaigns to the resubscribed user via Mail Merge.

Resubscribe email addresses manually

Resubscribe Contacts in Mail Merge

Open your Google Sheet, go to the addons menu, select Mail Merge with Attachments, choose Email Campaign Reports and then choose Resubscribe Contacts.

On the next screen, type one or more email addresses that you wish to reactivate for Mail Merge. You can specify up to 4 different email addresses, and each email address should be specified in its own input box.

Click the Resubscribe button to reactivate the subcriber.

Reactive Email Address

Everything I Need to Know About Coping With a Pandemic, I Learned From the Agile Manifesto

We’re many weeks into the COVID-19 crisis and, I don’t know about you, but things still feel chaotic to me. Part of it is trying to work from home while also homeschooling a 6-year old and 9-year old. Part of it is trying to keep up with all the recommendations and requirements from our public health officials. The big reason things feel chaotic to me, though, is all the uncertainty.

At times like these, our impulse is to impose order – even if that order exists only in our heads. We need ways of understanding the unsettling things we observe. Tools for mentally organizing what we read in the news. A framework, if you will. Some people may look to religious texts for this, but as a Certified Scrum Master and nerd, I’ve been thinking about the Agile Manifesto.

How Engineering Leaders Can Support Remote Working Teams

The Novel Coronavirus (COVID-19) pandemic has swept across 100 countries with no signs of abating. In light of COVID-19 your software development workforce is, at a furious pace, adapting to; extreme remote working policies – it is a fundamental challenge for all technology leaders to maintain productivity and maintainability of the software engineering organization

In this article, you will find practical tips on best practices to maintain a proper work from home setup for your software developers.

The Fusion of 5G, IoT, and AI

The amount of data is increasing rapidly. More and more devices can produce and transmit data. We live in a world that threatens to drown in the flood of data. The merger of 5G, IoT, and AI could help us and be of great importance when it comes to profiting from the rapid increase in available data.

The Fusion of 5G, AI, and IoT will play a significant role in critical areas like: